

Medicare
Coordination of Benefits
Section 111 COB Secure Web Site (COBSW)
User Guide
Version 7.1
Rev. 2013-7/January
COBR-M1-2013-V7.1
Medicare
Coordination of Benefits
Section 111 COB Secure Web Site (COBSW)
User Guide
Version 7.1
Rev. 2013-7/January
COBR-M1-2013-V7.1
Revision History
|
Date |
Version |
Reason
for Change |
|
January 18, 2013 |
7.1 |
Changes listed in Chapter 1. |
|
|
|
|
Confidentiality and Disclosure of Information Section 1106 (a) of the Social Security Act as it applies to the Centers for Medicare & Medicaid Services (CMS) - (42 CFR Chapter IV Part 401 §§ 401.101 to 401.152) prohibits disclosure of any information obtained at any time by officers and employees of Medicare Intermediaries, Carriers, or contractors in the course of carrying out agreements under Sections 1816 and 1842 of the Social Security Act, and any other information subject to Section 1106 (a) of the Social Security Act. Section 1106 (a) of the Act provides in pertinent part that “Any person who shall violate any provision of this section shall be deemed guilty of a felony and, upon conviction thereof, shall be punished by a fine not exceeding $10,000, or by imprisonment not exceeding five year, or both.” Additional and more severe penalties are provided under Title XVIII (Medicare) USC Section 285 (unauthorized taking or using of papers relating to claims) and under Section 1877 of Title XVIII of the Act (relating to fraud, kickbacks, bribes, etc., under Medicare).
These provisions refer to any information obtained by an employee in the course of their performance of duties and/or investigations (for example, beneficiary identification number, beneficiary diagnosis, social security number, pattern of practice of physicians, etc.). Any unauthorized inspection or disclosure of IRS return information in violation of any provision of Section 6103 may bring damages as described in IRC Sections 7431 and 7213, which include, but are not limited to, a fine of any amount not exceeding $5,000 or imprisonment.
Chapter 1: Summary of Version 7.1 Updates
Authorized
Representative (AR) Role
Chapter 3: Section 111 COBSW Login Page
Chapter 5: RRE ID Account Setup & Account Manager Registration
Account
Manager Self-Registration
Log
In to the Section 111 Web Site
Chapter 7: The RRE Listing Page
Chapter 8: Update Personal Information
Chapter 9: Designee Maintenance
Add
an Existing User as a Designee
Chapter 10: Account Designee Registration
Chapter 11: Update RRE Profile Information
Chapter 12: Replace Account Manager
Chapter 13: Remove Access to RRE
Chapter 14: Upload Input Files Via HTTPS
Input
Submission File Overview
Threshold
and Severe File Submission Errors
Chapter 15: Monitor File Processing
Chapter 16: Download Response Files Via HTTPS
Chapter 17: Monitor Test File Processing
Chapter 18: View Account Activity History
Representative
Information Page
Claimant
and Claimant Representative Listing Page
Claimant and
Claimant Representative Information Page
Resume
Claim Submission Process
Chapter 22: Beneficiary Lookup
Account
Manager and Authorized Representative E-mail Addresses Match
Unsuccessful
Account Designee Registration
Account
Designee E-mail Address Matches Authorized Representative E-mail Address
Successful
Registration Letter
Profile
Report Email Notification
Non-Receipt
of Signed Profile Report Email Notification
Profile
Report Annual Recertification Email Notification
Non-Response
to Annual Recertification Email Notification
Successful
File Receipt Email Notification
Severe Error
Email Notification
Ready for
Testing Notification
Non-Attainment
of Production Status Email Notification
Ready for
Production Notification
Successful
File Processed Email Notification
Designee
Self-Revocation Notification
The following updates have been made in Version 7.1 of the Section 111 COBSW User Guide:
· The ORM and TPOC Information section has been updated as follows:
· Two tables summarizing the mandatory thresholds for liability insurance (including self-insurance) and workers’ compensation TPOC settlements, judgments awards or other payments were added to the description for TPOC Amount.
· A reminder instruction was added to explain the correct procedure for removing all previously reported TPOCs on a previously accepted Claim Record with no ORM (ORM Indicator = ‘N’).
The Section 111 Coordination of Benefits Secure Web Site (COBSW) is a secure web application that provides a user interface for Section 111 Responsible Reporting Entities (RREs). The Section 111 COBSW is used by RREs and their agents to:
· Register the RRE and setup account reporting information
· Upload and download Section 111 files via the HTTPS file transfer method
· Monitor the results of test file submission
· Monitor the results of production file submission.
Section 111 of the Medicare, Medicaid, and SCHIP Extension Act of 2007 (MMSEA) amends the Medicare Secondary Payer (MSP) provisions of the Social Security Act to mandate entities that provide Group Health Plan (GHP), liability, no-fault, and workers’ compensation insurance to report information to Medicare for the purpose of coordinating benefits for Medicare beneficiaries. The provisions are to be implemented January 1, 2009 for GHP arrangements and July 1, 2009 for information about liability insurance, no-fault insurance, and workers’ compensation. The legislation requires insurers, third-party administrators, self-insured/administered entities, and applicable plan administrators or fiduciaries to report information to Medicare in the form and manner specified by the Secretary, DHHS. This new COB process is called the MMSEA Section 111 Reporting process.
This user guide was written to help the user understand the Section 111 COBSW and how to complete the registration and file submission processes.
All implementation instructions, including Mandatory Reporting User Guides containing file layouts, are available on the Section 111 dedicated Web page: http://www.cms.hhs.gov/MandatoryInsRep
The Section 111 COBSW permits multiple users per RRE to take part in the data exchange with the Coordination of Benefits Contractor (COBC). Each user will be defined with one of three possible roles.
The Authorized Representative (AR) is the individual in the RRE organization who has the legal authority to bind the organization to a contract and the terms of Section 111 requirements and processing. Your AR has ultimate accountability for the RRE’s compliance with Section 111 reporting requirements.
Although the AR does not have direct access to the Section 111 COBSW application and cannot be a user on the Section 111 COBSW, the AR must approve the RRE profile during the initial account setup and any subsequent changes. The AR is also the recipient of the more severe error notifications, such as missed quarterly file submissions. An AR cannot also be defined as an Account Manager (AM) or Account Designee (AD) for the RRE.
You may not change your Authorized Representative online after your registration has been processed. If you need to make a change later, you will have to contact your COBC EDI Representative.
If you are registering multiple RRE IDs, your Authorized Representative can be the same person for each or you may name a different person for each.
The AR:
· Designates the Account Manager, who registers the RRE and manages the file submission process.
· Must approve the account setup, by physically signing the Profile Report and returning to COBC.
· Cannot perform the role of an Account Manager (AM) or Account Designee (AD). This rule will be verified by defined E-mail addresses for the AR, AM, and AD.
· Cannot be an agent of the RRE.
Note: To initiate an Account Manager change, the AR must contact the EDI representative to invite the new AM.
The Account Manager (AM) is a user of the Section 111 COBSW who controls the administration of an RRE’s account, manages other users associated with the RRE ID and controls the overall reporting process. The AM may choose to manage the entire account and data file exchange, or may invite other company employees or data processing agents to assist. Each RRE ID can have only one Account Manager.
The AM:
· Must register on the Section 111 COBSW using the Personal Identification Number (PIN) issued by the COBC after the RRE ID has been registered in the New Registration step.
· Can be associated with more than one RRE ID if he has the authorized PIN from the COBC mailing for each.
· Can be an RRE employee or agent.
· Can invite other users to function as Account Designees (ADs).
· Manages the RRE’s profile, including selection of a file transfer method.
· Can upload and download files to the Section 111 COBSW if the RRE has specified HTTPS as the file transfer method.
· Can use his/her Login ID and Password to transmit files via the SFTP file transfer method.
· Can review file transmission history.
· Can review file-processing status and file statistics.
· Can remove an Account Designee’s association to an account.
· Can change account contact information (e.g. address, phone, etc.).
· Can change their personal information.
· Cannot be the Authorized Representative for any RRE ID.
· Cannot be an AD for the same RRE ID. This rule will be verified by defined E-mail addresses.
At the RRE’s discretion, an Account Manager for the RRE ID may invite other individuals to register as users of the COBSW associated with the RRE ID account known as Account Designees. Account Designees assist the Account Manager with the reporting process. Account Designees may be RRE employees or agents. There is no limit to the number of Account Designees associated with one RRE ID.
The Account Designee:
· Must register on the COBSW and obtain a Login ID.
· Can be associated with multiple RRE ID accounts, but only by an Account Manager invitation for each RRE ID.
· Can be an RRE employee or agent.
· Can upload and download files to the COBSW if the RRE has specified HTTPS as the file transfer method.
· Can use his/her Login ID and Password to transmit files if the RRE has specified SFTP as the file transfer method.
· Can review file transmission history.
· Can review file-processing statuses and file statistics.
· Can change his/her personal information on the COBSW.
· Cannot be an Authorized Representative for any RRE ID.
· Cannot be the Account Manager for the same RRE ID.
· Cannot invite other users to the RRE ID account.
· Cannot update RRE ID account information.
Each user of the Section 111 COBSW application will have only one Login ID and password. With that Login ID and password, you may be associated with multiple RRE IDs (RRE accounts). With one Login ID, you may be an Account Manager for one RRE ID and an Account Designee for another. In other words, the role you play on the COBSW is by RRE ID.
Users of the Section 111 COBSW may need assistance with managing an RRE account or with managing their personal information within the application. If necessary, users may contact their listed EDI Representative for such assistance. Each RRE is assigned an EDI Representative; however, any EDI Representative can assist a user. The name of their EDI Representative will be provided during RRE registration and will also be available on the RRE Information page during account setup. In addition, your EDI Representative Contact information is listed on your profile report which is sent to your Authorized Representative after the Account Setup is completed.
Contact your assigned EDI Representative directly via E-mail or phone using the contact information provided during registration and on your profile report. If you do not have this information or do not yet have an EDI Representative assigned, please contact the COBC EDI Department at 646-458-6740. EDI Representatives are available to assist you Monday through Friday, excluding Federal holidays, from 9:00 a.m. to 5:00 p.m. Eastern Time.
Contact your EDI Representative if:
· The RRE ID initial registration PIN letter is not received within 2 weeks (10 business days) after completing the New Registration step. The EDI Rep can resend the letter, allowing you to complete the RRE ID account setup.
· Any of the information entered during initial registration must be changed after the initial registration letter has been received.
· You have any questions or problems regarding the RRE ID account at any time during account setup.
· You forget your Login ID and cannot remember the answers to your Security Questions. The EDI Rep can resend your Login ID to your registered E-mail Address.
· You forget your Password and cannot remember the answers to your Security Questions. The EDI Rep can generate a temporary Password and send it to your registered E-mail Address.
· You incorrectly entered your PIN 3 times and locked the account. The EDI Representative can reset the PIN, unlocking the account.
· The File Transmission method must be changed for the RRE after the RRE account has been set up and the Profile Report has been sent.
· You uploaded a file in error. The EDI Rep can delete the erroneous file.
·
You have questions about file submission
errors or receive a notification from the COBC about a file threshold error.
The EDI Rep will work with you to understand the error, and determine whether
the file should be deleted and resubmitted or processed as submitted.
The Login page is the portal to the Section 111 COBSW for all Mandatory Reporting functions. Before the file submission process can begin, the following steps must be taken:
· The Responsible Reporting Entity (RRE) ID must be registered and Authorized Representative named by completing the New Registration step.
· The Account Manager must perform the Account Setup step for the RRE ID
· The Account Manager must self-register and obtain a Login ID
Once the RRE ID account and all users are registered, the Login page is used to log in to the Section 111 COBSW to manage the file submission process.
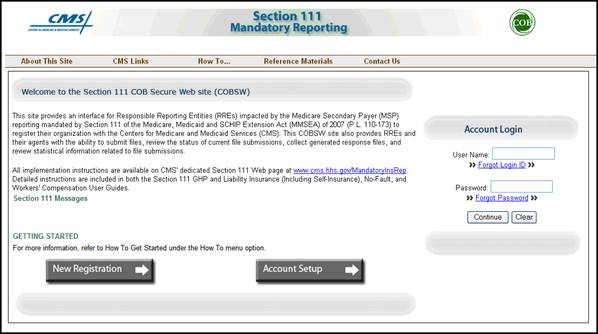
Figure 1: Login Page
The Section 111 Messages area of the Login page may contain important system messages.

Figure 2: Section 111 Messages
The navigation menu at the top of each page gives the user to access various parts of the CMS web site to facilitate using the Section 111 COBSW.

Figure
3: CMS Navigation Menu
· About This Site navigates to the How to Use This Site link, offering general information on how to use the Section 111 application.
·
CMS Links provides
links to the S111 dedicated Web page, the Medicare Website, and the
Coordination of Benefits Website.
·
How To provides
detailed information on performing the following functions:
· Getting Started
· Requesting your Login ID
· Requesting your Password
· Changing your Password
· Resetting your PIN
· Changing your Authorized Representative
· Changing your Account Manager
· Inviting Account Designees
· Changing your File Transmission Method
·
Reference Materials
provides links to the following, which offer detailed information pertaining to
the Section 111 COBSW:
· GHP User Guide
· Liability/No-Fault/Workers’ Compensation User Guide
· Test Beneficiary Data for NGHP RREs
· Excluded ICD-9 Diagnosis Code Data for NGHP RREs
· ICD-9 Diagnosis Codes
· Error Code Data for NGHP RREs
·
Contact Us
displays the following message:
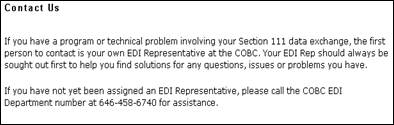
Figure 4: Contact Us
A company representative for the RRE must click on the New Registration button under Step 1, to complete and submit the registration information for each RRE ID needed. This step must be completed by the RRE, not an agent for the RRE. It is critical that you provide the Authorized Representative information (including e-mail address) in this New Registration step and not the email address for someone you want to be a user of the COBSW.
Depending on your reporting structure you may want to register more for more than one RRE ID. Refer to the How to Get Started section in the GHP User Guide to help determine how to decide the number of RRE IDs you will need.
Refer to Chapter 3 for more information on account registration.
Note:
Former GHP VDSA/VDEA partners who have already registered as Section 111 RREs
and were assigned RRE IDs prior to April 2009 will not need to perform this New
Registration step. Instead, the COBC will mail a PIN to your Authorized
Representative and your Account Manager will use that in
Step 2, Account Setup. Refer to Chapter 4 for more information.
After completion of the New Registration step, the COBC will mail a confirmation letter containing the RRE ID and PIN to the Authorized Representative, along with instructions for setting up the account. The assigned Account Manager should click the Account Setup button under Step 2 to finish the RRE ID account setup, and to register himself as the Account Manager. Refer to Chapter 4 for more information on account setup and AM registration.
After Account Managers and Account Designees have self-registered, and after Account Managers have completed the RRE Account setup process, AMs and ADs enter their Login IDs and Passwords in the Account Login fields to enter the Section 111 COBSW and manage the file submission process. Account Managers can also perform Account Designee maintenance. Refer to Chapter 9 for information on the AD self-registration process. Refer to Chapter 5 for more information about the Login process, including information on the Forgot Login ID and Forgot Password links on the Login page.
A Responsible Reporting Entity (RRE) is a plan or company that provides Group Health insurance, Liability insurance (including self-insurance), No-fault insurance, or Workers' Compensation plans. An RRE must be registered within the Section 111 COBSW to submit GHP coverage and Non-GHP (liability, no-fault, workers’ compensation) claim files.
Before beginning the registration process, an RRE must determine how the RRE will submit its Section 111 files to the COBC and how many Section 111 Reporter IDs (RRE IDs) will be needed. Only one GHP MSP Input File may be submitted on a quarterly basis for each GHP RRE ID. Liability Insurance/No-Fault Insurance/Workers’ Compensation RREs may only submit one Claim Input File for each RRE ID per quarter. Due to corporate organization, data processing system structures and agents that may be used for file submission, you may want to submit more than one Input File to the COBC on a quarterly basis and therefore need more than one RRE ID in order to do so.
For example, if an RRE will use one agent to submit one set of GHP coverage information and another agent to submit another set of GHP coverage information, the RRE must register on the COBSW twice to obtain two RRE IDs that will be used by each agent respectively. You may name the same Authorized Representative and Account Manager for both accounts or use different individuals. Likewise, if you have two or more subsidiary companies that handle different regions of the country (or different lines of business) using different data processing systems and you will not combine the quarterly Input Files for Section 111 reporting, you must register for each quarterly file submission to obtain separate RRE IDs in order to submit multiple Input Files in one quarter. Alternately, if you will submit only one Claim or MSP Input File per quarter, you will need only one RRE ID. Using the same RRE ID, one agent could submit your Claim or MSP Input Files and another agent could submit your Query Files. Please see the Section 111 User Guides for more information.
You may not set up a separate RRE ID for submission of the Query File or GHP Non-MSP Input File only. You must submit a quarterly GHP MSP Input File or liability/no-fault/workers’ compensation Claim Input File for every RRE ID you establish.
You must complete the New Registration step for every RRE ID you will use for Section 111 reporting.
It is critical that you provide accurate information on your Authorized Representative in this step, including his/her E-mail address.
Before beginning the RRE ID registration, read this entire chapter and gather all the necessary information. Once you have started the registration process you must complete the registration. If you click Cancel and close the application at any point before RRE ID registration is complete, your changes will NOT be saved, and all entered data will be lost.
From the Login page, a company representative for the RRE must provide basic information related to the RRE ID to start the registration process:
· A Federal Tax Identification Number (TIN) for the RRE
· RRE Company name and address
· RRE Authorized Representative contact information (name, job title, address, e-mail address, phone)
· National Association of Insurance Commissioners (NAIC) company code, if applicable
· Reporter Type (GHP or Liability/No-Fault/Worker’s Compensation)
· Optional Subsidiary company information to be included in the file submission for the registration (names, TINs, NAIC company codes for the subsidiaries).
To successfully register the RRE ID, follow the steps outlined below.
1. Enter the following URL into your web browser: https://www.section111.cms.hhs.gov/MRA/
2. The Login Warning page displays, detailing the Data Use Agreement. The Login Warning page may be printed by clicking the Print this Page link in the upper right of the page.
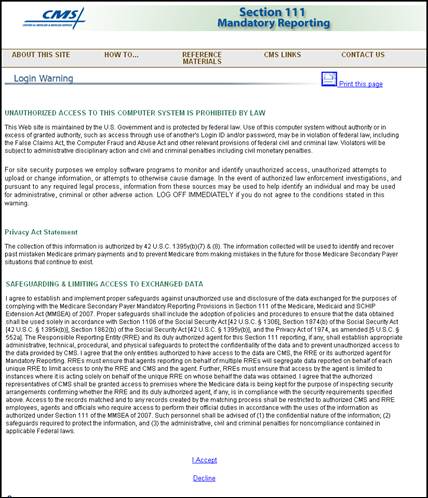
Figure 5: Login Warning Page
3. Review the Data Use Agreement (DUA). All users must agree to similar language each time they log in to the Section 111 COBSW application. The DUA explains that data exchanged for Section 111 is to be used solely for the purposes of coordinating health care benefits for Medicare beneficiaries between Medicare and Section 111 RREs who provide other health insurance coverage. Measures must be taken by all involved parties to secure all data exchanged and ensure it is used properly.
4. To proceed, click the I Accept link.
5. The Section 111 Mandatory Reporting Login page displays.

Figure 6: S111 Mandatory Reporting Login Page
6. Click the New Registration link.
7. The Account Registration Information page displays. This page outlines the process of RRE initial registration, explaining that basic information about the RRE must be entered, including RRE Company name and the names of its subsidiary companies. The Account Registration Information page describes what happens after initial registration is complete; you will receive a letter with the RRE ID and PIN, which will be used by the Account Manager to complete the RRE ID Account setup. This page also describes the role of the Authorized Representative.

Figure 7: Account Registration Information Page
8. Read the overview and click Continue.
9. The RRE ID Profile Information page displays, requesting information related to the RRE, including Company Name, Address, EIN, NAIC Information, and Phone Number. The table below details the required information. Fields marked with an asterisk (*) are required.
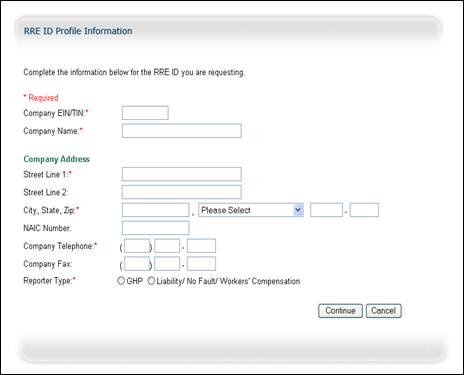
Figure 8: RRE ID
Profile Information Page
Table 1: RRE ID Profile Information Page Field Descriptions
|
Field |
Description |
|
Company EIN/TIN |
The IRS-assigned employer identification number (EIN) or tax identification number (TIN) associated with the organization reflected under this Section 111 registration. If you have more than one TIN, you may submit this registration with any one of those TINs. If you will be requesting multiple RRE IDs, you may use the same TIN for each or different TINs. For foreign RREs, enter a pseudo-TIN, using the 9999xxxxx format, where xxxx is a 5-digit number created by the RRE. (Foreign RREs are those that have no IRS-assigned TIN and/or US mailing address. Guam, Puerto Rico, and the US Virgin Islands are NOT foreign RREs.) |
|
Company Name |
Company or Organization Name of the RRE |
|
Street Line 1 |
Line 1 of Street Address |
|
Street Line 2 |
Line 2 of Street Address (Optional) |
|
City, State, Zip |
Enter the City, select the State from the dropdown menu, and enter the Zip Code (Required) plus 4-digit Zip-code suffix (Optional) of the RRE For foreign RREs, select “Foreign Country” from the State dropdown menu. The rest of the address fields are not required. Note: To quickly select a state, type the first letter then hit Enter to scroll to the desired state. |
|
NAIC Number |
The 5-digit company code assigned to your company by the National Association of Insurance Commissioners (NAIC). If you are not registered with the NAIC, enter 00000. If you have more than one NAIC Company Code, you may submit this registration with any one of those NAIC Company Codes. |
|
Company Telephone |
Company Telephone Number Note: For foreign RREs, enter a United States telephone number, if applicable. |
|
Company Fax |
Company Fax Number |
|
Reporter Type |
Type of RRE. Select from GHP (Group Health Plan) or Liability/No-Fault/Workers’ Compensation Note: Separate registrations are required for GHP and Liability/No-Fault /Workers’ Compensation (Non-GHP) entities. |
Table 2: RRE ID Profile Information Page Command Buttons
|
Button |
Description |
|
Continue |
Click to save changes and continue to the next screen. |
|
Cancel |
Click to return to the previous page. Information entered on the current page is NOT saved. |
10. Enter the requested information then click the Continue button. The Corporate Structure page displays. This page is presented to capture information related to all subsidiary companies that will be reported under the registered RRE ID. This information will be used to ensure all RREs are properly reporting.
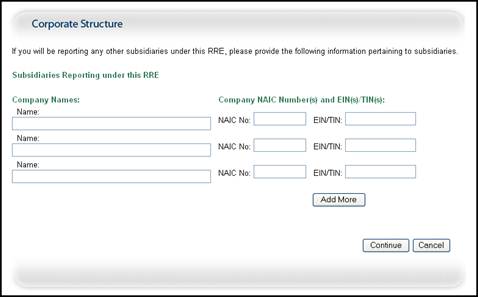
Figure 9: Corporate Structure Page
Table 3: Corporate Structure Page Field Descriptions
|
Field |
Description |
|
Company Names |
Supply the names of all the subsidiary companies reflected in this registration for which data will be submitted. |
|
Company NAIC Numbers(s) |
5-digit company code assigned to each subsidiary organization by the National Association of Insurance Commissioners (NAIC). If the subsidiary is not registered with the NAIC or if the NAIC number is unknown, enter 00000. |
|
EIN(s)/TIN(s) |
The IRS-assigned employer identification number (EIN) or tax identification number (TIN) associated each subsidiary company listed. You may use the same TIN entered for the RRE or different TINs. |
Table 4: Corporate Structure Page Command Buttons
|
Button |
Description |
|
Add More |
Click to add rows for additional subsidiary companies. |
|
Continue |
Click to save changes and continue to the next screen. |
|
Cancel |
Click to return to the previous page. Information entered on the current page is NOT saved. |
11. If subsidiary companies will be reporting under this RRE ID, those companies should be recorded. Subsidiaries separately incorporated or located in different states may be reported under one RRE ID.
12. Enter the following information for each subsidiary company of the RRE: Company Name, NAIC Number, and EIN/TIN, if applicable. To add additional subsidiaries, click the Add More button. Once all subsidiaries have been accounted for, click the Continue button.
13. The Authorized Representative Information page displays. Enter the personal information for the Authorized Representative for the RRE ID. The AR:
· Is responsible for the proper and accurate reporting by the RRE.
· Will not be provided with a Login ID to access the Section 111 COBSW.
· Designates the Account Manager, who performs Account Setup for the RRE ID, manages users associated with the RRE ID account, and manages the file submission process.
· Must approve the account setup, by physically signing the Profile Report and returning to COBC.
· Cannot perform the role of an Account Manager (AM) or Account Designee (AD). This rule will be verified by defined E-mail addresses for the AR, AM, and AD.
Note: An Authorized Representative can only have that one role; the AR cannot function as an Account Manager or an Account Designee. E-mail addresses for each user role will be verified upon entry, and any address matches between AM, AD, and AR roles will be denied.
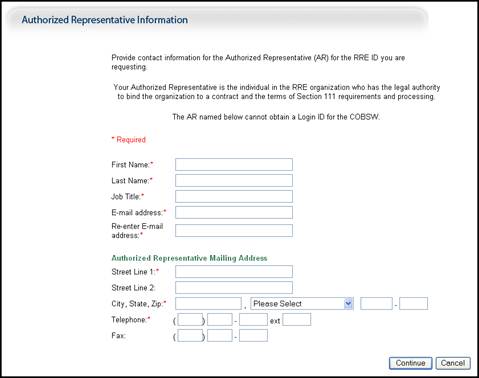
Figure 10: Authorized Representative Information Page
14. Enter the required information then click Continue. The Registration Summary page displays. This page lists all the information that was previously entered. All information should be reviewed and verified before continuing.

Figure 11: Registration Summary Page
15. Verify that all information is correct. To make any corrections, click the Edit button below the proper section to return to that section. Once all corrections have been made, click the Continue button on the Registration Summary page.
16. Once the RRE is registered, your RRE ID and EDI Representative will be listed on the Thank You page. Click the Section 111 Home link to return to the Login Warning page.
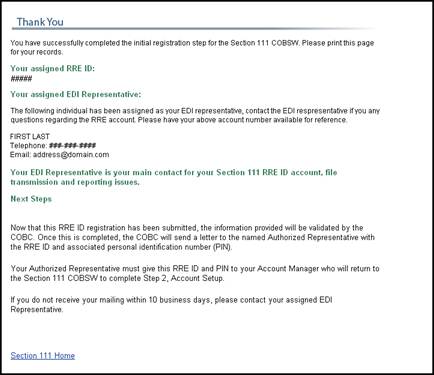
Figure 12: Registration Thank You Page
Within two weeks, a letter will be mailed to the Authorized Representative, containing the RRE ID and PIN, along with instructions for setting up the account (to be completed by the Account Manager). Refer to the Appendix for a sample mailing. If a letter is not received within 10 business days, contact your EDI Representative.
If you need more than one RRE ID for Section 111 reporting, each RRE must be registered separately. Return to the Section 111 homepage and click on New Registration to request an additional RRE ID.
Once the Account Manager has completed the account setup, an E-mail notification will be sent to you, including a profile report denoting all information previously recorded during RRE registration, additional information provided during the account setup, and the RRE file submission period. Refer to the Appendix for a sample notification E-mail and Profile Report. Refer to Chapter 15 for more information on file submission timeframes. It may take up to 10 business days to receive the profile report.
You will have 30 calendar days to review, sign, and return the Profile Report to the COB contractor listed on the report. If a signed Profile Report is not received during that timeframe, an E-mail will be sent to you, indicating that a signed Profile Report must be received before testing can ensue. Refer to the Appendix for a sample E-mail.
Upon receipt of the mailed RRE ID and PIN, the Authorized Representative must provide the information to the designated Account Manager, who must then access the Section 111 COBSW to complete the account setup. The following section details the information to be entered by the Account Manager related to himself and the electronic file submission process for the RRE ID.
Contact your EDI representative if you any questions or problems regarding the RRE ID account at any time during RRE ID account setup.
To successfully set up the account and register yourself as the Account Manager, follow the steps outlined below.
1. Enter the following URL into your web browser: https://www.section111.cms.hhs.gov/MRA/
17. The Login Warning page displays, detailing the Data Use Agreement. The Login Warning page may be printed by clicking the Print this Page link in the upper right of the page.
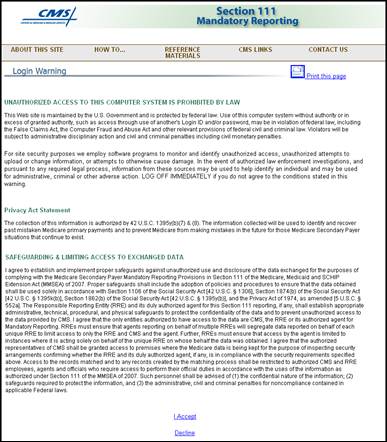
Figure 13:
Login Warning Page
18. Review the Data Use Agreement (DUA). All users must agree to similar language each time they log in to the Section 111 COBSW application. The DUA explains that data exchanged for Section 111 is to be used solely for the purposes of coordinating health care benefits for Medicare beneficiaries between Medicare and Section 111 RREs who provide other health insurance coverage. Measures must be taken by all involved parties to secure all data exchanged and ensure it is used properly.
19. To proceed, click the I Accept link.
20. The Login page displays.

Figure 14: Login Page (Account Setup)
21. Click the Account Setup button.
22. The Account Setup Introduction page displays. This page requires the entry of the RRE ID and PIN received from the mailing after registration.
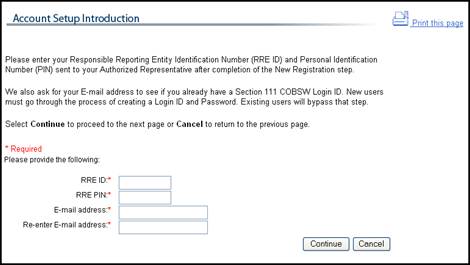
Figure 15: Account Setup Introduction Page
23. Enter the RRE ID and PIN from the mailing forwarded to you by the Authorized Representative, and your E-mail Address then click Continue. Your E-mail address is needed to verify that you are a new user. If you have previously registered to use the Section 111 Web site (because you are a user for more than one RRE) you will not be prompted to create a new Login ID and Password. However, new users must go through the process of creating a new Login ID and Password during the RRE account setup.
24. After all information has been entered and verified, the Company Information Confirmation page displays. The Company Information page displays all the information entered during the initial registration process.
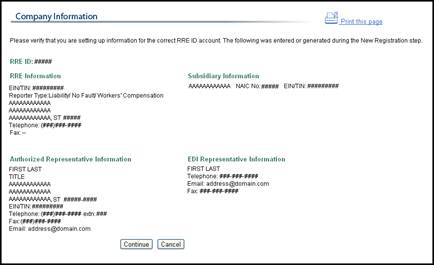
Figure 16: Company Information Confirmation Page
25. Review the listed information and click the Continue button. If any of the listed information is incorrect, contact your EDI Representative to correct it.
The Account Manager controls the administration of an RRE account. The AM has the following responsibilities:
· Must register on the Section 111 COBSW using the Personal Identification Number (PIN) issued by the COBC after the RRE ID has been registered in the New Registration step.
· Can be associated with more than one RRE ID if he has the authorized PIN from the COBC mailing for each.
· Can be an RRE employee or agent.
· Can invite other users to function as Account Designees (ADs).
· Manages the RRE’s profile, including selection of a claim submission method.
· Can upload and download files to the Section 111 COBSW if the RRE has specified HTTPS as the file transfer method.
· Can use his/her Login ID and Password to transmit files via the SFTP file transfer method.
· Can review file transmission history.
· Can review file-processing status and file statistics.
· Can remove an Account Designee’s association to an account.
· Can change account contact information (e.g. address, phone, etc.).
· Can change their personal information.
· Cannot be the Authorized Representative for any RRE ID.
· Cannot be an AD for the same RRE ID. This rule will be verified by defined E-mail addresses.
Your personal information must be entered at this point to register you as the Account Manager and provide access to the application.
1. The Account Setup Introduction page displays, with the Account Manager user role outlined, as well as an overview of the RRE Information entry process. Review the descriptions then click Continue.
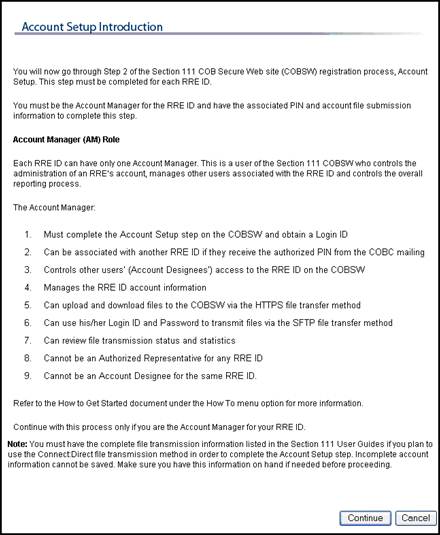
Figure 17: Account Setup Introduction Page
2. The Account Manager Personal Information page displays information regarding the Account Manager. The information is required for subsequent communications.
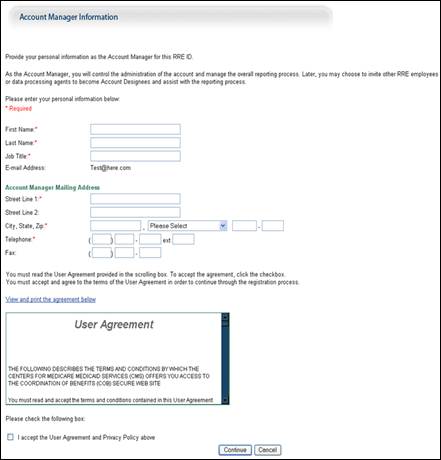
Figure 18: Account Manager Information Page
26. Enter
the required personal information, accept the User Agreement, and then click
Continue.
Note: You can register as an Account Manager for an RRE ID if
you are already a registered user. However, you cannot be an AM for any RRE if
you are an Authorized Representative. In addition, you cannot be an AM and an
Account Designee for that same RRE ID.
27. If you are a new user, the Account Manager Login Information page displays, requesting you to set up a Login ID and Password (using the following guidelines). Additionally, 2 security questions must be selected. Otherwise, this page is skipped.
· Login IDs must be 7 characters
·
Login IDs must be in the format of AA999AA
(first two alphabetic, next three numeric, last two alphabetic)
· Login ID and Password cannot be the same
· Password must be changed every sixty (60) days.
· Password must consist of at least eight (8) characters.
· Password must contain at least one upper-case letter, one lower-case letter, one number and one special character.
· Password must contain a minimum of four (4) changed characters from the previous password.
· Password cannot be changed more than once per day.
· Password must be different from the previous 6 passwords.
· Password cannot contain a reserved word.
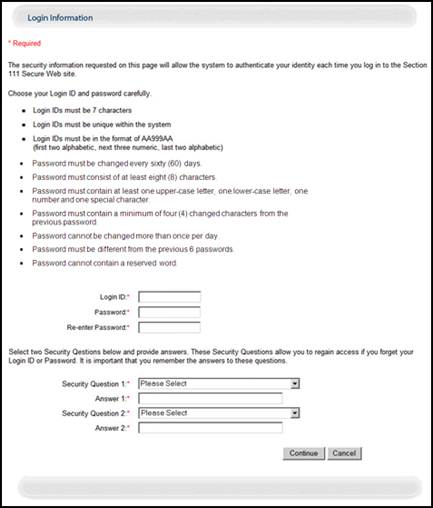
Figure 19: Account Manager Login Information Page
28. Enter the requested information, select 2 Security Questions and Answers, and click the Continue button. You will use your Login ID and Password to enter the Section 111 Web site and manage the RRE account, manage Designees, and upload and download files. The Security Questions will allow you to access your Login ID and reset your Password in the event you forget either one.
The RRE account setup process continues after Account Manager self-registration.
Your RRE Company will be one of two Reporter Types: Group Health Plan (GHP) or Non-Group Health Plan (Non-GHP). GHPs are companies that provide Group Health Plan insurance, while Non-GHPs provide Liability, No-Fault, and/or Worker’s Compensation insurance. The following pages display based on the selections made by the Authorized Representative during the initial account registration.
1. After you complete self-registration, the RRE ID Profile Information page displays. The following table details the listed information and the required information to be entered. Fields marked with an asterisk (*) are required.

Figure 20: RRE ID Profile Information Page, Non-GHP
Table 5: Non-GHP RRE Information Page Field Descriptions
|
Field |
Description |
|
Company EIN/TIN |
The IRS-assigned employer identification number (EIN) or tax identification number (TIN) associated with the organization reflected under this Section 111 registration. If you have more than one TIN, you may submit this registration with any one of those TINs. If you will be requesting multiple RRE IDs, you may use the same TIN for each or different TINs. |
|
Company Name |
The company name associated with this Section 111 registration |
|
Reporter Type |
Type of Section 111 RRE Group Health Plan (GHP) or Liability / No-Fault / Workers' Compensation |
|
Address 1 |
Displays Line 1 of Street Address associated with this RRE |
|
Address 2 |
Displays Line 2 of Street Address, if applicable |
|
City, State, Zip |
Displays the City, State, and Zip Code plus 4-digit Zip-code suffix of the Company |
|
Telephone |
Displays Company Telephone Number |
|
Fax |
Displays Company Fax Number, if applicable |
|
Insurer Lines of Business checkboxes |
Select Insurer Line of Business. Options are No Fault, Workers’ Compensation, and Liability. Select all that are applicable. |
|
File Submission Profile Information |
Header description on page |
|
Estimated Number of Paid Claims |
The estimated number of paid claims per year |
|
Will an Agent report data on your behalf? radio buttons |
Select Yes if a Reporting Agent will be submitting data for the RRE. If not, select No. |
|
Agent Company EIN/TIN |
Employer Identification Number of the Reporting Agent Company; same as the Tax Identification Number. Required if Yes is selected for Reporting Agent radio button. |
|
Claim Submission Method |
Select File Submission if you plan to create and submit your Claim and Query files using a flat file format via SFTP, HTTPS or Connect Direct. Select Direct Data Entry (DDE) to directly enter claim information on the website. This option is available to RREs who reported they plan to submit less than 500 claims per year. |
Table 6: Non-GHP RRE Information Page Command Buttons
|
Button |
Description |
|
Continue |
Click to save changes and continue to the next screen. |
|
Cancel |
Click to return to the previous page. Information entered on the current page is NOT saved. |
2.
Enter the requested information and click Continue.
Note: If the Agent Company TIN is already registered, company
information will be pre-populated. The following pages to display depend on the
selections made under the Reporting Agent option on the RRE Information
page.
29. If a Reporting Agent will report data on behalf of the RRE, the Agent Information page displays. The table below details the required information. Fields marked with an asterisk (*) are required. Otherwise, this page is skipped.

Figure 21: Agent Information Page
Table 7: Agent Information Page Field Descriptions
|
Field |
Description |
|
Agent Company EIN/TIN |
Displays the Employer Identification Number of the Reporting Agent Company you entered on the RRE Info page. |
|
Agent Company Name |
Name of the Reporting Agent Company |
|
Agent Contact First Name |
First Name of Reporting Agent Contact |
|
Agent Contact Last Name |
Last Name of Reporting Agent Contact |
|
Agent Company Address |
Header description on page |
|
Street Line 1 |
Line 1 of Reporting Agent Street Address |
|
Street Line 2 |
Line 2 of Reporting Agent Street Address (Optional) |
|
City, State, Zip |
Enter the City, select the State from the dropdown menu, and enter the Zip Code (Required) plus 4-digit Zip-code suffix (Optional) of the Reporting Agent. For foreign RREs, select “Foreign Country” from the State dropdown menu. The rest of the address fields are not required. |
|
Agent Contact Telephone |
Reporting Agent Telephone Number Note: For foreign RREs, enter a United States telephone number, if applicable. |
Table 8: Agent Information Page Command Buttons
|
Button |
Description |
|
Continue |
Click to save changes and continue to the next screen. |
|
Cancel |
Click to return to the previous page. Information entered on the current page is NOT saved. |
30. Enter the required information and click Continue.
31. If the File Transmission option was selected for Claim Submission Method, the File Transmission Methods page displays next. If DDE was selected as the Claim Submission Method, the RRE Information Summary page displays next. The File Transmission Methods page allows you to select how RRE Claim Input files and Query-Only files will be submitted to the COBC. Response files will be sent from the COBC using the same methods. The following table details the required information. Fields marked with an asterisk (*) are required.
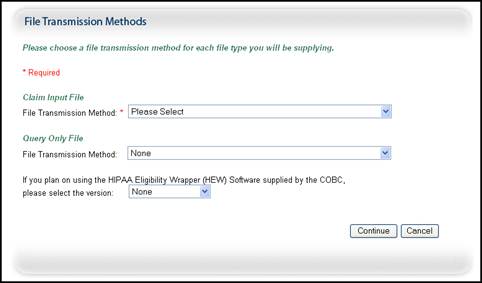
Figure 22: File Transmission Methods Page
Table 9: File Transmission Methods Field Descriptions
|
Field |
Description |
|
Claim Input File: File Transmission Method |
Select from Connect:Direct, SFTP, or HTTPS. |
|
Query-Only File: File Transmission Method |
Select from Connect:Direct, SFTP, or HTTPS. |
|
HEW Software Version |
Used for Query-Only files. Select from Mainframe or PC/Server Based. HEW software translates (wraps) the file into a HIPAA-compliant 270 eligibility query file format. The 270 format is created to transfer the file. The program also runs against the response file to put the file into a format that can be read (unwrapped) on your system. Contact your EDI Rep to request a copy of this software if you do not receive it by the time your RRE is approved for testing. |
Table 10: File Transmission Methods Command Buttons
|
Button |
Description |
|
Continue |
Click to save changes and continue to the next screen. |
|
Cancel |
Click to return to the previous page. Information entered on the current page is NOT saved. |
32. Enter the required information and click Continue. If Connect:Direct is chosen for any file transmission method, the Electronic Transmission Information page displays. Otherwise, this page is skipped. The following table details the required information. Note: Verify that the information entered is correct. Incorrect information will delay file submission.
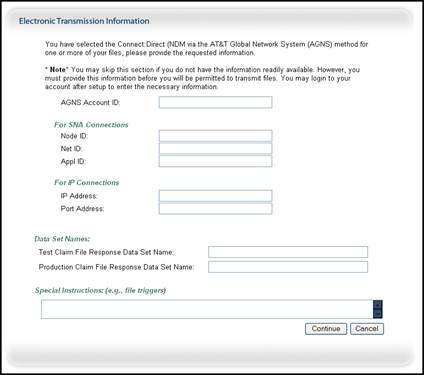
Figure 23: Electronic Transmission Information Page
*Select either SNA Connections or IP Connections for connection information, whichever is applicable.
Table 11: Electronic Transmission Information Field Descriptions
|
Field |
Description |
|
AGNS Account ID |
AGNS Account ID. Used for file transmission via Direct:Connect through AGNS. The AGNS account should be set up well in advance of Section 111 registration and set up. Contact your IT department for more information. |
|
For SNA Connections* |
Header description on page |
|
Node ID |
Unique sting of characters that identifies the device or point on your network to which you connect. Contact your IT department for this information. |
|
Net ID |
Net ID. Contact your IT department for this information. |
|
Appl ID |
APPL ID. Contact your IT department for this information. |
|
For IP Connections* |
Header description on page |
|
IP Address |
Unique 32-bit address that specifies the location on the internet your file will be sent to/from. Ex: 32.83.179.56 Contact your IT department for this information. |
|
Port Address |
The number assigned to the program running in the destination computer. The number is used to link the incoming data to the correct application. Ex: Port 80 Contact your IT department for this information. |
|
Data Set Names |
Header description on page |
|
Test Claim File Response Data Set Name |
For Connect:Direct. Specify the dataset name. If you are using a generation data group (GDG) then place the characters (+1) at the end of your data set name. |
|
Production Claim File Response Data Set Name |
For Connect:Direct. Specify the dataset name. If you are using a generation data group (GDG) then place the characters (+1) at the end of your data set name. |
|
Special Instructions |
Enter any special instructions for file transmission to the COBC. |
Table 12: Electronic Transmission Information Command Buttons
|
Button |
Description |
|
Continue |
Click to save changes and continue to the next screen. |
|
Cancel |
Click to return to the previous page. Information entered on the current page is NOT saved. |
33. Enter
the required information and click Continue.
NOTE: You must have complete file transmission information
available if the Connect:Direct method is selected or this step cannot be
completed and all the other data you provided will be lost.
34. The RRE Information Summary page displays.

Figure 24: RRE Information Summary Page
35. Review the entered information. Click Edit under any section that must be corrected to return to that section. After all corrections have been made, click Continue on the RRE Information Summary page.
36. The Thank You page displays, describing the next steps in the process. It also re-lists your RRE ID and assigned EDI Representative. Click the Login button to return to the Login Warning page.
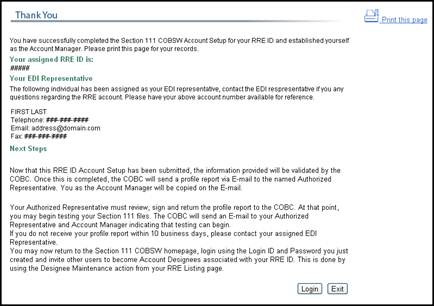
Figure 25: Thank You Page, Account Setup
1. After you complete self-registration, the RRE ID Profile Information page displays. The following table details the listed information and the required information to be entered. Fields marked with an asterisk (*) are required.
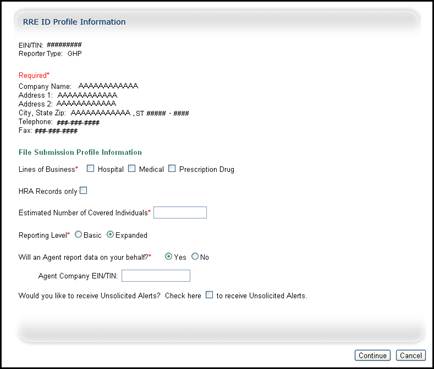
Figure 26: RRE ID Profile Information Page
Table 13: GHP Basic RRE ID Profile Information Field Descriptions
|
Field |
Description |
|
Company EIN/TIN |
Displays Employer Identification Number; same as the Tax Identification Number |
|
Reporter Type |
Displays RRE Reporter Type. |
|
Company Name |
Displays Company Name of Insurer |
|
Address 1 |
Displays Line 1 of Street Address |
|
Address 2 |
Displays Line 2 of Street Address, if applicable |
|
City, State, Zip |
Displays the City, State, and Zip Code plus 4-digit Zip-code suffix of the Company |
|
Telephone |
Displays Company Telephone Number |
|
Fax |
Displays Company Fax Number, if applicable |
|
Insurer Lines of Business checkboxes |
Select Insurer Line of Business. Options are Hospital, Medical, and Prescription Drug. Select all that are applicable. |
|
HRA records only |
Check this box if the only records that will be submitted for this RRE will be for Health Reimbursement Accounts. (This option is for GHP RREs only. When checked, HRA records only = Y will display on the summary page). |
|
Estimated Number of Covered Individuals |
Estimated Number of Insured Individuals |
|
Reporting Level radio buttons |
Select Basic. Basic Responsible Reporters must provide hospital medical coverage that is primary to Medicare Part A and B. Basic Reporters can also process Query-only files. Insurers are required to submit an MSP file and the accompanying TIN Reference file on a quarterly basis. However, reporters can also submit Query-Only files as often as monthly. |
|
Will an Agent report data on your behalf? radio buttons |
Select Yes if a Reporting Agent will be submitting data for the RRE. If not, select No. Note: Aside from a separate agency, the Account Manager or Account Designee can also act as the Reporting Agent, although a Reporting Agent is not required. |
|
Agent Company EIN/TIN |
Employer Identification Number of the Reporting Agent Company; same as the Tax Identification Number. Required if Yes is selected for Reporting Agent radio button. |
|
Would you like to receive Unsolicited Alerts? check box |
Check the box to receive an Unsolicited Alerts file on a monthly basis. This file will alert the RRE to any changes to MSP occurrences that have been submitted. |
Table 14: GHP Basic RRE ID Profile Information Command Buttons
|
Button |
Description |
|
Continue |
Click to save changes and continue to the next screen. |
|
Cancel |
Click to return to the previous page. Information entered on the current page is NOT saved. |
2.
Enter the requested information and click Continue.
Note: If the Agent Company TIN is already registered, company
information will be pre-populated. The following pages to display depend on the
selections made under the Reporting Level and Reporting Agent options on the RRE
Profile Information page.
37. If a Reporting Agent will report data on behalf of the RRE, the Agent Information page displays. The table below details the required information. Fields marked with an asterisk (*) are required. Otherwise, this page is skipped.
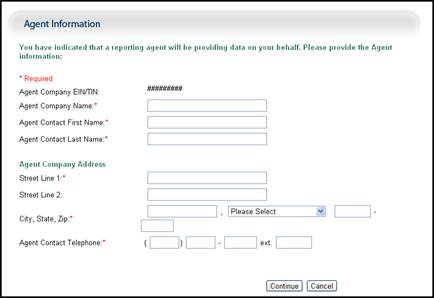
Figure 27: Agent Information Page
Table 15: Agent Information Page Field Descriptions
|
Field |
Description |
|
Agent Company EIN/TIN |
Displays the Employer Identification Number of the Reporting Agent Company you entered on the RRE Profile Info page. |
|
Agent Company Name |
Name of the Reporting Agent Company |
|
Agent Contact First Name |
First Name of Reporting Agent Contact |
|
Agent Contact Last Name |
Last Name of Reporting Agent Contact |
|
Agent Company Addresss |
Header description on page |
|
Street Line 1 |
Line 1 of Reporting Agent Street Address |
|
Street Line 2 |
Line 2 of Reporting Agent Street Address (Optional) |
|
City, State, Zip |
Enter the City, select the State from the dropdown menu, and enter the Zip Code (Required) plus 4-digit Zip-code suffix (Optional) of the Reporting Agent. For foreign RREs, select “Foreign Country” from the State dropdown menu. The rest of the address fields are not required. |
|
Agent Contact Telephone |
Reporting Agent Telephone Number Note: For foreign RREs, enter a United States telephone number, if applicable. |
Table 16: Agent Information Page Command Buttons
|
Button |
Description |
|
Continue |
Click to save changes and continue to the next screen. |
|
Cancel |
Click to return to the previous page. Information entered on the current page is NOT saved. |
38. Enter the required information and click Continue.
39. The File Transmission Methods page displays next. The table below details the required information. Fields marked with an asterisk (*) are required.
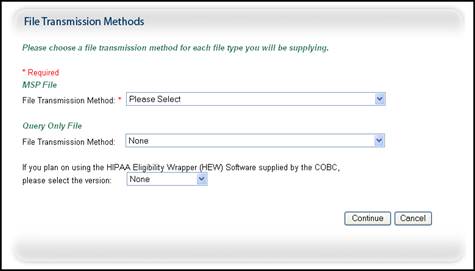
Figure 28: File Transmission Methods Page
Table 17: Basic Reporting Options Field Descriptions
|
Field |
Description |
|
MSP File Transmission Method |
Select from Connect:Direct, SFTP, or HTTPS. |
|
Query-Only File Transmission Method |
Select from Connect:Direct, SFTP, or HTTPS. |
|
HEW Software Version |
Used for Query-Only files. Select from Mainframe or PC/Server Based. HEW software translates (wraps) the file into a HIPAA-compliant 270 eligibility query file format. The 270 format is created to transfer the file. The program also runs against the response file to put the file into a format that can be read (unwrapped) on your system. Contact your EDI Rep to request a copy of this software if you do not receive it by the time your RRE is approved for testing. |
Table 18: Basic Reporting Options Command Buttons
|
Button |
Description |
|
Continue |
Click to save changes and continue to the next screen. |
|
Cancel |
Click to return to the previous page. Information entered on the current page is NOT saved. |
40. Enter
the required information and click Continue. If
Connect:Direct is chosen for any file transmission method, the Electronic
Transmission Information page displays. Otherwise, this page is skipped.
The following table details the required information. Note:
Verify that the information entered is correct. Incorrect information will
delay file submission.
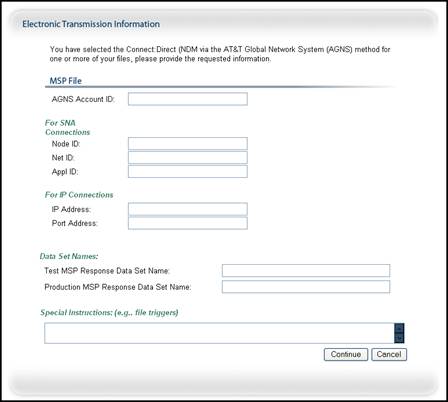
Figure 29: Electronic Transmission Information Page
*Select either SNA Connections OR IP Connections for connection information, whichever is applicable.
Table 19: Electronic Transmission Information Field Descriptions
|
Field |
Description |
|
AGNS Account ID |
AGNS Account ID. Used for file transmission via Direct:Connect through AGNS. The AGNS account should be set up well in advance of Section 111 registration and set up. Contact your IT department for more information. |
|
For SNA Connections* |
Header description on page |
|
Node ID |
Unique sting of characters that identifies the device or point on your network to which you connect. Contact your IT department for this information. |
|
Net ID |
Net ID. Contact your IT department for this information. |
|
Appl ID |
APPLI ID. Contact your IT department for this information. |
|
For IP Connections* |
Header description on page |
|
IP Address |
Unique 32-bit address that specifies the location on the internet your file will be sent to/from. Ex: 32.83.179.56 Contact your IT department for this information. |
|
Port Address |
The number assigned to the program running in the destination computer. The number is used to link the incoming data to the correct application. Ex: Port 80 Contact your IT department for this information. |
|
Data Set Names |
Header description on page |
|
Test MSP Response Data Set Name |
For Connect:Direct. Specify the dataset name. If you are using a generation data group (GDG) then place the characters (+1) at the end of your data set name. |
|
Production MSP Response Data Set Name |
For Connect:Direct. Specify the dataset name. If you are using a generation data group (GDG) then place the characters (+1) at the end of your data set name. |
|
Special Instructions |
Enter any special instructions for file transmission to the COBC. |
Table 20: Electronic Transmission Information Command Buttons
|
Button |
Description |
|
Continue |
Click to save changes and continue to the next screen. |
|
Cancel |
Click to return to the previous page. Information entered on the current page is NOT saved. |
41. Enter
the required information and click Continue. Note:
You must have the complete file transmission information available if the
Connect:Direct method is selected, or this step cannot be completed and all
other data you provided will be lost.
42. The
Query Only File screen of the Electronic Transmission page
displays if you selected Connect:Direct as a file transmission option for
Query-Only files. This screen requests the same information as the prior
screen, except for Query-Only files as opposed to MSP files.
Note: You must have complete file transmission information
available if the Connect:Direct method is selected or this step cannot be
completed and all the other data you provided will be lost.
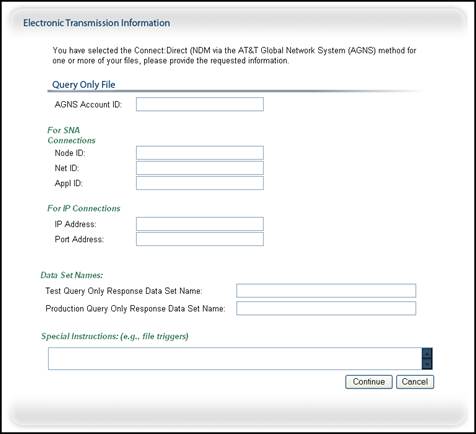
Figure 30: Electronic Transmission Page, Query-Only Screen
43. Enter the required information and click Continue.
44. The RRE Information Summary page displays.
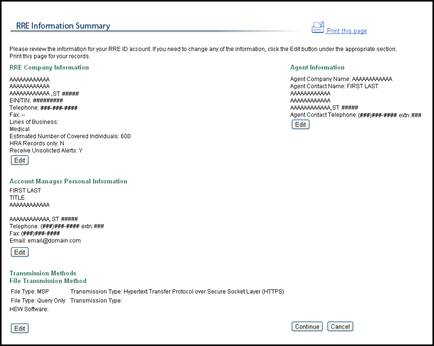
Figure 31: RRE Information Summary
45. Review the entered information. Click Edit under any section that must be corrected to return to that section. After all corrections have been made, click Continue on the RRE Information Summary page.
46. The Thank You page displays, describing the next steps in the process. It also re-lists your RRE ID and assigned EDI Representative. Click the Login button to return to the Login Warning page.

Figure 32: Thank You Page, RRE ID
1. After you complete self-registration, the Responsible Reporting Entity Information page displays. The following table details the listed information and the required information to be entered. Fields marked with an asterisk (*) are required.

Figure 33: RRE ID Profile Information Page
Table 21: RRE ID Profile Information Field Descriptions
|
Field |
Description |
|
Company EIN/TIN |
Displays Employer Identification Number; same as the Tax Identification Number |
|
Company Name |
Displays Company Name of Insurer |
|
Reporter Type |
Displays RRE Reporter Type. |
|
Address 1 |
Displays Line 1 of Street Address |
|
Address 2 |
Displays Line 2 of Street Address, if applicable |
|
City, State, Zip |
Displays the City, State, and Zip Code plus 4-digit Zip-code suffix of the Company |
|
Telephone |
Displays Company Telephone Number |
|
Fax |
Displays Company Fax Number, if applicable |
|
Insurer Lines of Business checkboxes |
Select Insurer Line of Business. Options are Hospital, Medical, and Prescription Drug. Select all that are applicable. |
|
HRA records only |
Check this box if the only records that will be submitted for this RRE will be for Health Reimbursement Accounts. (This option is for GHP RREs only. When checked, HRA records only = Y will display on the summary page). |
|
Estimated Number of Covered Individuals |
Estimated Number of Insured Individuals |
|
Reporting Level radio buttons |
Select Expanded. Expanded Responsible Reporters must provide hospital medical coverage that is primary to Medicare Part A and B. Reporters can also process Query-only files. Expanded Reporters must also provide other health insurance (OHI) information related to the covered individual’s Part D enrollment (prescription drug plan).Expanded reporters’ query files can receive Parts A, B, and D entitlement information. (Part D information is supplied only if the reporter has submitted OHI). Insurers are required to submit an MSP file and the accompanying TIN Reference file on a quarterly basis. However, Expanded reporters can also submit non-MSP and Query-Only files as often as monthly. |
|
Will an Agent report data on your behalf? radio buttons |
Select Yes if a Reporting Agent will be submitting data for the RRE. If not, select No. Note: Aside from a separate agency, the Account Manager or Account Designee can also act as the Reporting Agent, although a Reporting Agent is not required. |
|
Agent Company EIN/TIN |
Employer Identification Number of the Reporting Agent Company; same as the Tax Identification Number. Required if Yes is selected for Reporting Agent radio button. |
|
Would you like to receive Unsolicited Alerts? check box |
Check the box to receive an Unsolicited Alerts file on a monthly basis. This file will alert the RRE to any changes to MSP occurrences that have been submitted. |
Table 22: RRE ID Profile Information Page Command Buttons
|
Button |
Description |
|
Continue |
Click to save changes and continue to the next screen. |
|
Cancel |
Click to return to the previous page. Information entered on the current page is NOT saved. |
2.
Enter the requested information and click Continue.
Note: If the Agent Company TIN is already registered, company
information will be pre-populated. The following pages to display depend on the
selections made under the Reporting Level and Reporting Agent options on the RRE
Information page.
47. If a Reporting Agent will report data on behalf of the RRE, the Agent Information page displays. Otherwise, this page is skipped. The table below details the required information. Fields marked with an asterisk (*) are required.

Figure 34: Agent Information Page
Table 23: Agent Information Page Field Descriptions
|
Field |
Description |
|
Agent Company EIN/TIN |
Displays the Employer Identification Number of the Reporting Agent Company you entered on the RRE Info page. |
|
Agent Company Name |
Name of the Reporting Agent Company |
|
Agent Contact First Name |
First Name of Reporting Agent Contact |
|
Agent Contact Last Name |
Last Name of Reporting Agent Contact |
|
Agent Company Address |
Header description on screen |
|
Street Line 1 |
Line 1 of Reporting Agent Street Address |
|
Street Line 2 |
Line 2 of Reporting Agent Street Address (Optional) |
|
City, State, Zip |
Enter the City, select the State from the dropdown menu, and enter the Zip Code (Required) plus 4-digit Zip-code suffix (Optional) of the Reporting Agent For foreign RREs, select “Foreign Country” from the State dropdown menu. The rest of the address fields are not required. |
|
Agent Contact Telephone |
Reporting Agent Telephone Number Note: For foreign RREs, enter a United States telephone number, if applicable. |
Table 24: Agent Information Page Command Buttons
|
Button |
Description |
|
Continue |
Click to save changes and continue to the next screen. |
|
Cancel |
Click to return to the previous page. Information entered on the current page is NOT saved. |
48. Enter the required information and click Continue.
49. The Expanded Reporting Option page displays (The Expanded option is only available to GHP reporters). The table below details the required information. Fields marked with an asterisk (*) are required. Otherwise, this page is skipped.
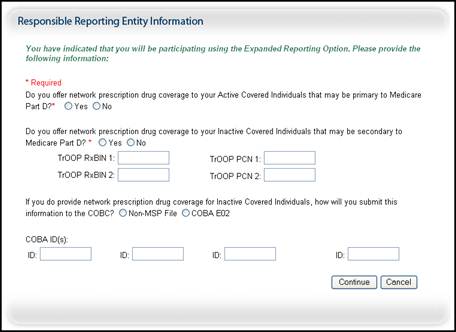
Figure 35: Expanded Reporting Option Page
Table 25: Expanded Reporting Option Page Field Descriptions
|
Field |
Description |
|
Drug Prescription Coverage/ Active Covered Individuals radio buttons |
If your RRE offers network prescription drug coverage that may be primary to Part D coverage to Active Covered Individuals, select Yes. Otherwise, select No. |
|
Drug Prescription Coverage/ Inactive Covered Individuals radio buttons |
If your RRE offers network prescription drug coverage that may be secondary to Part D coverage to Inactive Covered Individuals, select Yes. Otherwise, select No. |
|
TrOOP Rx BIN 1 |
Prescription Drug Benefit Identification Number If you checked Yes to the question above, provide your RxBIN for this supplemental drug network coverage. |
|
TrOOP PCN 1 |
Prescription Drug Processor Control Number. If you checked Yes to the question above, provide your RxBIN for this supplemental drug network coverage. |
|
TrOOP Rx BIN 2 |
Additional Rx Benefit Identification Number. For use when reporting Supplemental Rx Coverage. Provide if you have more than one RX BIN for supplemental Rx coverage. |
|
TrOOP PCN 2 |
Additional Prescription Drug Processor Control Number. For use when reporting Supplemental Rx Coverage. Provide if you have more than one Rx PCN for supplemental Rx coverage. |
|
Drug Coverage Information Submission radio buttons |
If supplemental network drug coverage is provided to INACTIVE covered individuals, choose a submission method to indicate how this information will be supplied to the COBC. Select Non-MSP File or COBA E02 |
|
COBA ID(s) |
Coordination of Benefits Agreement ID numbers associated with the RRE. Required if the COBA E02 method of reporting was selected. |
Table 26: Expanded Reporting Option Command Buttons
|
Button |
Description |
|
Continue |
Click to save changes and continue to the next screen. |
|
Cancel |
Click to return to the previous page. Information entered on the current page is NOT saved. |
50. Enter the required information and click Continue.
51. The File Transmission Methods page displays. The table below details the required information. Fields marked with an asterisk (*) are required.
Figure 36: File Transmission Methods Page
Table 27: File Transmission Methods Page Field Descriptions
|
Field |
Description |
|
MSP File Transmission Method |
Select from Connect:Direct, SFTP, or HTTPS. |
|
Non-MSP File RDS radio button |
If you will be submitting RDS Retiree File Records with the Non-MSP File, select Yes. |
|
Non-MSP File Transmission Method |
Select from Connect:Direct, SFTP, or HTTPS |
|
Query-Only File Transmission Method |
Select from Connect:Direct, SFTP, or HTTPS. |
|
HEW Software Version |
Used for Query-Only files. Select from Mainframe or PC/Server Based. HEW software translates (wraps) the file into a HIPAA-compliant 270 eligibility query file format. The 270 format is created to transfer the file. The program also runs against the response file to put the file into a format that can be read (unwrapped) on your system. Contact your EDI Rep to request a copy of this software if you do not receive it by the time your RRE is approved for testing. |
Table 28: File Transmission Methods Page Command Buttons
|
Button |
Description |
|
Continue |
Click to save changes and continue to the next screen. |
|
Cancel |
Click to return to the previous page. Information entered on the current page is NOT saved. |
52. Enter the required information and click Continue. If Connect:Direct is chosen for any file transmission method, the Electronic Transmission Information page displays for each transmission type, MSP, Non-MSP, and Query-Only. Otherwise, this page is skipped. The following table details the required information. Note: Verify that the information entered is correct. Incorrect information will delay file submission.
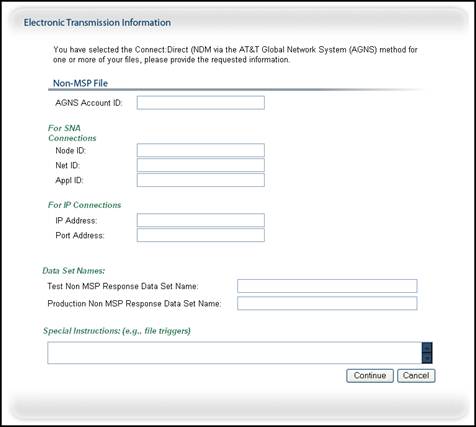
Figure 37: Electronic Transmission Information Page, MSP
Table 29: MSP Electronic Transmission Information Page Field Descriptions
|
Field |
Description |
|
AGNS Account ID |
AGNS Account ID. Used for file transmission via Direct:Connect through AGNS. The AGNS account must be set up well in advance of Section 111 registration and set up. Contact your IT department for more information. |
|
For SNA Connections |
Header description on page |
|
Node ID |
Unique sting of characters that identifies the device or point on your network to which you connect. Contact your IT department for this information. |
|
Net ID |
Net ID. Contact your IT department for this information. |
|
Appl ID |
APPLI ID. Contact your IT department for this information. |
|
For IP Connections |
Header description on page |
|
IP Address |
Unique 32-bit address that specifies the location on the internet your file will be sent to/from. Ex: 32.83.179.56 Contact your IT department for this information. |
|
Port Address |
The number assigned to the program running in the
destination computer. The number is used to link the incoming data to the
correct application. Ex: Port 80 Contact your IT department for this information. |
|
Data Set Names |
Header description on page |
|
Test MSP Response Data Set Name |
For Connect:Direct. Specify the dataset name. If you are
using a generation data group (GDG) then place the characters (+1) at the end
of your data set name. |
|
Production MSP Response Data Set Name |
For Connect:Direct. Specify the dataset name. If you are
using a generation data group (GDG) then place the characters (+1) at the end
of your data set name. |
|
Special Instructions |
Enter any special instructions for file transmission to
the COBC. |
Table 30: MSP Electronic Transmission Information Page Command Buttons
|
Button |
Description |
|
Continue |
Click to save changes and continue to the next screen. |
|
Cancel |
Click to return to the previous page. Information entered on the current page is NOT saved. |
53. Enter
the required information for each transmission type and click Continue.
Note: You must have complete file transmission information
available if the Connect:Direct method is selected or this step cannot be
completed and all the other data you provided will be lost.
54. The RRE
Information Summary page displays.

Figure 38: RRE Information Summary Page
55. Review the entered information. Click Edit under any section that must be corrected to return to that section. After all corrections have been made, click Continue on the RRE Information Summary page.
56. The Thank You page displays, describing the next steps in the process. It also re-lists your RRE ID and assigned EDI Representative. Click the Login button to return to the Login Warning page.

Figure 39: Thank You Page
You have successfully set up the RRE account and yourself as the Account Manager. As the AM, you control the administration of the responsible reporting entity's account. Once you log in to the account, you will be able to maintain RRE information (Name, Address, Contact Information), upload and download files via HTTPS, monitor file processing, and review prior file processing results.
You may choose to manage the entire account and data file exchange, or you may invite other company employees or data processing agents to assist as Account Designees. Each RRE may have only one Account Manager. All Account Managers and their Account Designees will be authenticated prior to being added to the account.
To add Designees to the RRE account, you must login to the Section 111 Web site using the Login ID and Password you created during the Account Setup process. Chapter 8 describes the steps you must take as the Account Manager to invite users to be Account Designees. Chapter 9 details the Account Designee self-registration process once he has received an invitation E-mail from the COBC after you add him to your account, in the event that an AD is assigned to help the Account Manager with the file submission process.
Upon completion of all information for the account setup, an E-mail notification will be sent to the Authorized Representative. The E-mail will also include a profile report noting all information previously recorded during RRE registration, additional information provided during the account setup, and the RRE file submission period (if you selected the Direct Data Entry method, you will not be assigned a submission period). Refer to the Appendix for a sample notification E-mail and Profile Report. Refer to Chapter 15 for more information on file submission timeframes. It may take up to 10 business days to receive the profile report.
The Authorized Representative will have 30 calendar days to review, sign, and return the Profile Report to the COB contractor listed on the report. If a signed profile report is not received during that timeframe, an E-mail will be sent to the Authorized Representative, indicating that a signed Profile Report must be received before testing can ensue. Refer to the Appendix for a sample E-mail.
For RREs using a file submission method: Upon verification of profile information and physical setup of the file transmission, an E-mail will be sent by the COBC to the Authorized Representative and Account Manager to notify them of the change in status to “Testing.” At that point the RRE may begin test file submissions. Refer to the Appendix for a sample E-mail.
RREs using the Direct Data Entry Method: Upon verification of profile information, the RRE may begin entering claims on the COBSW.
1. Enter the following URL into your web browser: https://www.section111.cms.hhs.gov/MRA/
2. The Login Warning page displays, detailing the Data Use Agreement. The Login Warning page may be printed by clicking the Print this Page link in the upper right of the page.
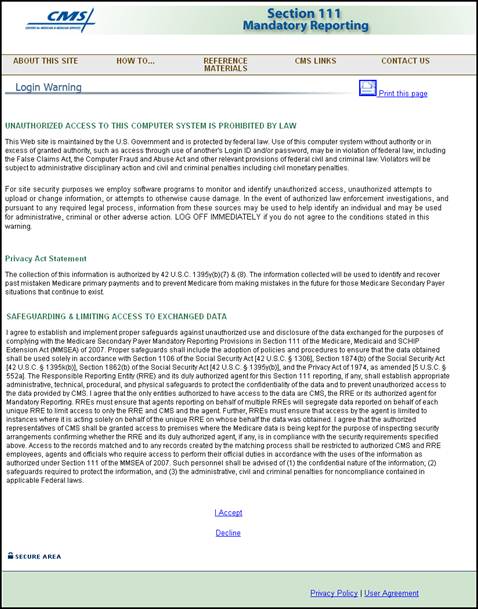
Figure 40: Login Warning Page
57. Review the DUA. To proceed, click the I Accept link.
58. The Section 111 Mandatory Reporting Login page displays.
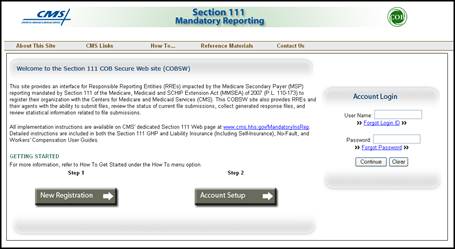
Figure 41: Login Page
59. Enter your Login ID in the User Name field and your Password in the Password field, and click Login.
60. The RRE Listing page displays. This page functions as the main processing screen or Home page to initiate any Section 111 Web site processes. It lists all RRE IDs to which your Login ID is associated. Refer to Chapter 6 for more information about the RRE Listing page.

Figure 42: RRE Listing Page
1. On the Login screen, click the Forgot Login ID link in the Account Login box.
Figure 43: Account Login Box
2. This displays the Forgot Login ID page. Enter your E-mail address and click Continue.
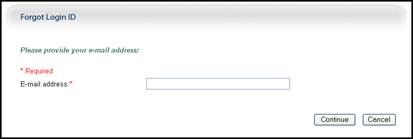
Figure 44: Forgot Login ID Page
3.
The screen then re-displays with the two Security
Questions you selected during the registration process. Correctly answer each
of your pre-selected Security Questions then click the Continue
button. If the information you entered is correct, your Login ID will be sent
via E-mail.
If you receive an error indicating that the answers are incorrect, check your
answers and re-enter. If you cannot remember the answers to your Security
Questions, contact your assigned EDI Representative.
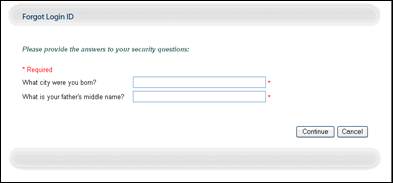
Figure 45: Forgot Login ID Page, Security Questions
4. The Thank You page displays if your answers are correct. This page confirms that you have successfully requested your Login ID. You will then receive an E-mail containing your Login ID. After receipt of the E-mail, please return to the Section 111 Web site and log in using your Login ID and Password.
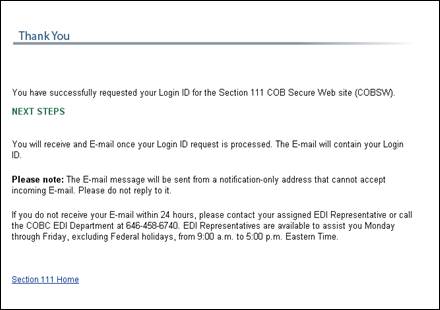
Figure 46: Thank You Page
If you do not
receive your E-mail within 24 hours, please contact your assigned EDI
Representative.
1. On the Login screen, click the Forgot Password link, in the box on the left of the screen.
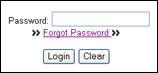
Figure 47: Forgot Password Link
2. This displays the Forgot Password page. Enter your Login ID and click Continue.
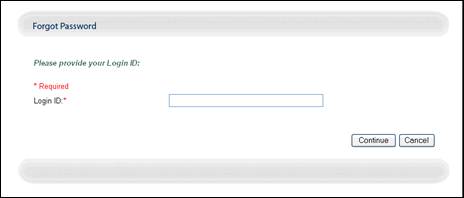
Figure 48: Forgot Password Page
3. The screen then re-displays with the two Security Questions you selected during the registration process. Correctly answer each of your pre-selected Security Questions then click the Continue button. If the information you entered is correct, your new temporary Password will be sent via E-mail.
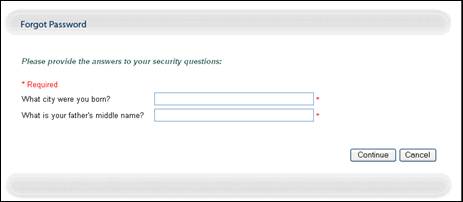
Figure 49: Forgot Password Page, Security Questions
If you receive an error indicating that the answers are incorrect, check your answers and re-enter. If you cannot remember the answers to your Security Questions, contact your assigned EDI Representative.
4. The Password Change Successful page displays, indicating that the system has generated a temporary Password and sent it to your registered E-mail address. If you do not receive your E-mail within 24 hours, please contact your assigned EDI Representative. Click Continue at the bottom of the page to return to the Login Warning page.
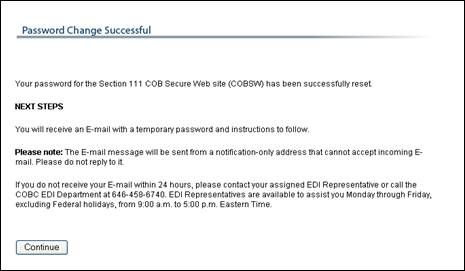
Figure 50: Password Change Successful Page
5. You must change your temporary Password the next time you log into the Section 111 Web site. Refer to the Change Password section in the next chapter for more information.
The RRE Listing page is the first page displayed
after a successful login. This page functions as the main processing screen or
Home page to initiate any of the Section 111 COBSW processes. The Home
link returns you to the RRE Listing page, and Log
Off returns you to the Login Warning page.
It lists all the RRE IDs you are associated with. For each assigned RRE ID, the following information is displayed:
· RRE ID (Responsible Reporting Entity Identification Number)
· Company Name associated with the RRE ID
· Status of the RRE—Setup, Ready to Test or Production
· Submission Period—01-12 for file submissions, 0 for DDE
· Reporting Option—Basic, Expanded, or DDE
· Actions—dropdown box of available Actions. Actions displayed depend on your user role for the RRE ID (Account Manager or Account Designee).
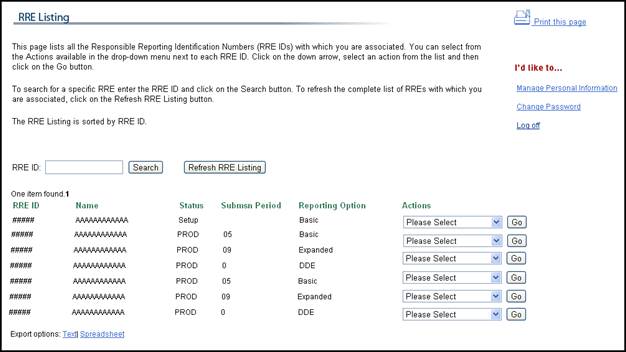
Figure 51: RRE Listing Page
For each RRE ID listed on this page, the Account Manager can select one of the following options from the Actions dropdown menu. Simply select the function and then select Go:
· Beneficiary Lookup—Search for specific beneficiaries (for all RREs except Direct Data Entry users)
· RRE Information—View or update information for the associated RRE
· File Processing Results—Monitor production file submission processing and history and download response files using the HTTPS method
· Upload File—Upload GHP or NGHP production and files using the HTTPS method (for RREs set up with file transmission only)
· Test File Results—View results of test file submissions
· Designee Maintenance—View, delete, edit, or add an Account Designee
· View Account Activity—View account activity detail
· Register for DDE—Change claim submission method to Direct Data Entry (for NGHP RREs currently set up with file transmission methods only)
· New Claim—Enter a new claim using Direct Data Entry (DDE method only)
· Claim Listing—View, edit or delete a DDE claim (DDE method only)
For each RRE ID listed on this page, the Account Designee for the RRE ID can select one of the following options from the Actions dropdown menu. Simply select the function and then select Go:
· Beneficiary Lookup—Search for specific beneficiaries (for all RREs except Direct Data Entry users)
· File Processing Results—Monitor production file submission processing and history and download files using the HTTPS method
· Upload File—Upload GHP or NGHP production and test files using the HTTPS method (for RREs setup with file transmission only)
·
Test
File Results—View results of
test file submissions
·
View
Account Activity—View account
activity detail
· Register for DDE—Change claim submission method to Direct Data Entry (for NGHP RREs currently set up with file transmission methods only)
· New Claim—Enter a new claim using Direct Data Entry (DDE method only)
· Claim Listing—View, edit or delete a DDE claim (DDE method only)
· Remove from RRE—Remove your access to an RRE account
The system requires you to change your Password every 60 days. The following details the steps to successfully change your Password.
1. On the RRE Listing page, click the Change Password link in the Account Settings box on the right side of the page.
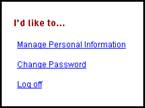
Figure 52: Account Settings Box
2. This displays the Change Password page.
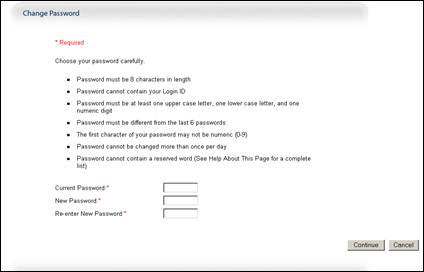
Figure 53: Change Password Page
3. Enter your Current Password.
4. Enter and Re-enter a new Password following the listed guidelines then click Continue.
5. The Password Change Successful page displays. Click Continue to go to the RRE Listing page.
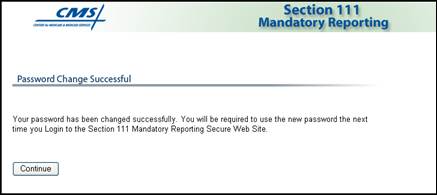
Figure 54: Password Change Successful Page
Use the Export Options links at the bottom of the RRE Listing page to export the RRE List to a spreadsheet or a text file.
![]()
Figure 55: Export Options Links
Click Spreadsheet to export the RRE List. A dialog box displays. Click Save to save the RRE List to a location on your computer; click Open to display the RRE List as a spreadsheet.
Figure 56: RRE Listing Report, Spreadsheet
Note: All RREs associated with the user will be exported, not only the RRE
IDs displayed on the first page of the RRE Listing page.
Click Text to export the RRE List. A dialog box displays. Click Save to save the RRE List to a location on your computer; click Open to display the RRE List as a text file.
Figure 57: RRE Listing Report, Text File
Note: All RREs associated with the user will be exported, not only the RRE IDs displayed on the first page of the RRE Listing page.
![]()
Your personal information is recorded during your initial registration process. However, this information may be updated and changed, if necessary.
1. On the RRE Listing page, click the Manage Personal Information link in the Account Settings box on the right side of the page.

Figure 58: Account Settings Box
2. This displays the Manage Personal Information page.

Figure 59: Manage Personal Information Page
3.
Your current personal information is displayed on this
page. After making any necessary changes, click the Continue button at
the bottom of the page.
For foreign RREs, select “Foreign Country” from the State dropdown menu. The
rest of the address fields are not required.
4. This displays the Personal Information Update Confirmation page, showing what information has been updated.
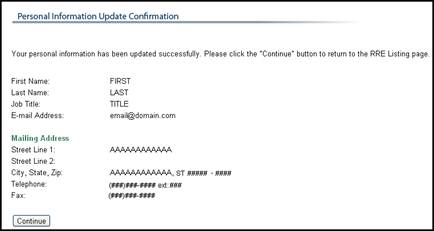
Figure 60: Personal Information Update Confirmation Page
5.
Click the Continue button to
return to the RRE Listing page. The system then generates and sends
you an E-mail, indicating that your personal information has been changed.
To assist with RRE account management and data file processing, the Account Manager may designate one or more Account Designees to an RRE. The Account Manager can perform the following Designee Maintenance functions for the RRE:
· Add an Account Designee
· Delete an Account Designee
· Edit information for an unregistered Account Designee
· Regenerate an invitation E-mail with a token link for an Account Designee’s registration
1. Log in to the Section 111 COBSW; the RRE Listing page displays.
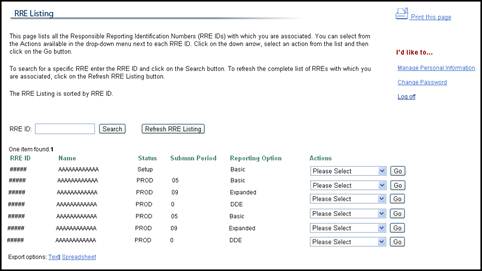
Figure 61: RRE Listing Page
2. For the desired RRE ID, select “Designee Maintenance” from the Actions dropdown box then click Go.
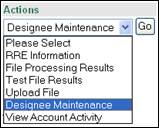
Figure 62: Actions Dropdown Box, Designee Maintenance Selected
3. The Designee Listing for RRE page displays, with all Designees and their associated statuses (Pending, Active, Locked, Expired, Revoked) listed.
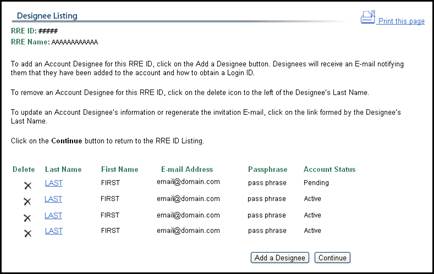
Figure 63: Designee Listing Page
4. To print the Designee Listing page, click the Print this Page icon in the upper right corner. To return to the RRE Listing screen without making any changes, click the Continue button.
5. To add an Account Designee, click the Add a Designee button under the Account Designee List.

Figure 64: Add a Designee Button
6. The Designee Information page displays.
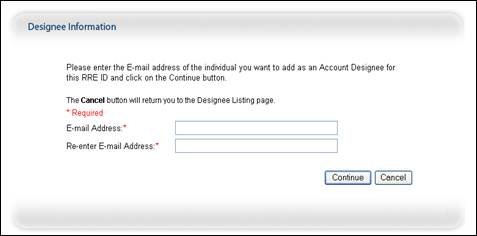
Figure 65: Designee Information Page
7. Enter and re-enter the E-mail address of the Account Designee you wish to invite and click Continue.
8. The
system then verifies that the entered E-mail address is not in the database for
an existing user.
Note: An existing, registered user can be an Account Designee
for an RRE ID as long as he is not already registered as an Authorized
Representative for any RRE ID or the Account Manager for the same RRE ID. Refer
to the next section if the invited Account Designee is already a registered
user (if his E-mail address is found in system).
9.
If the entered E-mail address has not been found in the
database, the Account Designee Information page displays. Enter the
invited Designee’s First Name, Last Name, and create a Pass Phrase then click Continue.
The Pass Phrase should be a short case-sensitive phrase, of your creation, that
must be conveyed to the intended Designee verbally. Be careful to remember the
exact wording because the Designee must enter the same text to complete a
successful registration. Enter a word or words up to 30 characters. This is a
secret code that you make up and provide to your Designee outside the system.
After you complete the invitation process, contact your Designee and provide
him with this secret code. He will need to enter it exactly as you did when he
follows the link in his invitation E-mail to register for the site. This will
make sure that only the people you invite will have access to your account. Do
not share this pass phrase with anyone else. It will not be sent to the
Designee in his invitation E-mail. You must give it to him outside the system.

Figure 66: Account Designee Information Page
10. Click the Continue button at the bottom of the page. This re-displays the Designee Listing page with the new Designee listed, with a status of “Pending.”

Figure 67: Updated Designee Listing Page
An invitation E-mail will be sent to the invited Designee, informing him to register and providing him with the token link to access the registration site. This E-mail will come from cob@section111.cms.hhs.gov. Please inform your Designee to allow delivery of E-mails from this account.
A user can be an Account Designee for an RRE ID who is already registered in the database as a user for another RRE ID. The following steps detail how to successfully add an existing user as an Account Designee for a different RRE ID.
1. From the RRE Listing page, select “Designee Maintenance” from the Actions dropdown box for the desired RRE ID then click Go.
Figure 68: Actions Dropdown Box, Designee Maintenance Selected
2. The Designee Listing for RRE page displays.
Figure 69: Designee Listing Page
3. Click Add a Designee. The Designee Information page displays.
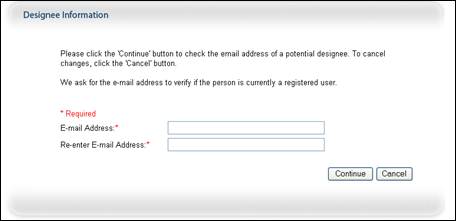
Figure 70: Designee Information Page, Enter E-mail Address
4. Enter and re-enter the E-mail address of the Account Designee you wish to invite and click Continue.
5. The system determines that this E-mail address is associated with an existing, eligible user, and re-displays the Account Designee Information page with the First and Last Name of the user found under the E-mail Address, with a message asking the AM to confirm the invited Designee’s information.

Figure 71: Account Designee Information Page, Existing User Found
6. If you do NOT want to invite the user associated with the Name and E-mail Address displayed, click Cancel to be returned to the Account Designee Information screen to re-enter information.
7. If you DO want to invite the user associated with the Name and E-mail Address displayed, click Continue button to accept the Account Designee.
8. This re-displays the Account Designee Listing page, displaying the new Account Designee with a status of “Active.”
![]()
Figure 72: Updated Designee Listing Page
9. The system then generates a notification E-mail to the AD, notifying him that he has been added as a Designee for this RRE ID.
1. Click the Delete icon (‘X’) next to the Designee you wish to delete from the RRE account.

Figure 73: Designee Listing, Delete Icon Displayed
2. The Delete Account Designee Confirmation page displays.
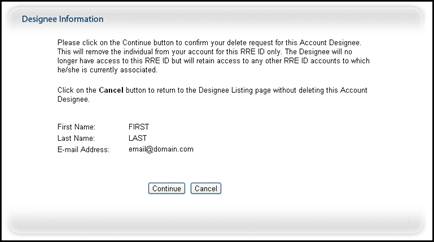
Figure 74: Delete Account Designee Confirmation Page
3. If you do NOT want to delete the selected Designee, click Cancel to be returned to the Account Designee Listing page, which will show the Account Designee still listed.
4. If you DO want to delete the selected Designee, click Continue.
5. The system disassociates the Account Designee from the RRE and re-displays the Account Designee Listing page without the Account Designee who was just deleted. This removes the AD from your account for this RRE ID only. The Designee will no longer have access to this RRE ID but will retain access to any other RRE ID accounts to which he is currently associated.
An Account Manager can edit information for Designees in Pending status, who have not yet registered. (AMs can only view personal information on Active Designees.)
1. From the RRE Listing page, select “Designee Maintenance” from the Actions dropdown box for the desired RRE ID then click Go.
2. The Designee Listing page displays.
3. Click the last name of the Designee whose information must be updated.
![]()
Figure 75: Designee Listing
4. The Designee Information page displays, with the Designee’s personal information open for editing.
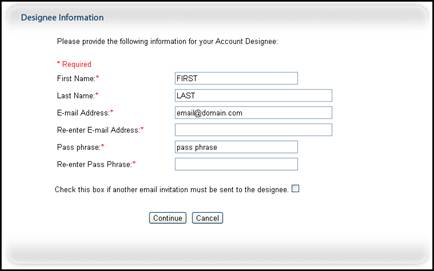
Figure 76: Designee Information Page, Fields Open for Editing
5. Make the necessary changes and click Continue. If no changes are necessary, click Cancel.
6. The Designee Listing page re-displays, with the Designee’s personal information updated.

Figure 77:
Updated Designee Listing Page
When the Account Manager invites a person to be an Account Designee, an E-mail is generated and sent to the intended Designee informing him of the invitation, and includes a token link for him to access the Section 111 Web site and self-register as an AD. If the intended Designee has misplaced or deleted the invitation E-mail or if the Designee has not registered within 30 days, the Account Manager can regenerate the invitation E-mail, allowing the intended AD to self-register. The previously-generated token link will not work once a new E-mail is generated. Note: Invitation E-mails can only be regenerated for Designees in Pending status. This E-mail will come from cob@section111.cms.hhs.gov. Please inform your Designee to allow delivery of E-mails from this account.
The following steps outline the regeneration process.
1. From the RRE Listing page, select “Designee Maintenance” from the Actions dropdown box for the desired RRE then click Go.
2. The Designee Listing page displays.
3. Click the last name of the preferred Designee.
![]()
Figure 78: Designee Listing
4. The Designee Information page displays.

Figure 79: Designee Information Page, Fields Open for Editing
5. The Designee Information page displays. Click the Invitation E-mail checkbox beneath the Designee’s personal information then click Continue.
![]()
Figure 80: Regenerate Token Checkbox
6. The Designee Listing page displays. The system re-generates the invitation E-mail and sends it to the E-mail address registered for the Account Designee.
Account Designees (ADs) are optional users associated with an RRE ID account who assist the Account Manager in managing the RRE account and data file exchange. As a Designee, you will be able to perform most of the functions on the site, including submitting Section 111 files, but will not be able to invite additional users to be associated with the RRE ID nor may you update RRE ID company information. Only the Account Manager can invite and manage the users associated with the RRE ID.
ADs are assigned by the Account Manager. After the AM adds the AD to the RRE ID account, the system sends an invitation E-mail to the AD, containing a specific URL. It is necessary for the AD to use this URL, as it contains a specific token which allows access to the registration site. The Account Designee will also verbally receive a Passphrase from the Account Manager that must be entered during the AD’s registration.
An Account Designee registers himself on the Section 111 COBSW, using the information contained in the system-generated E-mail sent to him and the Passphrase given to him by the Account Manager. To successfully register yourself as an Account Designee, follow the steps outlined below.
You will only go through this process once as you need only one Login ID no matter how many Responsible Reporting Entities (RREs) you will work with ultimately.
1. Click on the URL and token provided in the invitation E-mail sent by the COBC.
2. The Login Warning page displays, detailing the Data Use Agreement. The Login Warning page may be printed by clicking the Print this Page link in the upper right of the page.

Figure 81: Login Warning Page
3. Review the DUA. To proceed, click the I Accept link.
4. The Account Designee Registration page displays.
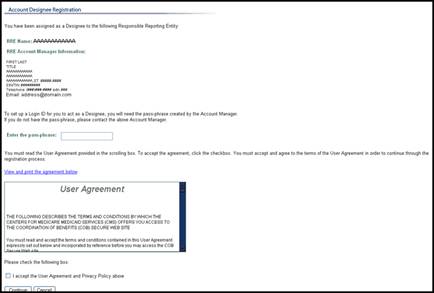
Figure 82: Account Designee Registration Page
5. The registration page informs you that you have been assigned as an AD to the listed Responsible Reporting Entity (RRE) ID. Enter the Passphrase provided earlier by the Account Manager, check the I Accept box beneath the DUA, and click the Continue button. Note: The Passphrase is case-sensitive.
6. The Account Designee Personal Information page displays.
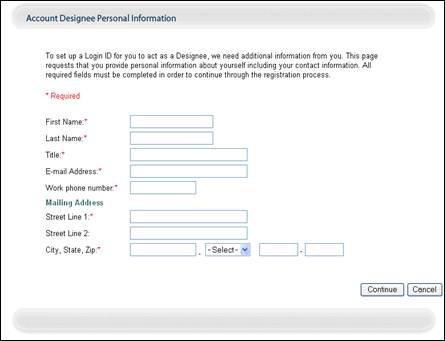
Figure 83: Account Designee Personal Information Page
7.
Enter the requested information and click the Continue
button.
Note: For foreign RREs, select “Foreign Country” from the
State dropdown menu. The rest of the address fields are not required.
8. The Account Designee Login Information page displays. Set up a Login ID and Password (using the following guidelines). Additionally, 2 security questions must be selected.
· Login IDs must be 7 characters
·
Login IDs must be in the format of AA999AA
(first two alphabetic, next three numeric, last two alphabetic)
· Login ID and Password cannot be the same
· Passwords must be changed every 60 days
· Passwords must be 8 characters in length
· Passwords must contain a mix of upper case letters, lower case letters, and numbers (at least one of each type must be included)
· Passwords cannot be changed more than once per day
· Passwords cannot contain a user’s User ID
· Passwords cannot begin with a number
· Passwords must be different from the last 6 Passwords
· Passwords cannot contain a reserved word (Password, welcome, hcfa, cms, system, medicare, medicaid, temp, letmein, god, sex, money, quest, 1234, or f20asya, ravens, redskin, orioles, bullets, capitol, Maryland, terps, doctor, 567890, 12345678, root, bossman, january, february, march, april, may, june, july, august, september, october, november, december, ssa, firewall, citic, admin, unisys, pwd, security, 76543210, 43210, 098765, iraq, ois, tmg, internet, intranet, extranet, att, Lockheed
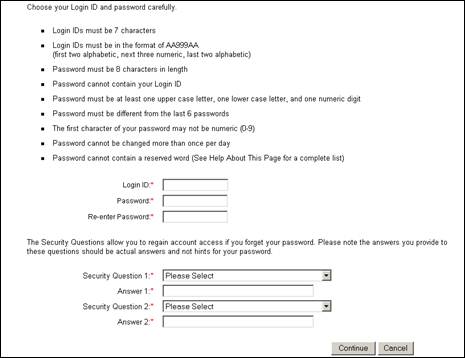
Figure 84: Account Designee Login Information Page
9. Enter the required information and click the Continue button.
10. The Account Designee Summary page displays. The page provides a summary of all the information you have entered.
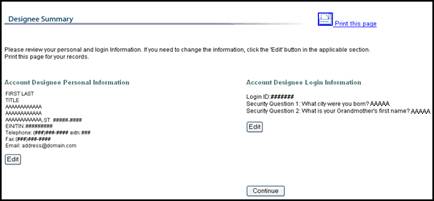
Figure 85: Account Designee Summary Page
11. Review the summary information. If changes are required, click the Edit button beneath the appropriate section. Once all information is correct, click the Continue button.
12. The Thank You page displays. Click the Section 111 Home link to go to the Home page to log in to the site to manage RRE account information.
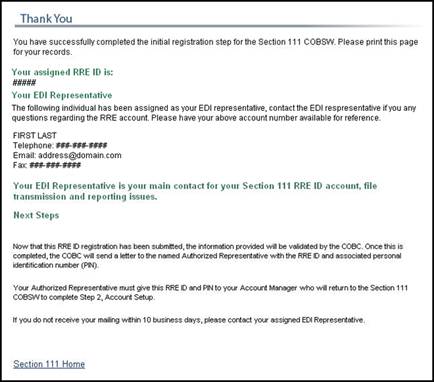
Figure 86: Thank You Page
You have successfully completed self-registration on the Section 111 COBSW.
Accurate RRE ID information ensures that Section 111 Mandatory Reporting information is properly recorded. RRE ID information is initially provided during registration, but may also be changed after the Account Setup is complete. It is important that this information is up-to-date to ensure the RRE receives all communications regarding file submission and processing.
Updated information will be used for all future communications from the Coordination of Benefits Contractor. An automated E-mail is generated and sent to the Authorized Representative and Account Manager when RRE ID profile information has been updated by the Account Manager.
To successfully update RRE ID profile information, follow the steps below.
1. From the RRE Listing page select “RRE Information” from the Actions dropdown box and click Go.
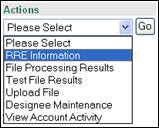
Figure 87: Actions Dropdown Box, RRE Information Selected
2.
The RRE Information Summary page
displays. Click the Edit
button to open all pages for editing. To update File Transmission Method
information or change your Authorized Representative or Account Manager,
contact your EDI Representative.

Figure 88: RRE Information Summary Page
3. Alternately, if no changes are necessary, click the Continue button at the bottom of the page.
4. Make changes to the necessary pages and click Continue on that page.
5. Click Continue on each subsequent page, whether or not changes are necessary, until the RRE Information page re-displays. All sections will be displayed, including the updated sections.
The RRE profile information has been successfully changed. A profile E-mail and updated profile report are generated and sent to the Authorized Representative. The Authorized Representative must review, sign, and return a copy of the profile report to the COBC.
After the Authorized Representative has requested that the EDI Representative replace the existing Account Manager, the system sends an invitation E-mail to the pending AM replacement, containing a specific URL and token, which allow access to the registration site. The pending replacement Account Manager will also verbally receive a Pass Phrase from the EDI Representative that must be entered during the replacement AM’s registration.
The replacement Account Manager registers himself on the Section 111 COBSW, using the information contained in the system-generated E-mail sent to him and the Pass Phrase given to him by the EDI Representative. To successfully register yourself as the replacement Account Manager, follow the steps outlined below.
Note: If you are an existing Designee or an Account Manager for another RRE, you do not need to re-register as the new AM. The next time you log in to the COBSW, your new RRE ID will be displayed on the RRE Listing page.
1. Click on the URL and token provided in the invitation E-mail sent by the COBC.
2. The Account Setup Introduction page displays, informing you that you have been assigned as the replacement Account Manager for the listed RRE ID.
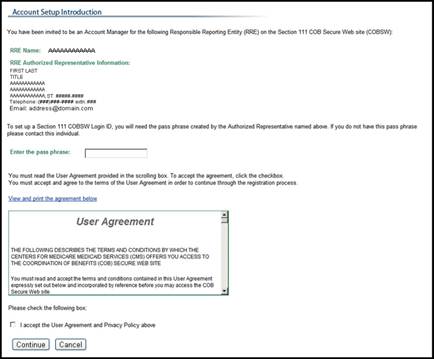
Figure 89: Account Setup Introduction, Replace Account Manager Page
3. Enter the Pass Phrase provided earlier by the EDI Representative, check the I Accept box beneath the User Agreement, and click the Continue button. Note: The Pass Phrase is case-sensitive.
4. The Account Manager Personal Information page displays.
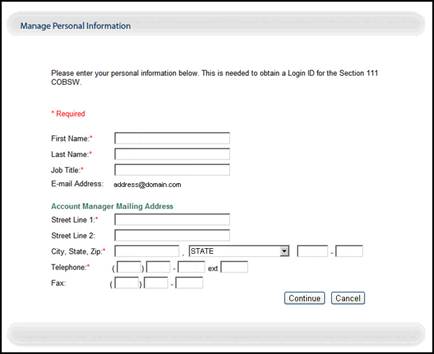
Figure 90: Account Manager Personal Information Page
5. Enter the required personal information and click Continue. Fields marked with an asterisk (*) are required.
6. The Account Manager Login Information page displays, requesting that you to set up a Login ID and Password.
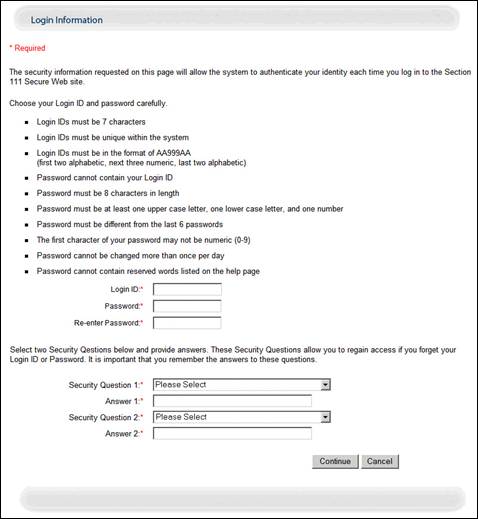
Figure 91: Account Manger Login Information Page
7. Enter the requested login information using the criteria outlined on the page. Select 2 Security Questions and Answers then click the Continue button. Fields marked with an asterisk (*) are required.
8. A summary page containing the information entered is displayed for confirmation. Click on the Edit button beneath either section if you need to edit your personal or login information. Click on the Continue button once you are satisfied with your displayed information.

Figure 92: Account Manager Information Confirmation Page
9. After you have confirmed your personal and login information, the Thank You page displays. You can then use your new ID to login to the COBSW.
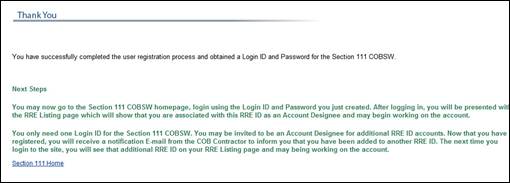
Figure 93: User Registration Thank You Page
The “Remove from RRE” action is only available to Account Designees. Removing an RRE revokes your access to that RRE ID. Take the following steps to remove an RRE ID from your RRE Listing page.
1. From the RRE Listing page, select “Remove from RRE” from the Actions dropdown box for the desired RRE ID then click Go.
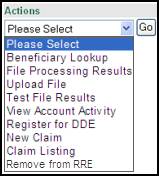
Figure 94: Actions Dropdown Box, for “Remove from RRE”
2. The Remove RRE Confirmation page displays.
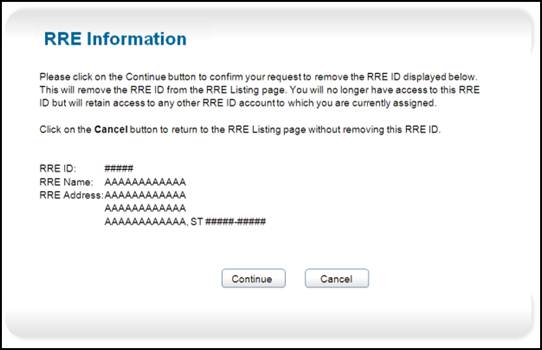
Figure 95: Remove RRE Confirmation
3. If you are only assigned to one RRE, the following warning message displays on the Remove RRE Confirmation page:
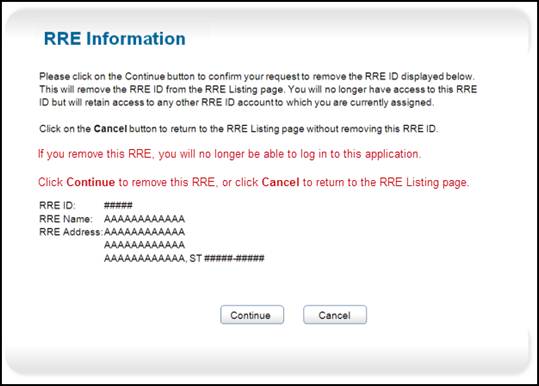
Figure 96: Remove RRE Warning Message, Single RRE
4. If you do NOT want to delete the selected RRE ID, click Cancel to be returned to the RRE Listing page, which will show the RRE ID still listed.
5. If you DO want to delete the selected RRE ID, click Continue.
6. The system disassociates you from the RRE and re-displays the RRE Listing page without the RRE ID that was just deleted. This removes this RRE ID from your account. You will no longer have access to this RRE ID but will retain access to any other RRE ID accounts you are currently assigned with.
7. If you were only associated with one RRE, you will no longer have access to the COBSW Section 111 application, and the next time you attempt to log in, you will receive an error message.
8. The system then generates a notification E-mail to your e-mail address, notifying you that have has been removed as a Designee for this RRE ID.
To regain access to the removed RRE ID, contact your Account Manager.
Please refer to the MMSEA Section 111 MSP Mandatory Reporting GHP User Guide and the MMSEA Section 111 MSP Mandatory Reporting Liability Insurance (Including Self-Insurance), No-Fault Insurance, and Workers’ Compensation User Guide located under the Reference Materials menu option or on http://www.cms.hhs.gov/MandatoryInsRep for more information on the file submission methods available.
File uploads can be performed directly through the Section 111 COBSW using HTTPS protocol. This option is only available to RREs that selected HTTPS during registration. Both Account Managers and Account Designees can upload submission files. The following list details the file upload guidelines.
GHP Basic submitters who have chosen HTTPS as their file submission method can upload the following test and production files:
· MSP file
· TIN Reference file
· Query-Only file (can only be submitted once per quarter)
GHP Expanded submitters who have chosen HTTPS as their file submission method can upload the following test and production files:
· MSP Input File
· TIN Reference File
· Non-MSP Input File
· Query-Only Input File (can only be submitted once per quarter)
Non-GHP submitters who have chosen HTTPS as their file submission method can upload the following test and production files:
· Claim Input File
· TIN Reference File
· Query-Only file (can only be submitted once per quarter)
Note:
Test files can only be uploaded once the RRE is in a “Testing” status.
An E-mail is sent to the Authorized Representative and Account Manager to
notify them of the change in status to “Testing.” At that point the RRE may
begin test file submissions. Test files can still be submitted after the RRE is
in “Production” status, to test internal changes for a specific condition Refer
to Chapter 15 for more information about Test file processing.
Follow the steps below to successfully upload test and production Section 111 Input Files.
1. From the RRE Listing page select “Upload File” from the Actions dropdown box for the applicable RRE ID and click Go.

Figure 97: Actions Dropdown Box, Upload File Selected
2. The File Upload page displays for the selected RRE.
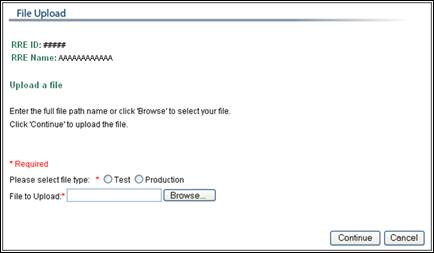
Figure 98: File Upload Page
3. Specify the type of file to be uploaded, Test or Production.
4. Click Browse to specify the file location and file name to be uploaded, or type in the file path and name, if you know it.
5. Click Continue. Do not logoff of the Section 111 COBSW or close any associated browser window until the file upload is complete. The Upload Successful page displays.
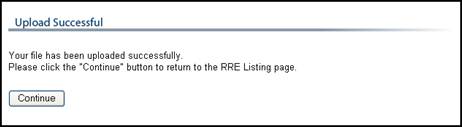
Figure 99: Upload Successful Page
6. Click Continue. The RRE Listing page displays.
Submitted files may be rejected or suspended from processing due to severe errors or if they meet certain threshold checks. Please refer to the Section 111 Reporting User Guides for more information on these edits.
Any input file with a severe error, such as a missing header or trailer record, will automatically be rejected and deleted by the system. The system generates an E-mail to inform the Account Manager that the file was rejected and lists the severe error found. This file status will also be displayed on the File Listing page under the associated RRE ID. The file must be corrected and resubmitted. If the rejected file is a required, quarterly submission of your MSP Input or Claim Input File, then it must be resubmitted as soon as possible. You should not wait for your file submission period for the next quarter. Contact your COBC EDI Representative if you have questions.
The COBC has in place certain threshold checks that will suspend files from processing temporarily until an EDI Representative investigates the situation with the RRE, and makes a determination to reject the file or allow it to process normally. The threshold checks are applied to the GHP MSP and Non-MSP Input Files as well as the Non-GHP Claim Input File. The threshold restrictions are in place to catch files that are suspected to be erroneous before the COBC completes processing and updates Medicare’s databases. These threshold checks include looking for a file that has an unusually larger number of deletes, a large number of records in error, or the submission of more than one required file per quarter.
The system generates an E-mail to inform the Account Manager that the file has been suspended from processing and lists the threshold error found. This file status will also be displayed on the File Listing page under the associated RRE ID. An Account Manager or Account Designee must contact the EDI Representative assigned to the RRE ID to discuss and resolve the file threshold error. The file may be released for processing or if sent in error deleted by the EDI Representative in which case a corrected file must be submitted as instructed.
Refer
to the Appendix for documentation on the E-mails sent regarding files with
threshold and severe errors.
Note:
If you uploaded the wrong input file by mistake, please contact your EDI
Representative immediately. ![]()
An RRE has the ability to monitor test and production file submission processing and history. As files are received by the application, file information is saved and stored on a database, and a status code is used to track the file as it processes through the system. Account Managers and Account Designees may review this information to ascertain what processing has been performed. Refer to the Section 111 Reporting User Guides for more information on file processing results.
File submission information available for viewing:
· Submission file statistics related to the RRE ID
· Historical processing and statistics
· Submission timeframes
· Notices of late and early submissions
· Statistical information associated with processed files (e.g. records received, adds, updates, deletes, beneficiary matches, edit errors, etc.). Statistical information varies depending on processing stage and file type.
Account Managers and Account Designees can also review information related to previously submitted files, for a one-year period. This information includes receipt date, process completion date, transmittal date, and file status, as well as all available statistical information. Follow the steps detailed below to monitor submission file processing.
1. To view production file processing information, from the RRE Listing page, select “File Processing Results” from the Actions dropdown box and click Go.

Figure 100: Actions Dropdown Box, File Processing Results Selected
2. The File Listing page displays for the RRE. The following section details the listed information.
The File Listing page displays all submitted production files for an RRE, categorized by File ID and broken into subfiles by Record Type. Response files are sent to the RRE using the same transmission method that was selected for uploaded files. Files transmitted using the HTTPS method will have response files available for download on the File Listing page. This page displays the results after the COBC has processed your production input files.
After files have been processed by the COBC, they are separated into components depending on how the files were submitted, the File Type and record identifiers within. For example, when a GHP MSP Input File is submitted with the TIN Reference File concatenated (two logical files separated by headers and trailers submitted in one physical file), after it is processed by the COBC, it is split into its component parts; namely, the MSP Input File denoted with a Record Type of MS and the TIN Reference File denoted with a Record Type of TN. Likewise, a Liability/No-Fault/Workers’ Compensation Claim Input File submitted with a TIN Reference File concatenated will be split into its component parts with a Record Type of CL for the Claim Input File records and TN for the TIN Reference File records.
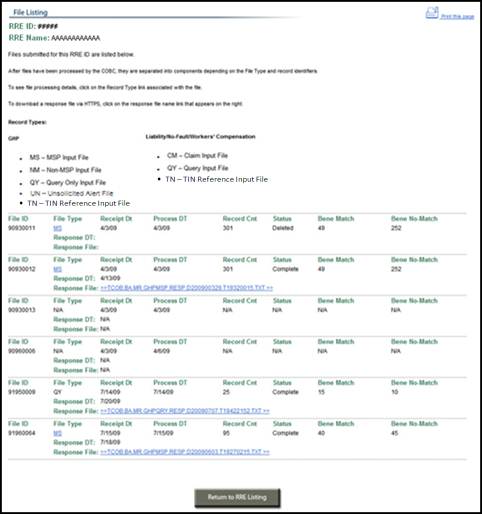
Figure 101: File Listing Page
Table 31: File Listing Page Field Descriptions
|
Field |
Description |
|
File ID |
File ID for the submitted file. Generated automatically by the system. |
|
File Type |
Type of submitted file. GHP: MSP, Non-MSP, Query, TIN Reference, Unsolicited Alert NGHP: Claim, Query Only, TIN Reference |
|
Receipt Dt |
Date the file was received and acknowledged by the COBC. |
|
Process DT |
Date the COBC began processing on the file. MSP and Claim Input Files submitted early will be held and processed later during the assigned file submission timeframe. |
|
Record Cnt |
Number of records in a submitted file not including header or trailer records. |
|
Status |
Status of the submitted file. Options are: Received Processing Completed Early Submission Deleted Threshold Error Severe Error |
|
Bene Match |
Number of records matched to a Medicare beneficiary. |
|
Bene No-Match |
Number of records not matched to a Medicare beneficiary (‘51’ Disposition Code.) |
|
Record Count |
Total record count of the component file not including header and trailer records. |
|
Response DT |
Date the COBC created the corresponding response file |
|
Response File |
Click the link to download the associated HTTPS response file. SFTP and Connect:Direct files will be sent automatically. |
|
Return to RRE Listing |
Command button: Click to return to the RRE Listing page. |
Click on the File
Type link and the File
Detail page displays, listing
statistics associated with the file. The statistics will vary, depending on the
type of file submitted. No further processing details are available for Query
or TIN Reference Files. Only files in a Completed status will have file processing
details available.
This page displays more detailed information about the file you selected. The File Detail page lists:
RRE ID: Responsible Reporting Entity ID the file was submitted under.
File ID: File processing number assigned by the COBC. Have this ID on hand when contacting your EDI Representative with questions or issues concerning submitted files.
Sub File ID: Sub file (component file) processing number assigned by the COBC. Have this ID on hand when contacting your EDI Representative with questions or issues concerning submitted files.
Record Type:
GHP
· MS—MSP Input File
· NM—Non-MSP Input File
· QY—Query Only Input File
· TN—TIN Reference File
· UN—Unsolicited Alert File
Liability/No-Fault/Workers’ Compensation
· CL—Claim Input File
· TN—TIN Reference File
· QY—Query Input File
The information shown on the File Detail page depends on the type of file selected. Different counts display for each File Type.
This page lists detailed record information for the submitted MSP Input File.
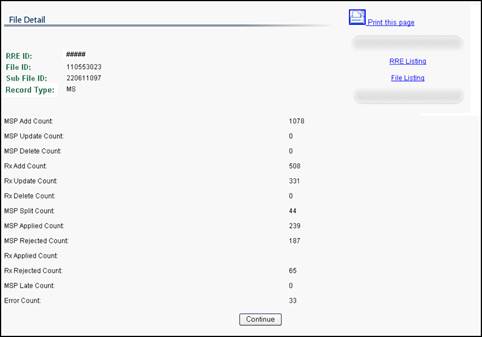
Figure 102: MSP File Detail Page
Table 32: MSP File Detail Page Field Descriptions
|
Field |
Description |
|
RRE ID |
RRE Identification number assigned by the system. |
|
File ID |
File ID for the submitted file. Generated automatically by the system. |
|
Sub File ID |
Used internally by the system to keep track of submitted files when an RRE submits a file that contains more than one type of file inside it. Ex: a submission file containing both an MSP or Claim Input File and a TIN Reference File. |
|
Record Type |
Type of submitted file. MS MSP CM Claim |
|
MSP Add Count |
Number of medical/hospital MSP add records submitted. |
|
MSP Update Count |
Number of medical/hospital MSP update records submitted. |
|
MSP Delete Count |
Number of medical/hospital MSP delete records submitted. |
|
Rx Add Count |
Number of prescription drug MSP add records submitted. A record could be counted in the MSP Add Count and this count if it reflects medical/hospital coverage as well as drug coverage. |
|
Rx Update Count |
Number of prescription drug MSP update records submitted. A record could be counted in the MSP Update Count and this count if it reflects medical/hospital coverage as well as drug coverage. |
|
Rx Delete Count |
Number of prescription drug MSP delete records submitted. A record could be counted in the MSP Delete Count and this count if it reflects medical/hospital coverage as well as drug coverage. |
|
MSP Split Count |
Number of response file records with a ‘Y’ in the Split Entitlement Indicator. One input record can result in more than one MSP occurrence due to breaks in Medicare entitlement. |
|
MSP Applied Count |
Total number of add, update and delete medical/hospital coverage input records receiving an ‘01’ disposition code. Number of medical/hospital MSP records that were accepted and correctly applied at CWF (CMS’s Common Working File). |
|
MSP Rejected Count |
Total number of add, update and delete medical/hospital coverage input records receiving a disposition code other than ‘01’. Number of medical/hospital MSP records that were returned in error, not matched to a Medicare beneficiary or still being processed and not applied at CWF (CMS’s Common Working File). |
|
Rx Applied Count |
Total number of add, update and delete prescription drug coverage input records receiving an ‘01’ Rx disposition code. Number of drug MSP records that were accepted and correctly applied on the Medicare Beneficiary Database (MBD). Note that one input record could generate a medical/hospital MSP occurrence and a prescription drug MSP occurrence and in that case be counted in both applied count fields. In addition, the medical/hospital coverage could be accepted and the drug coverage rejected and vice versa. |
|
Rx Rejected Count |
Total number of add, update and delete prescription drug coverage input records receiving an Rx disposition code other than ‘01’. Number of drug MSP records that were rejected and not applied on the Medicare Beneficiary Database (MBD). Note that one input record could generate a medical/hospital MSP occurrence and a prescription drug MSP occurrence and in that case be counted in both rejected count fields. In addition, the medical/hospital coverage could be accepted and the drug coverage rejected and vice versa. |
|
MSP Late Count |
Number of add records that were submitted late and were processed but flagged with a “Y” in the Late Submission Indicator on the response file record. Note: If the individual is under the age of 45 of the MSP Effective Date, the Late Submission Indicator will NOT be set to “Y.” |
|
Error Count |
Number of records found to contain errors and returned on the response file with a ‘SP’ disposition code. |
|
Continue |
Command button: Click to return to the File Listing page. |
This page lists detailed record information for a Non-MSP Input File submitted with ‘N’ and ‘D’ records.
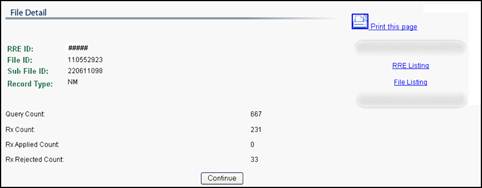
Figure 103: Non-MSP File Detail Page
Table 33: Non-MSP File Detail Page Field Descriptions
|
Field |
Description |
|
RRE ID |
RRE Identification number assigned by the system. |
|
File ID |
File ID for the submitted file. Generated automatically by the system. |
|
Sub File ID |
Used internally by the system to keep track of submitted files when an RRE submits a file that contains more than one type of file inside it. Ex: a submission file containing both an MSP or Claim Input File and a TIN Reference File. |
|
Record Type |
Type of submitted file. NM Non-MSP |
|
Query Count |
Number of ‘N’ query records submitted. |
|
Rx Count |
Number of ‘D’ supplemental drug records submitted. |
|
Rx Applied Count |
Total number of ‘D’ records resulting in updates to the Medicare Beneficiary Database (MBD). Records that received an ‘01’ disposition code on the corresponding response file record. |
|
Rx Rejected Count |
Total number of ‘D’ records rejected with a disposition code other than ‘01’. |
|
Continue |
Command button: Click to return to the File Listing page. |
After reviewing file activity, click the File Listing link at the right of the page to return to the File Listing page. Or click the RRE Listing link to return to the RRE Listing page.
This page lists detailed record information for a submitted Claim Input File.
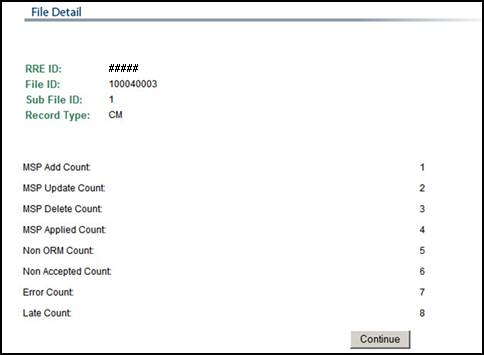
Figure 104: Claim File Detail Page
Table 34: Claim File Detail Page Field Descriptions
|
Field |
Description |
|
RRE ID |
RRE Identification number assigned by the system. |
|
File ID |
File ID for the submitted file. Generated automatically by the system. |
|
Sub File ID |
Used internally by the system to keep track of submitted files when an RRE submits a file that contains more than one type of file inside it. Ex: a submission file containing both a Claim or Input File and a TIN Reference File. |
|
Record Type |
Type of submitted file. CM Claim |
|
MSP Add Count |
Number of NGHP Claim add records submitted. |
|
MSP Update Count |
Number of NGHP Claim update records submitted. |
|
MSP Delete Count |
Number of NGHP Claim delete records submitted. |
|
MSP Applied Count |
Total number of add, update and delete NGHP Claim input records receiving an ‘01’ disposition code. Number of MSP records that were accepted and correctly applied at CWF (CMS’s Common Working File). |
|
Non ORM Count |
Total number of add, update and delete NGHP Claim input records receiving an ‘02’ disposition code. Number of claim records without ORM that were accepted without error. |
|
Non Accepted Count |
Number of claims that were error free and matched to a beneficiary, but the period of time reflected on the claim report did not overlap the beneficiary’s Medicare Coverage dates. |
|
Error Count |
Number of records found to contain errors and returned on the response file with a ‘SP’ disposition code. |
|
Late Count |
Number of add records that were submitted late and were processed but flagged with a compliance error on the response file record. Note: If the individual is under the age of 45 as of the CMS Date of Injury, the submission will not be considered late. |
|
Continue |
Command button: Click to return to the File Listing page. |
After reviewing file activity, click the File
Listing link at the right of the page to return to the File
Listing page. Or click the RRE Listing link
to return to the RRE Listing page

Test and production response file downloads can be performed directly through the Section 111 COBSW user interface using the HTTPS protocol. This option is only available to RREs that selected HTTPS during Account Setup. The RRE has the option of changing the electronic file submission methodology; however, you must contact your EDI Representative to make this change for you. The system maintains response files for downloading for 2 calendar quarters (180 days). There is no limit to the number of times a file can be downloaded in that time.
Both Account Managers and Account Designees associated with the RRE ID can download response files. RREs or their agents must develop software to process response files and take Actions on the disposition codes and other information provided. For guidance on interpreting response files, refer to the GHP or Non-GHP reporting user guides available at http://www.cms.hhs.gov/MandatoryInsRep.
GHP Basic submitters who have selected the HTTPS file transmission method can download the following files:
· MSP Response File
· Query Only Response File
· TIN Reference Response File
· Unsolicited Alert File
GHP Expanded submitters who have selected the HTTPS file transmission method can download the following files:
· MSP Response File
· Non-MSP Response File (including RDS Non-MSP Response Files)
· Query Only Response File
· TIN Reference Response File
· Unsolicited Alert File
NGHP (Liability/No-Fault/Workers’ Compensation) submitters can download the following files:
·
Claim Response File
·
Query Response File
·
TIN
Response File
Refer to the next chapter for more information about Test file processing. To successfully download production response files, complete the following steps:
1. Next to the applicable RRE ID, select “File Processing Results” from the Actions dropdown box on the RRE Listing page and click Go.
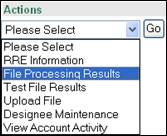
Figure 105: Actions Dropdown Box, File Processing Results Selected
2. The File Listing page displays for the RRE ID.
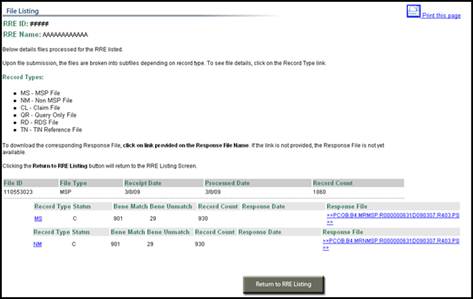
Figure 106: File Listing Page
3. Click the link formed by the response file name inside the double arrows (>> >>) associated with the completed file.
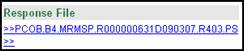
Figure 107: Download Response File Link
4. The File Save options display. The Save dialog box displays.
5. Select a location on your computer or network from the Save In field at the top of the Save dialog box.
6. Enter a file name of your choosing the File Name field.
7.
Click Save in the Save
dialog box.
Note: Leave the File Download dialog box and all browser pages
open during the download. Do not log off or close your browser. You
must stay logged on to the Section 111 COBSW with an active session during the
download process.
8. After completing your download, click the Return to RRE Listing button at the bottom of the page.
9. The system then displays the RRE Listing page.
Please refer to the MMSEA Section 111 MSP Mandatory Reporting GHP User Guide and the MMSEA Section 111 MSP Mandatory Reporting Liability Insurance (Including Self-Insurance), No-Fault Insurance, and Workers’ Compensation User Guide located under the Reference Materials menu option or on http://www.cms.hhs.gov/MandatoryInsRep for requirements regarding testing Section 111 files.
Test files are limited to a maximum of 100 records each.
Account Managers and Account Designees can submit test files for the RRE ID. Test files can only be uploaded once the RRE ID account is in “Testing” status. An E-mail is sent to the Authorized Representative and Account Manager to notify them of the change in status to “Testing.” At that point the RRE may begin test file submissions. The RRE account cannot be set to “Testing” status until a signed profile report has been received.
Test files can still be submitted after the RRE is in “Production” status, to test internal changes for a specific condition or continue testing after you have passed the COBC testing requirements.
Agents may perform testing on behalf of RREs. At the RRE’s discretion, individuals from an RRE’s reporting agent company may play the role of Account Manager for the RRE ID but more typically is invited by the RRE’s Account Manager to register as Account Designees. If an agent is submitting files on behalf of an RRE, the agent must submit test files and pass the testing requirements for each RRE ID he is providing this service for. In other words, even if an agent passes the testing process for one RRE ID, it is still required to submit test files for each subsequent RRE ID he represents. Testing and production statuses are tracked in the system by RRE ID.
Note: Aside from a separate agency, the Account Manager or Account Designee can also act as the Reporting Agent, although a Reporting Agent is not required.
RREs must submit test files in the same manner as the method they chose for submitting production files. All users associated with the RRE ID can monitor the status of the testing process no matter what file transmission method is used. Follow the steps below to monitor test file processing.
1. From the RRE Listing page, next to the applicable RRE ID, select “Test File Results” from the Actions dropdown box and click Go.
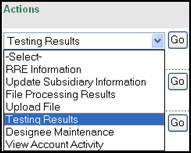
Figure 108: Actions Dropdown Box, Testing Results Selected
2. A File Listing page showing only submitted test file information displays for the RRE ID.

Figure 109: File Listing Page, Submitted Test File Information
3. Click
on the Record
Type link and the File Detail page displays, listing
statistics associated with the file. The statistics will vary, depending on the
type of file submitted. You will use the counts shown on the File Detail
page to determine whether the submitted MSP Input or Claim Input test files
passed the testing criteria specified in the reporting user guides (e.g. 25
Adds were successfully processed on the initial test file, etc.).
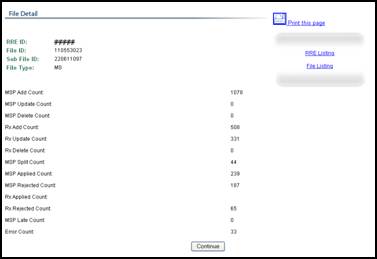
Figure 110: File Detail Page
4. After reviewing test file activity, click the Return to RRE Listing button at the bottom of the page.
5. The system then displays the RRE Listing page.
The system places the RRE ID in “Production” status after testing requirements have been successfully completed. An E-mail is then sent to the Authorized Representative and Account Manager, notifying them of the status change. Once an RRE ID has been moved to “Production,” test files can still be submitted at the discretion of the RRE.
All activity performed for an RRE ID account can be reviewed. This function can be initiated from the RRE Listing page. The system provides an Account Activity History page that lists Activity Date, User name, and Activity Description including:
· Account Designee invited
· Account Designee registered
· Account Designee removed
· File uploaded(by type)
· File downloaded(by type)
· RRE Name & Address changed
· RRE file transmission information changed
· RRE GHP reporting option (basic/expanded) changed
1. From the RRE Listing page, next to the applicable RRE ID, select “View Account Activity” from the Actions dropdown box and click Go.
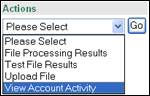
Figure 111: Actions Dropdown Box, View Account Activity Selected
2. The Account Activity page displays for the RRE, listing the date, description, and associated user’s name for each event logged to the audit file for this RRE ID. In the case that no User name was applicable or the action was made by the system, this field defaults to a system-generated value. To print the Account Activity page, click the Print this Page link in the upper right corner of the page.
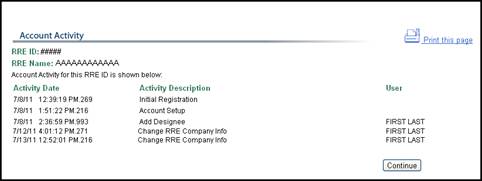
Figure 112: Account Activity Page
3. After reviewing the account activity, click Continue to return to the RRE Listing page.
![]() Non-GHP
RREs can change their submission method from file submission to the Direct Data
Entry (DDE) method. With the DDE method, instead of creating a flat file, RREs
enter claim data directly into the web site.
Non-GHP
RREs can change their submission method from file submission to the Direct Data
Entry (DDE) method. With the DDE method, instead of creating a flat file, RREs
enter claim data directly into the web site.
Please note that once the DDE option is selected you will not be able to upload any more files, including claim or query files, and testing is not required for RREs using the DDE submission method.
Note: Although you can register for the DDE method beginning in October 2010, you will not be able to submit claim records with this method until early 2011.
Issues to Consider Before Selecting the DDE
Method:
· The DDE method is intended for RREs who expect to have only an occasional claim report to make. RREs that must frequently report claims should use one of the other current file submission methods (HTTPS, SFTP, Connect:Direct).
· RREs using the DDE method are required to report the same claim information as those RREs using the other file submission methods. Due to the amount of information required, manual data entry for a single claim report may take a considerable amount of time.
· RREs using the DDE method can only submit 500 or fewer claims per calendar year.
· When the information entered for an injured party does not match to a Medicare beneficiary, the claim submission still counts against the RRE’s limit of 500 claims per year, and reduces the number of remaining transactions by 1.
Take the following steps to register for the DDE submission method.
1. From the RRE Listing page, next to the applicable RRE ID, select “Register for DDE” from the Actions dropdown box and click Go.

Figure 113: Actions Dropdown Box
2.
The Register for DDE page displays with a
description of the DDE submission option. 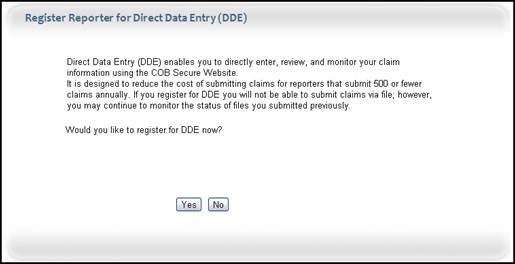
Figure 114: Register for DDE Page
3. Click Yes to register for the DDE method. The RRE Listing page then redisplays, with the submission period for the RRE changed to 0, since DDE claims can be submitted at any time. If the RRE’s previous status was “Test,” the status is updated to “Production.” If the RRE’s previous status was “Setup,” status will not be updated to “Production” until after your signed Profile Report is received.
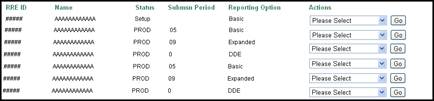
Figure 115: RRE Listing Page
4. Once the signed Profile Report has been received and the RRE has been changed to “Production” status, the new actions “New Claim” and “Claim Listing” are displayed on the dropdown list. In addition, the “Upload File” action is removed from the dropdown list, since RREs are not allowed to submit files after they have registered for the DDE submission method.
The New Claim function is available to RREs using the Direct Data Entry method. RREs that have chosen the Direct Data Entry method can submit claims by manually entering beneficiary, insurance, representative, and claimant information on the COBSW. Since there is a significant amount of information needed to submit a claim, claim information can be entered incrementally, and claims can be saved as information is entered. This allows you to submit the claim at a later time, if more information is needed than what you have on-hand.
Claims entered using the DDE method can be saved for up to 30 calendar days. At that point, the claim must be submitted or it will be deleted from the system on the 31st day. On the 15th day, an E-mail notification will be sent to you, reminding you about claims that have been saved but not submitted. Refer to the Appendix for a sample notification E-mail.
Once all claim transactions are used for the calendar year, the following message displays:
“We're
sorry. There are no transactions remaining. This site will no longer permit you
to create or submit claims. Please contact your EDI Representative if you need
assistance.”
If you have a small amount of additional claims to enter, contact your EDI representative to increase your transaction limit. If you have a significant number of additional claims to enter, contact your EDI representative to change your submission method to one of the file transmission methods.
Note: Claims must be submitted within 45 calendar days of the Total Payment Obligation to the Claimant (TPOC) date, or within 45 calendar days of assuming Ongoing Responsibility for Medicals (ORM).
However, since retroactive reporting is required for certain ORM (ORM exists at any time prior to 1/1/2010 and continues on or after 1/1/2010) and certain TPOC Amounts (TPOC dates from 10/1/2010 through 12/31/2010), an exception will be made for these claim records to be reported outside the 45 calendar day grace period. But information for these ORMs and TPOCs must be submitted during the first calendar quarter of 2011. ORM termination date submission is required within 45 calendar days of the ORM termination date.
Take the following steps to enter a new claim record using the Direct Data Entry submission method.
1. From the RRE Listing page, next to the applicable RRE ID, select “New Claim” from the Actions dropdown box and click Go.

Figure 116: Actions Dropdown Box
2. The Injured Party Information page displays.
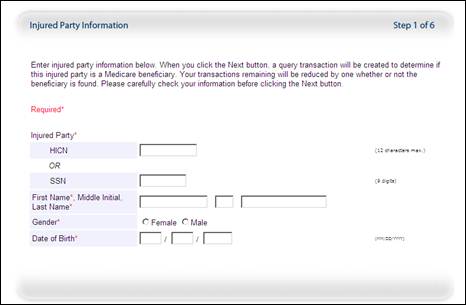
Figure 117: Injured Party Information Page
A summary of the claim you are entering displays along the right side of every page of the new claim entry process. It tracks all entries made for the claim, and includes the Claim ID, also known as the DCN (Document Control Number). Make note of the Claim ID; it can be used to quickly search for the claim on the Claim Listing page. See the next chapter for more information on the Claim Listing page.
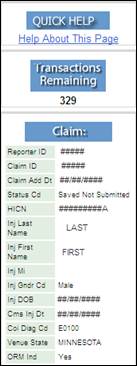
Figure 118: Claim Summary Bar
3. Enter the required information for the injured party in question then click Next. (Enter either a HICN or SSN. If both are entered, the search will be performed using the HICN.)
4. If the insured party is NOT a Medicare beneficiary, the Beneficiary Not Found page displays. Click the Print this Page icon to print for your record.

Figure 119:
Beneficiary Not Found Page
5. Click OK to go to the Claim Listing page.
6. If the insured party IS a Medicare beneficiary, the Injury Information page displays.
Enter injury information for the selected Medicare beneficiary on this page.
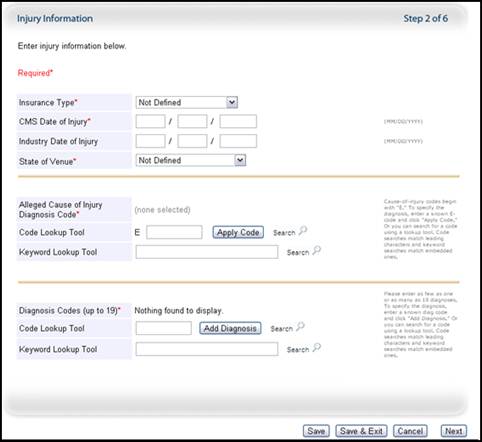
Figure 120: Injury Information Page
Note: All claim information that has been entered and saved is displayed in the column on the right of the screen.
Table 35: Injury Information Page Field Descriptions
|
Field |
Description |
|
Insurance Type |
From the dropdown menu, select the type of insurance coverage or line of business provided by the plan policy or self-insurance for the injured party. Valid values: · No-Fault · Workers’ Compensation · Liability |
|
CMS Date of Injury |
Enter the date of injury as defined by CMS: · For an automobile wreck or other accident, the date of incident is the date of the accident. · For claims involving exposure (including, for example, occupational disease and any associated cumulative injury) the DOI is the date of first exposure. · For claims involving ingestion (for example, a recalled drug), it is the date of first ingestion. · For claims involving implants, it is the date of the implant (or date of the first implant if there are multiple implants). |
|
Industry Date of Injury |
Enter the date of injury used by the insurance/workers’ compensation industry: · For an automobile wreck or other accident, the date of incident is the date of the accident. · For claims involving exposure, ingestion, or implantation, the date of incident is the date of last exposure, ingestion, or implantation. Optional. |
|
State of Venue |
From the dropdown menu, select the state (including Guam, Puerto Rico, Washington DC, and the US Virgin Islands) whose law controls the resolution of the claim. Note: For Federal Tort Claims Act liability insurance or a Federal Workers’ Compensation claim, select “US” as the state of venue. |
|
Alleged Cause of Injury Diagnosis Code |
ICD-9 External Cause of Injury Code “E Code” describing the alleged cause of injury/illness. This field is view-only and cannot be changed. |
|
Code Lookup Tool |
Enter a full or partial ICD-9 injury diagnosis code |
|
Keyword Lookup Tool |
Enter a full or partial description of an injury diagnosis code |
|
Diagnosis Codes |
ICD-9 Diagnosis Codes describing the alleged injury/illness. This field cannot be edited. |
|
Code Lookup Tool |
Enter a partial ICD-9 diagnosis code to search for the appropriate code. |
|
Keyword Lookup Tool |
Enter a full or partial description of a diagnosis code to search for the appropriate code. |
Table 36: Injury Information Page Command Buttons
|
Button |
Description |
|
Delete Icon |
Click to remove a diagnosis code. |
|
Apply Code |
Click to apply an injury diagnosis code. |
|
Search (Apply Code) |
Click to search for an injury diagnosis code using the data entered. |
|
Add Diagnosis |
Click to apply a diagnosis code. |
|
Search (Add Diagnosis) |
Click to search for a diagnosis code using the data entered. |
|
Save |
Click to save all information entered for the claim. |
|
Save & Exit |
Click to save all valid information entered and go to the Claim Listing page |
|
Cancel |
Click to leave the page without saving the information entered |
|
Next |
Click to navigate to the next page |
7. Enter the requested information. To add a Cause of Injury diagnosis code, enter the code in the Injury Diagnosis Code Lookup Tool field or the full description in the Keyword Lookup Tool field then click Apply Code.
8.
To search for a Cause of Injury diagnosis code, enter a
partial code in the Code Lookup Tool field or a partial
description in the Keyword Lookup Tool field, and click the Search
icon. The Injury Diagnosis Lookup page then displays.
Note: Code searches match leading characters and keyword
searches match embedded characters.
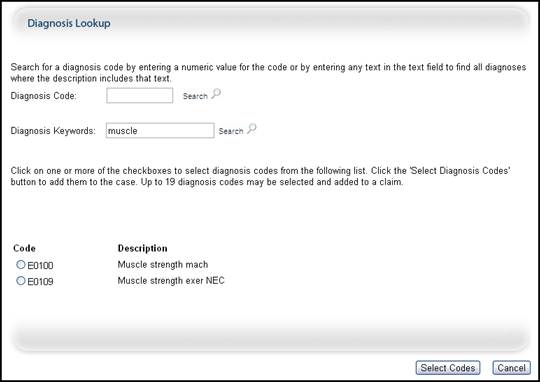
Figure 121: Injury Diagnosis Lookup Page
9. Select the desired cause of injury diagnosis code from the list then click Select Codes. You also have the option to search for additional codes by entering new information in the Diagnosis Code or Diagnosis Keywords fields then clicking Search.
10. After clicking Select Codes, the Injury Information page redisplays, with the selected cause of injury diagnosis code added as a view-only value.
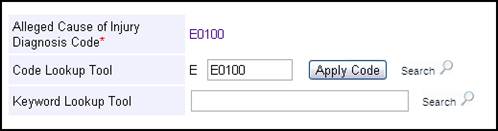
Figure 122: Injury Information Page, Cause of Injury Diagnosis Code Added
11. If the Alleged Cause of Injury is incorrect or must be changed, enter or search for a new code using the Cause of Injury Code Lookup Tool field. The newly entered code will replace the existing injury diagnosis code.
12. To add an Injury Diagnosis code, enter the code in the Diagnosis Code Lookup Tool field or the full description in the Keyword Lookup Tool field then click Add Diagnosis.
13. To
search for a Diagnosis code, enter a partial code in the Code
Lookup Tool field or a partial description in the Keyword
Lookup Tool field, and click the Search icon. The Diagnosis
Lookup page then displays.
Note: Code searches match leading characters and keyword
searches match embedded characters.
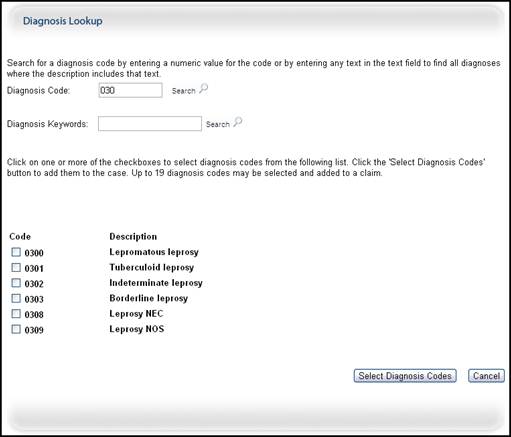
Figure 123: Diagnosis Lookup Page
14. Select the desired diagnosis code from the list then click Select Diagnosis Codes. You can add up to 19 diagnosis codes to a claim.
15. You also have the option to search for additional codes by entering new information in the Diagnosis Code or Diagnosis Keywords fields then clicking Search.
16. After clicking Select Diagnosis Codes, the Injury Information page redisplays, with the selected diagnosis codes added as view-only values.
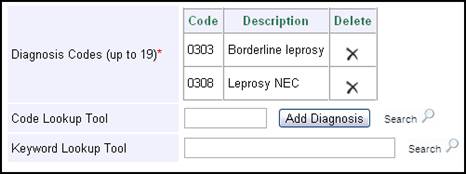
Figure 124: Injury Information Page, Diagonsis Codes Added
17. To remove a diagnosis code, click the Delete icon next to the code.
18. After entering all necessary information, click Save to save all information entered, or click Save & Exit to save all valid information entered and go to the Claim Listing page.
19. Click Next to go to the ORM and TPOC Information page.
Enter Ongoing Responsibility for Medicals and Total Payment Obligation to the Claimant for the selected Medicare beneficiary on this page, if applicable.
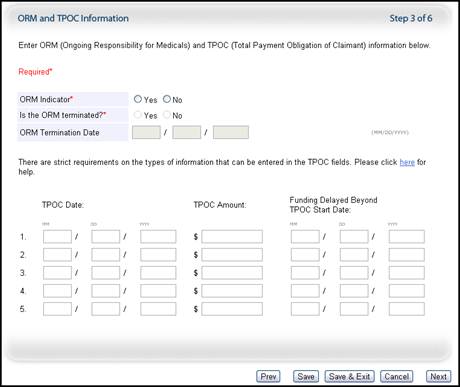
Figure 125: ORM and TPOC Information Page
Note: All claim information that has been entered and saved is displayed in the column on the right of the screen.
Table 37: ORM and TPOC Information Page Field Descriptions
|
Field |
Description |
|
ORM Indicator |
If there is Ongoing responsibility for medicals (ORM) for the injured party, click Yes. Otherwise, click No. |
|
Is the ORM terminated? |
If the ORM has ended, click Yes. Otherwise select No. ORM is not terminated if the injured party can still submit/apply for payment for additional medicals related to the claim. Required field if the ORM Indicator is set to Yes. |
|
ORM Termination Date |
Enter the date the ORM ended, if applicable. This field is enabled only if ORM Terminated is set to Yes. The ORM Termination Date must be greater than the CMS Date of Injury. Note: Future dates are accepted, but not more than 6 months greater than the claim submission date. |
|
TPOC Date |
Enter the date of associated Total Payment Obligation to the Claimant. Use the date the payment obligation was established. Optional for No-Fault insurance. |
|
TPOC Amount |
Enter the dollar amount of the TPOC. If there is a structured settlement, the amount is the total payout amount. If a settlement provides for the purchase of an annuity, it is the total payout from the annuity. For annuities, base the total amount upon the time period used in calculating the purchase price of the annuity or the minimum payout amount (if there is a minimum payout), whichever calculation results in the larger amount. Required if a TPOC date is entered. Please see the tables 38 and 39 for a summary of the mandatory TPOC reporting requirements. For more information on TPOC Amounts, refer to the NGHP User Guide under the References link on the Navigation menu. |
|
Funding Delayed Beyond TPOC Start Date |
If funding for the TPOC Amount(s) is delayed, enter the actual or estimated date of funding. |
Table 38: Mandatory Thresholds for Liability Insurance (Including Self-Insurance) TPOC Settlements, Judgments, Awards, or Other Payments
|
Total TPOC Amount |
TPOC Date On or After |
Section 111 Reporting Required in the Quarter Beginning |
|
TPOCs over $100,000 |
October 1, 2011 |
January 1, 2012 |
|
TPOCs over $50,000 |
April 1, 2012 |
July 1, 2012 |
|
TPOCs over $25,000 |
July 1, 2012 |
October 1, 2012 |
|
TPOCs over $5,000 |
October 1, 2012 |
January 1, 2013 |
|
TPOCs over $2,000 |
October 1, 2013 |
January 1, 2014 |
|
TPOCs over $300 |
October 1, 2014 |
January 1, 2015 |
Table 39: Mandatory Thresholds for Workers' Compensation TPOC Settlements, Judgments, Awards, or Other Payments
|
Total TPOC Amount |
TPOC Date On or After |
Section 111 Reporting
Required in the Quarter Beginning |
|
TPOCs over $5,000 |
October 1, 2010 |
January 1, 2011 |
|
TPOCs over $2,000 |
October 1, 2013 |
January 1, 2014 |
|
TPOCs over $300 |
October 1, 2014 |
January 1, 2015 |
Table 40: ORM and TPOC Information Page Command Buttons
|
Button |
Description |
|
Prev |
Click to return to the previous page |
|
Save |
Click to save all information entered |
|
Save & Exit |
Click to save all valid information entered and go to the Claim Listing page |
|
Cancel |
Click to leave the page without saving the information entered |
|
Next |
Click to navigate to the next page |
After entering all necessary information, click Save
to save all information entered then click Next to go to the Insurance
Information page. Or click Save & Exit to
save all valid information entered and go to the Claim Listing page.
To remove all previously reported TPOCs on a
previously accepted Claim Record with no ORM, locate the claim from
the Claim Listing page and select the Delete option from the Actions column. In this case, the previously accepted record
should never have been sent (i.e., the RRE submitted it in error, there was no
settlement, judgment, award, or other payment [including assumption of ORM]).
Enter the injured party’s insurance information on this page.
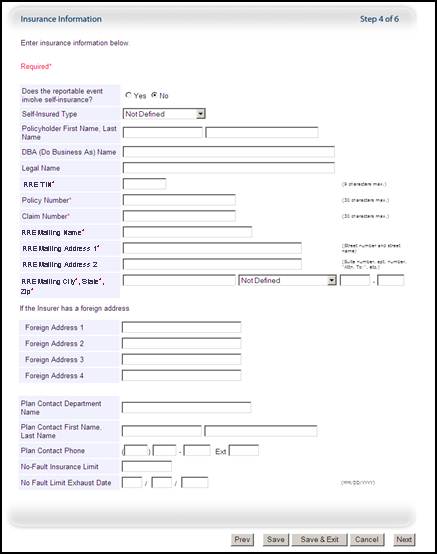
Figure 126: Insurance Information Page
Note: All claim information that has been entered and saved is displayed in the column on the right of the screen.
Table 41: Insurance Information Page Field Descriptions
|
Field |
Description |
|
Does the reportable event involve self-insurance? |
If the injured party is self-insured, click Yes. Otherwise, click No. Only Workers’ Compensation or Liability insurance qualifies as types of self-insurance. No-Fault insurance does not qualify. Optional. |
|
Self-Insured Type |
Select the injured party’s insurance type from the dropdown list. Options are: Not Defined (select this option if the injured party is not self-insured Individual Other than Individual (i.e. business, corporation, organization, company, etc.) Required if Self Insured indicator is set to Yes. |
|
Policyholder First Name, Last Name |
Enter the first and last name of the self-insured individual or policyholder. Required if the Self-Insured Type is Individual. |
|
DBA (Do Business As) Name |
Enter the “Doing Business As” Name of the self-insured organization or business. Required if the Self-Insured Type is Other than Individual, and the Legal Name is not provided. |
|
Legal Name |
Enter the legal name of the self-insured organization or business. Required if the Self-Insured Type is Other than Individual and the DBA Name is not provided. |
|
RRE TIN |
Enter the Federal Tax Identification Number of the applicable plan used by the RRE, whether Liability insurance (including self-insurance), No-Fault, or Workers’ Compensation. Note: For a foreign RRE without a valid IRS-assigned TIN, supply the pseudo-TIN created during Section 111 registration. Required. |
|
Policy Number |
Enter the unique identifier for the policy the underlying claim was filed under. Required. Note: Policy Number is not required when the insurance type is Self Insurance. |
|
Claim Number |
Enter the unique claim identifier used by the primary plan. Note: For Liability self-insurance or Workers’ Compensation self-insurance, fill with zeroes if you do not have a specific claim number. Required. |
|
RRE Mailing Name |
Enter the name of the RRE that should be used to address correspondence relating to the associated claim. This field is pre-populated with the RRE information entered during registration, but is open for editing. Required. |
|
RRE Mailing Address 1 |
Enter the first line of the primary mailing address of the RRE. This field is pre-populated with the RRE information entered during registration, but is open for editing. Required if FOREIGN COUNTRY is not selected as the RRE state. |
|
RRE Mailing Address 2 |
Enter the second line of the primary mailing address of the RRE. This field is pre-populated with the RRE information entered during registration, but is open for editing. Optional. Leave blank if FOREIGN COUNTRY is selected as the RRE state. |
|
RRE Mailing City, State, Zip |
Enter the city, state, and zip code of the RRE mailing address. These fields are pre-populated with the RRE information entered during registration, but is open for editing. Required if FOREIGN COUNTRY is not selected as the RRE state. |
|
Foreign Address 1 |
If the insurance company has a foreign address, enter the first line of the street address for the insurer’s foreign address. Required field for insurers with a foreign address. |
|
Foreign Address 2 |
Enter the second line of the insurer’s foreign address. Optional. |
|
Foreign Address 3 |
Enter the third line of the insurer’s foreign address. Optional. |
|
Foreign Address 4 |
Enter the fourth line of the insurer’s foreign address. Optional. |
|
Plan Contact Department Name |
Enter the department name for the plan contact. Note: All claim-related communication and correspondence should be sent to the plan contact. The plan contact is used for informal communications and not used for recovery demand notifications. Optional. |
|
Plan Contact First Name, Last Name |
Enter the first and last name for the plan contact. Optional. |
|
Plan Contact Phone |
Enter the phone number for the plan contact. Optional. |
|
No-Fault Insurance Limit |
Enter the dollar amount of limit on No-Fault insurance. Note: Fill with zeroes if the insurance type is Workers’ Compensation or Liability (including self-insurance). Required if Insurance Type is No-Fault. |
|
No Fault Limit Exhaust Date |
Enter the date the No-Fault benefit limits were reached or exhausted. Fill with zeroes if the No-Fault limit has not been reached/exhausted or if Insurance Type is Workers’ Compensation) or Liability (including self-insurance). |
Table 42: Insurance Information Page Command Buttons
|
Button |
Description |
|
Prev |
Click to return to the previous page |
|
Save |
Click to save all information entered |
|
Save & Exit |
Click to save all valid information entered and go to the Claim Listing page |
|
Cancel |
Click to leave the page without saving the information entered |
|
Next |
Click to navigate to the next page |
After entering all necessary information, click Save to save all information entered then click Next to go to the Representative Information page. Or click Save & Exit to save all valid information entered and go to the Claim Listing page.
Enter the injured party’s representative information on this page, if applicable. Representative information is required only if the injured party has a representative, such as an attorney or conservator. If you choose to enter representative information, fields marked with an asterisk (*) are required. If there is no representative, select “None” as the representative type, click Save, and then click Next to go to the next page.
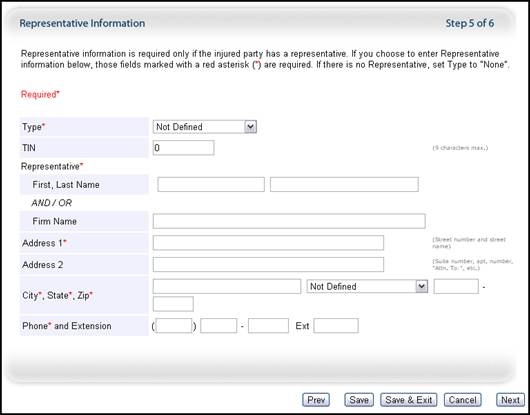
Figure 127: Representative Information Page
Note: All claim information that has been entered and saved is displayed in the column on the right of the screen.
Table 43: Representative Information Page Field Descriptions
|
Field |
Description |
|
Type |
Select the injured party’s representative type from the dropdown list. Options are: · None · Attorney · Guardian/Conservator · Power of Attorney · Other If the injured party has more than one representative, enter the injured party’s attorney information (if available). Required. |
|
TIN |
Enter the Representative’s Federal Tax Identification Number (TIN). If representative is part of a firm, enter the firm’s Employer Identification Number (EIN); otherwise supply the representative’s Social Security Number (SSN). Optional. |
|
Representative |
Header description on page |
|
First, Last Name |
Enter the first and last name of the injured party’s representative. If the injured party has a representative, this field is required if Firm Name is not entered. |
|
Firm Name |
Enter the firm name of the injured party’s representatives. If the injured party has a representative, this field is required if First Name, Last Name is not entered. |
|
Address 1 |
Enter the first line of the representative’s street address. If no US address is available, leave this field blank and select FOREIGN COUNTRY from the State dropdown list. Required if the injured party has a representative. |
|
Address 2 |
Enter the second line of the representative’s mailing address, such as Attention To, apartment number, or suite number. Optional. |
|
City, State, Zip |
Enter the city, state, and zip code for the representative’s mailing address. If no US address is available, leave this field blank and select FOREIGN COUNTRY from the State dropdown list. Required if the injured party has a representative. |
|
Phone and Extension |
Enter the telephone number (required) and the extension (optional) of the injured party’s representative. If no US phone number is available, leave this field blank and select FOREIGN COUNTRY from the State dropdown list. Phone number is required if the injured party has a representative. |
Table 44: Representative Information Page Command Buttons
|
Button |
Description |
|
Prev |
Click to return to the previous page |
|
Save |
Click to save all information entered |
|
Save & Exit |
Click to save all valid information entered and go to the Claim Listing page |
|
Cancel |
Click to leave the page without saving the information entered |
|
Next |
Click to navigate to the next page |
After entering all necessary information, click Save to save all information entered then click Next to go to the Claimant and Claimant Representative Listing page. Or click Save & Exit to save all valid information entered and go to the Claim Listing page.
For wrongful death or survivor action claims, use this page to add claimants and a claimant representative to a claim. Enter claimants other than the injured party, such as the beneficiary's estate, a family member, or another claimant.
If you are submitting a claim on behalf of a
living Medicare beneficiary, do NOT enter information on this page.
To bypass this page and continue the claim submission process, click Next.
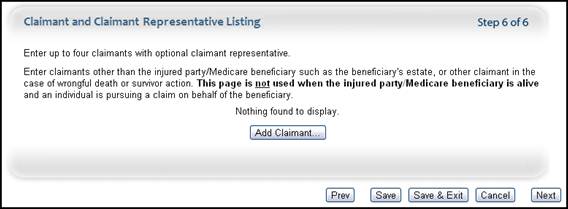
Figure 128: Claimanat and Claimant Representative Listing Page
To add claimant and claimant representative information to a claim, click Add Claimant. The Claimant and Claimant Representative Information page then displays.
Use this page to enter up to four claimants and a claimant representative. Claimant representative information is required only if the claimant entered at the top of the page has a representative, such as an attorney or conservator. If you choose to enter claimant representative information, fields marked with an asterisk (*) are required. If the claimant does not have a representative, select “None” as the claimant representative type. After all requested information is entered for the claimant, click Done with Claimant.
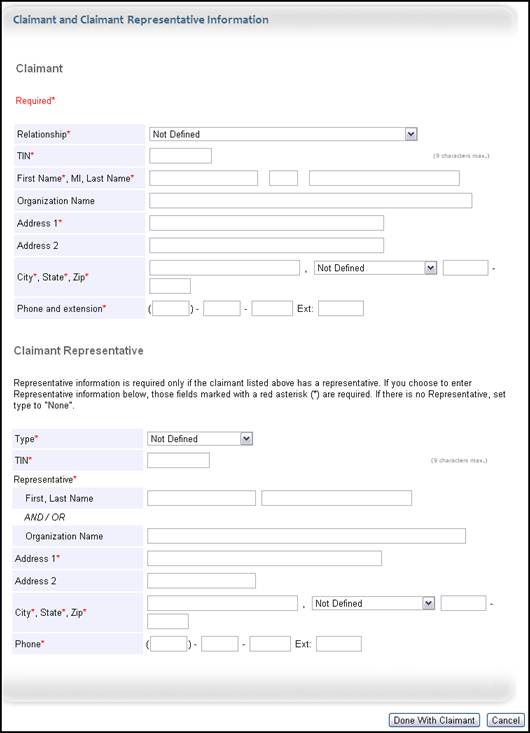
Figure 129: Claimant and Claimant Representative Information Page
Note: All claim information that has been entered and saved is displayed in the column on the right of the screen.
Table 45: Claimant and Claimant Representative Information Page Field Descriptions
|
Field |
Description |
|
Claimant |
Header description on page. |
|
Relationship |
Relationship of the claimant to the injured party/Medicare beneficiary. This field also indicates whether the claimant name refers to an individual or an entity/organization (e.g. “The Trust of John Doe” or “The Estate of John Doe”). Options are: · Estate, Individual Name Provided · Family Member, Individual Name Provided · Other, Individual Name Provided · Estate, Entity Name Provided (e.g. "The Estate of John Doe") · Family, Entity Name Provided (e.g. "The Family of John Doe") · Other, Entity Name Provided (e.g. "The Trust of John Doe") Required. |
|
TIN |
Federal Tax Identification Number (TIN), Employer Identification Number (EIN) or Social Security Number (SSN) of the claimant. Required. Note: Enter the unique TIN for each claimant entered. |
|
First Name, MI, Last Name |
Enter the first name, middle initial (optional), and last name of the claimant. Required if the claimant relationship is “Estate, Individual Name Provided;” “Family Member, Individual Name Provided;” or “Other, Individual Name Provided.” |
|
Organization Name |
Enter the name of the organization affiliated with the claimant. Required if the claimant relationship is “Estate, Entity Name Provided;” “Family, Entity Name Provided;” or “Other, Entity Name Provided.” |
|
Address 1 |
Enter the first line of the claimant’s street address. If no US address is available, leave this field blank and select “FOREIGN COUNTRY” from the State dropdown list. Required. |
|
Address 2 |
Enter the second line of the claimant’s mailing address, such as Attention To, apartment number, or suite number. Optional. |
|
City, State, Zip |
Enter the city, state, and zip code for the claimant’s mailing address If the claimant has a foreign address, select “FOREIGN COUNRTY” from the state dropdown list. Required. |
|
Phone and Extension |
Enter the telephone number (required) and the extension (optional) for the claimant. If no US phone number is available, leave this field blank and select “FOREIGN COUNTRY” from the State dropdown list. |
|
Claimant Representative |
Header description on page |
|
First, Last Name |
Enter the first and last name of the claimant’s representative. Required if the claimant has a representative and an Organization Name is not entered. However, information can be entered in both fields. |
|
Organization Name |
Enter the name of the organization affiliated with the claimant’s representative. Required if the claimant has a representative and a First and Last Name are not entered. However, information can be entered in both fields. |
|
Address 1 |
Enter the first line of the claimant representative’s street address. If no US address is available, leave this field blank and select “FOREIGN COUNTRY” from the State dropdown list. Required if the claimant has a representative. |
|
Address 2 |
Enter the second line of the claimant representative’s mailing address, such as Attention To, apartment number, or suite number. Optional. |
|
City, State, Zip |
Enter the city, state, and zip code of the claimant representative’s mailing address. If the claimant representative has a foreign address, leave these fields blank but select “FOREIGN COUNRTY” from the state dropdown list. Required. |
|
Phone |
Enter the telephone number for the claimant’s representative. If no US phone number is available, leave this field blank and select “FOREIGN COUNRTY” from the state dropdown list. Required if the claimant has a representative. |
Table 46: Claimant and Claimant Representative Information Page Command Buttons
|
Button |
Description |
|
Done With Claimant |
Click to save all information entered and add it to the claim |
|
Cancel |
Click to leave the page without saving the information entered |
After adding a claimant to a
claim, the Claimant and Claimant
Representative page redisplays, with the claimant’s name and the claimant
representative’s name displayed. Click Edit to make changes to claimant information that has
already been added. Click Delete to remove a claimant from the claim. If necessary,
click Add Claimant to add more claimants to a claim. Up to four
claimants can be entered on a claim.
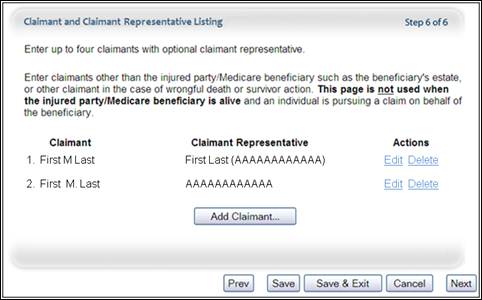
Figure 130:
Claimant and Claimant Representative Listing Page
After all claimant information has been entered and verified, click Save & Exit to go to the Claim Listing page. Or click Save to save all information entered then click Next. The Claim Confirmation page displays.
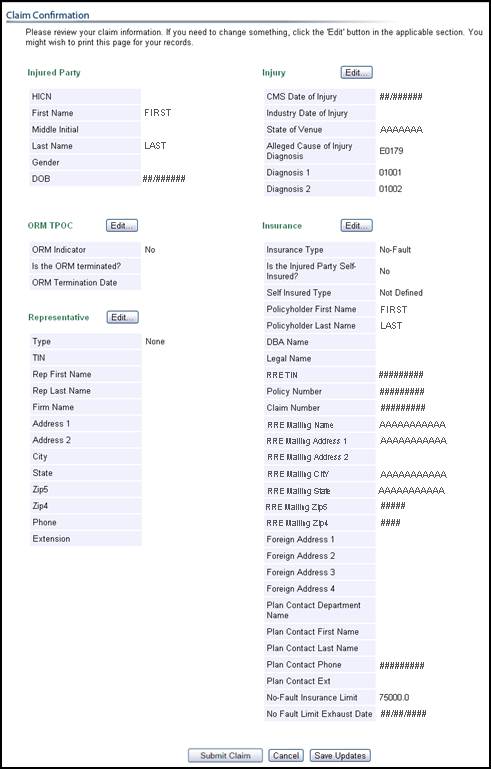
Figure 131: Claim Confirmation Page
To make changes to any information entered, click Edit next to the appropriate section. That page then displays, with all fields open for editing. You can update any pages before returning to the Claim Confirmation page by using the Prev and Next buttons to access the relevant pages. After making the necessary changes, navigate back to the Claim Confirmation page.
From here, you can save the claim by clicking Save Updates, which allows you to submit the claim at a later time. This is helpful if you would prefer to verify the information you have entered before submitting the claim. If you click Cancel, the following message displays:
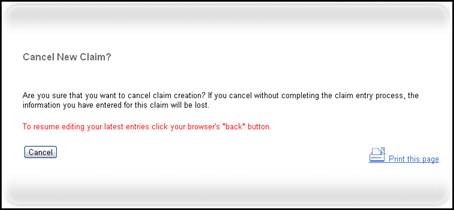
Figure 132: Cancel Claim Confirmation Page
If you clicked Cancel by mistake, click your browser’s “Back” button to return to the Claim Confirmation page. Otherwise, if you click Cancel on this message, any unsaved information entered for the claim will be deleted.
To submit the claim, click Submit Claim. The following message displays:
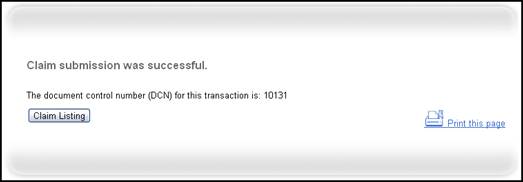
Figure 133: Successful Claim Submission Page
Retain the Document Control Number (DCN) for your records. The DCN will be helpful if you need to search for the claim at a later time. Click the Claim Listing button to go to the Claim Listing page. Refer to the next chapter for more information on the Claim Listing page.
The Claim Listing function is available to RREs using the Direct Data Entry method. This function is used to search for claim records that have previously been entered in order to complete or correct the data entered and submit the claim. You can also update previously submitted claims and delete saved claims.
Claims entered using the DDE method can be saved on the COBSW for 30 calendar days. At that point, the claim must be submitted or it will be deleted from the system on the 31st day. Before the end of the 30-day window, the COBSW will remind you about claims that were saved but not submitted. Refer to the Appendix for a sample notification E-mail.
1. From the RRE Listing page, next to the applicable RRE ID, select “Claim Listing” from the Actions dropdown box and click Go.
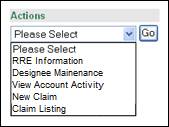
Figure 134: Actions Dropdown Box
2. The Claim Listing page displays.
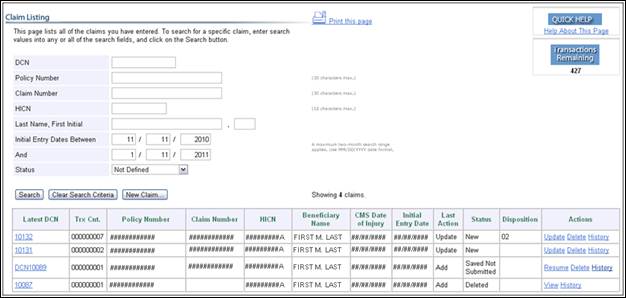
Figure 135: Claim Listing Page
Table 47: Claim Listing Page Field Descriptions
|
Field |
Description |
|
Remaining Transactions |
The number of remaining claims you can enter and submit in the current calendar year. |
|
DCN |
Enter the latest Document Control Number to search for a claim. The DCN is the number that displays after a claim is submitted, updated, or saved. The DCN is also displayed on each page of the claim entry process in the far-right column as the Claim ID. |
|
Policy Number |
Enter a Policy Number to search by |
|
Claim Number |
Enter a Claim Number to search by |
|
HICN |
Enter a Health Insurance Claim Number to search by |
|
Last Name, First Initial |
Enter a Last name and First Initial to search by |
|
Initial Entry Dates Between And |
Enter an initial claim entry date range to search by. Search within a two-month range. |
|
Status |
Select a claim status to search by. Options are: Not Defined: Default option. Returns claims in all statuses New: The claim has been submitted but not processed by the COBC Saved Not Submitted: At least one claim submission page has been entered and saved, but the claim has not been submitted yet In Progress: The claim has been submitted and is being processed by the COBC Completed: The claim has been submitted and processing is complete Deleted: The claim had at least one page saved and entered, but the entire record has been deleted |
|
Latest DCN |
The Document Control Number that was provided the last time the submitted claim was updated |
|
Trx Cnt. |
The number of transactions (Adds, Updates, and Deletes) for the claim |
|
Policy Number |
Policy number for the claim |
|
Claim Number |
Claim number for the claim |
|
HICN |
Health Insurance Claim Number for the claim |
|
Beneficiary Name |
Name of the beneficiary the claim was filed for |
|
CMS Date of Injury |
Date of Injury as defined by CMS: · For an automobile wreck or other accident, the date of incident is the date of the accident. · For claims involving exposure (including, for example, occupational disease and any associated cumulative injury) the DOI is the date of first exposure. · For claims involving ingestion (for example, a recalled drug), it is the date of first ingestion. · For claims involving implants, it is the date of the implant (or date of the first implant if there are multiple implants). |
|
Initial Entry Date |
Date the claim was first entered |
|
Last Action |
The most recent transaction on the claim. Options are: · Add: A new claim record has been created, or a claim record has been submitted. · Update: A change has been made to a previously submitted claim and the record has been resubmitted. · Delete: The claim has been deleted |
|
Status |
The current status of the claim. Options are: · New · Saved Not Submitted · Completed · In Process · Deleted |
|
Disposition |
2-digit code indicating the results after a claim was processed. Options are: · SP: Record processing resulted in an error and the record must be corrected · 01: MSP record successfully applied · 02: Record accepted, no MSP created · 03: Record accepted, no MSP created (Coverage period does not overlap with Medicare eligibility) See page 138 for more information on disposition codes. |
|
Actions |
Update claims, Resume the claim submission process, Delete a claim, or view the History of a claim by clicking on the desired link |
Table 48: Claim Listing Page Command Buttons
|
Button |
Description |
|
Search |
Click to search for a claim using the information entered |
|
Clear Search Criteria |
Click to reset all fields |
|
New Claim |
Click to enter a new claim |
3. Enter a value in any or all fields to search for a claim then click Search. The Claim Listing page redisplays, with a list of previously entered claims that match the search criteria entered.
Incomplete claims can be accessed from the Claim Listing page. Take the following steps to resume the claims submission process for claims in Saved Not Submitted status.
1. On the Claim Listing page, click the “Resume” link in the Actions field for the selected claim.
2. The Injury Information page displays for the selected claim, regardless of the last page that was completed and saved.
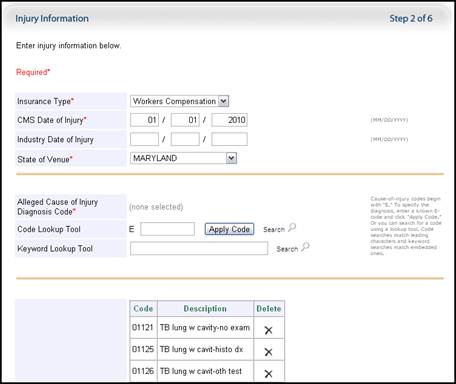
Figure 136: Resume Claim Submission Process, Injury Information Page Displayed
3. Use the Prev and Next buttons to access any pages you need to complete, making sure to click Save before going to the next page. After all pages are completed, the Claim Confirmation page displays.
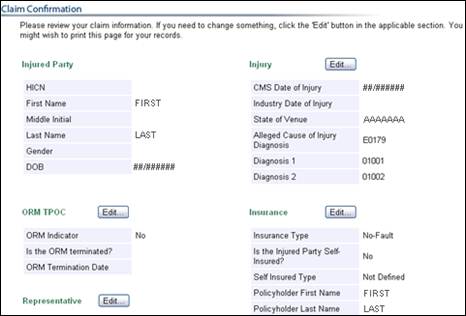
Figure 137: Claim Confirmation Page
4. On the Claim Confirmation page, verify that all information entered is correct. If not, click Edit next to the appropriate section to return to that page and make corrections.
5. Once all information is verified, you can save the claim by clicking Save Updates, which allows you to submit the claim at a later time.
6. To submit the claim, click Submit Claim.
7. The following message displays:
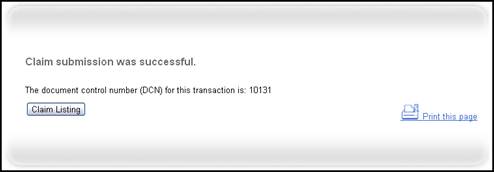
Figure 138: Successful Claim Submission Page
8. Retain the Document Control Number (DCN) for your records. The DCN will be helpful if you need to search for the claim at a later time. Click the Claim Listing button to return to the Claim Listing page.
If necessary, claims that have been submitted can be updated. Take the following steps to update claims in New, In Process, and Completed statuses.
Note: Updating claims in Completed status reduces your annual transaction limit by 1, with the exception of claims with an SP disposition code.
1. On the Claim Listing page, click the “Update” link in the Actions field for the selected claim. The Claim Confirmation page displays.
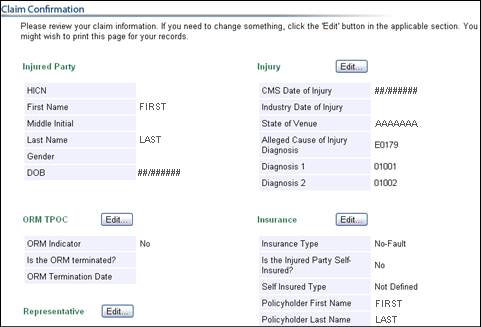
Figure 139: Claim Confirmation Page
2.
To make changes to any information entered, click Edit
next to the appropriate section. That page then displays, with all fields open
for editing.
Note: The following fields cannot be updated on claims in
Completed or In Progress status: all fields on the Injured Party page,
as well as Insurance Type and CMS Date of Injury.
3. Update any other pages by using the Prev and Next buttons to access the relevant pages. After making the necessary changes, navigate back to the Claim Confirmation page.
4. Once all information is verified, you can save the claim by clicking Save Updates, which allows you to submit the claim at a later time.
5. To submit the claim, click Submit Claim, and the following message displays:

Figure 140: Successful Claim Submission Page
6. Retain the updated DCN for your records; the previous DCN is no longer valid for the claim record. Click the Claim Listing button to return to the Claim Listing page.
Claims in Saved Not Submitted, New, In Progress, and Completed statuses can be deleted. However, deleting claims does not increase your transaction limit. Take the following steps to delete a claim.
Note: Deleting claims in Completed status reduces your annual transaction limit by 1, with the exception of claims with an SP disposition code.
1. On the Claim Listing page, click the “Delete” link in the Actions field for the selected claim. The Delete Claim Confirmation page displays.
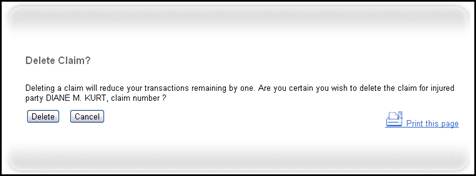
Figure 141: Delete Claim Page
2. If you clicked Delete by mistake, click Cancel to return to the Claim Listing page. To confirm the deletion, click Delete. The Deletion Confirmation page displays.
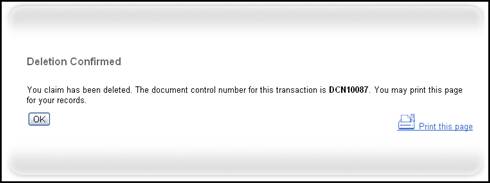
Figure 142: Delete Claim Confirmation Page
3. Retain the updated DCN for your records; the previous DCN is no longer valid for the claim record. Click the OK button to return to the Claim Listing page.
The information entered for claims in Deleted status can still be viewed on the COBSW. Take the following steps to view deleted claim information.
Note: If a claim that was previously deleted must be submitted, the claim must be entered again from the beginning, reducing your annual transaction limit by 1.
1. On the Claim Listing page, click the “View” link in the Actions field for the selected claim. The Claim Confirmation page displays for the deleted claim, with all fields closed.
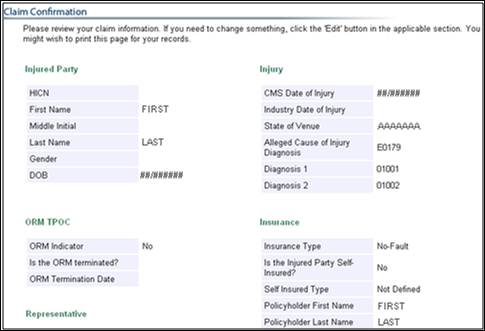
Figure 143: Deleted Claim Confirmation Page, All Fields Closed For Editing
2. After viewing the deleted claim information, click Cancel to return to the Claim Listing page.
The Claim History page lists all transactions (Adds, Updates, and Deletes) for a claim in any status, along with the DCN associated with the transaction, the associated claim status, transaction date, and any corresponding applicable disposition code. Take the following steps to view the transaction history for a claim.
1. On the Claim Listing page, click the “History” link in the Actions field for the selected claim. The Claim History page displays.
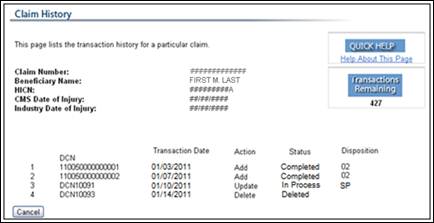
Figure 144: Claim History Page
2. After viewing the transaction history for the claim, click Cancel to return to the Claim Listing page.
A disposition code is applied to a claim after the claim has been submitted and processed by the COBC. The disposition code indicates whether the claim was accepted, or if there are errors on the submitted claim that must be corrected before it can be accepted.
SP: Record in Error
Claim records returned with an “SP” disposition code failed the COBC edits with errors and must be corrected and resent. The claim must be updated to correct any errors and then resubmitted.
01: Record Accepted for Individual Identified as a
Medicare Beneficiary and ORM
Claim records accepted with a “01” disposition code were accepted by the COBC as claims where the RRE has indicated Ongoing Responsibility for Medicals. The claim record does not need to be reported again until the ORM ends or updates are needed, or unless a resubmission is needed to correct the TIN. Records with a “01” disposition code require no additional action.
02: Record Accepted for Individual Identified as a
Medicare Beneficiary and No ORM
Claim records accepted with a “02” disposition code were accepted by the COBC as claims where the injured party is a Medicare beneficiary during the time between the CMS Date of Injury and the TPOC date, and the RRE has indicated No Ongoing Responsibility for Medicals. The claim record does not need to be reported again unless updates are needed, or unless a resubmission is needed to correct the TIN. Records with a “02” disposition code require no additional action.
03: Record for Individual Matched to a Medicare
Beneficiary but Outside Medicare Coverage Period
Claim records returned with a “03” disposition code were found to be error-free and the injured party submitted was matched to a Medicare beneficiary, but the beneficiary’s Medicare coverage dates are outside the time period between the CMS Date of Injury and TPOC date or the date ORM ended, as applicable. For example, the individual may have been covered by Medicare but that coverage ended prior to the CMS Date of Injury, or the individual’s Medicare coverage was not effective until after the TPOC Date or after the ORM Termination Date. In other words, the beneficiary’s Medicare coverage does not currently overlap the applicable period of time reflected on the submitted claim.
As long as the injured party information you submitted was completely correct and the claim does NOT represent Ongoing Responsibility for Medicals, you do not have to submit the claim again unless a subsequent TPOC Amount is established at a later date.
If the claim represents Ongoing Responsibility for Medicals, you must continue to monitor the status of the injured party as long as the claim remains open with ORM, in order to determine if/when the injured party becomes covered by Medicare again in the future.
The RRE will continue to receive a disposition code of “03” on the corresponding response file record until Medicare coverage is re-activated for the injured party, and overlaps the period of time reported on the claim between the CMS Date of Incident and ORM Termination Date (which could be open-ended—00/00/0000).
You can stop submitting claims once the RRE’s ORM has ended and the claim is closed. One final claim should be submitted after an ORM Termination Date has been established and that date has passed. When resubmitting claims that previously were returned with a “03” disposition code, supply the most current claim information you have available at the time of resubmission.
RREs that have not selected the DDE reporting option and are in “Production” status have the Beneficiary Lookup action on the RRE Listing page. Use this function to determine if an injured party is a Medicare beneficiary. You can perform up to 100 beneficiary lookups per month.
Note: If you need to perform additional beneficiary lookups and have no transactions remaining, contact your EDI Representative to increase your transaction amount.
1. From the RRE Listing page, next to the applicable RRE ID, select “Beneficiary Lookup” from the Actions dropdown box and click Go.

Figure 145: Actions Dropdown Box
2. The Beneficiary Lookup page displays.
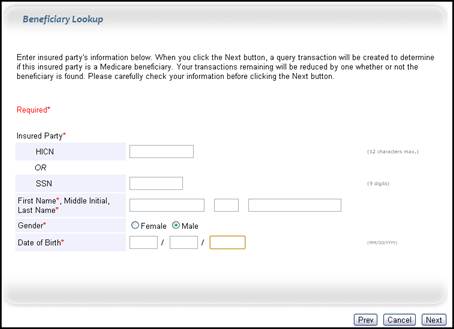
Figure 146: Beneficiary Lookup Page
3. Enter the required information for the insured party in question then click Next. (Enter either a HICN or SSN. If both are entered, the search will be performed using the HICN.) If the RRE is a Non-GHP reporter, results display on the following Beneficiary Lookup Response page.

Figure 147: Beneficiary Lookup Response Page, Non-GHP Beneficiary
4. If the RRE is a GHP reporter using the Basic reporting option, results display on the following Beneficiary Lookup Response page.
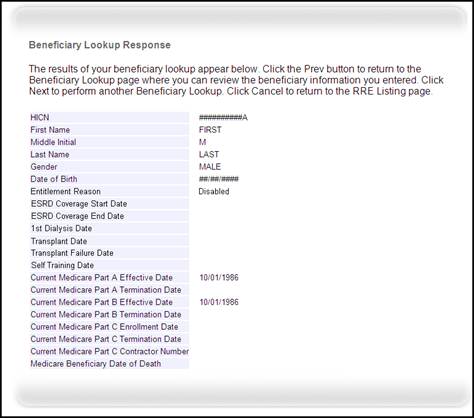
Figure 148: Beneficiary Lookup Response Page, GHP Basic
5. If the RRE is a GHP reporter using the Expanded reporting option, results display on the following Beneficiary Lookup Response page.
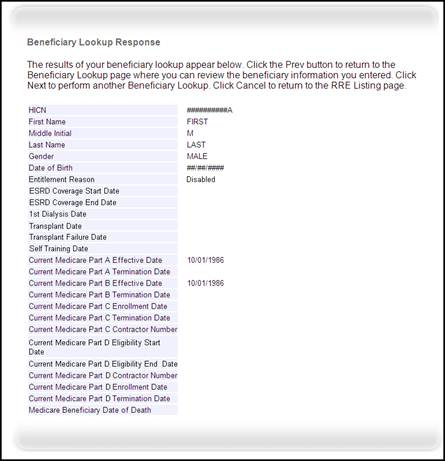
Figure 149: Beneficiary Lookup Response Page, GHP Expanded
6. The number of remaining available lookups is displayed on the Beneficiary Lookup Response page. The “Transactions Remaining” field, in the upper left of the page, is reduced by 1 whether or not a match is found. Lookup transactions reset to 100 at the beginning of the next month.
7. If the insured party is NOT a Medicare beneficiary, the Beneficiary Not Found page displays.
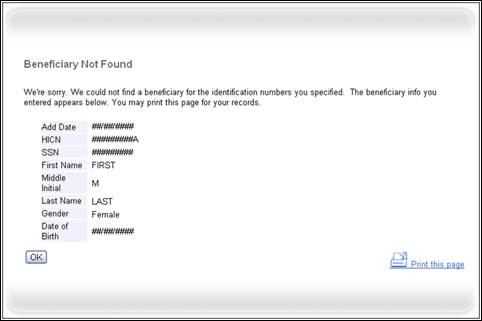
Figure 150: Beneficiary Not Found Page
8. If the Beneficiary Not Found page displays, you have the option to click Prev to return to the Beneficiary Lookup page, to review and edit the information entered. However, if you perform another lookup after editing previously entered information, the transaction limit is reduced by 1 again.
9. Click Next to go to a blank Beneficiary Lookup page to perform another query; or click Cancel to return to the RRE Listing page.
1. From any page, click the Log off link at the top of the screen.

Figure 151: Log Off Link
10. The system ends your session and displays the Login Warning page. Once this is displayed, close your browser.

Figure 152: Login Warning Page
The Personal Identification Number (PIN) for the RRE ID will be sent to the Authorized Representative after the New Registration step for the RRE ID has been completed. If during Account Setup the Account Manager receives an Invalid RRE ID/PIN Combination error message during registration, check the numbers on the mailing the AR received. An RRE ID should always contain nine digits and a PIN should have four digits. If your numbers are shorter, add leading zeros to make them the proper length. You have three tries to enter the PIN correctly before the RRE ID account is locked. Contact your EDI Representative to confirm the RRE ID/PIN combination or unlock the PIN.
During Account Setup, an error message will display on the Account Setup Introduction page if you enter an RRE ID and PIN for which the Account Setup step has already been completed. The message will indicate that the RRE ID and PIN are valid, but that the RRE ID Account is already set up. Because the account is already set up, you cannot self-register as the Account Manager for the RRE ID or repeat the Account Setup step. There can be only one Account Manager for each RRE ID. If you completed Account Setup for the RRE ID and registered as the Account Manager, then go back to the Section 111 Login page and enter your Login ID and Password to sign on to the Section 111 COBSW and start working off your RRE Listing page. If you are not the Account Manager, contact the existing Account Manager to add you as an Account Designee if you need access to the system.
An error message will display if, during Account Setup and Account Manager self-registration, it is found that your E-mail address matches the E-mail address of any Authorized Representative previously recorded in the system. Authorized Representatives cannot be users of the Section 111 COBSW for any RRE ID. Different individuals must play the role of Authorized Representative and Account Manager. Click Continue on the error message to be returned to the Login page. If the wrong individual was named as the Authorized Representative in the New Registration step, then contact your assigned EDI Representative to make the necessary correction.
The Passphrase must be provided to you by the Account Manager outside the system. It will not be included on the designee invitation E-mail. The Account Manager’s name is contained in the invitation E-mail and can also be found on the registration page where the error is received. Contact your Account Manager to obtain the Passphrase. If your Account Manager does not remember the Passphrase he can log in and retrieve your Passphrase by viewing the Designee Maintenance page for the RRE ID and selecting the details associated with your last name. He can then provide the correct Passphrase to you. The Passphrase is case-sensitive.
An error message will display if, while an Account Manager is adding an Account Designee to the RRE ID account, it is found that the Designee’s E-mail address matches the E-mail address of any Authorized Representative previously recorded in the system. Authorized Representatives cannot be users of the Section 111 COBSW for any RRE ID. Click Continue on the error message to be returned to the Login page.
Refer to Chapter 5.
Refer to Chapter 5.
If you receive this error message at login, your access the Section 111 COBSW has been deactivated due to inactivity in the last 180 days. Contact your EDI Representative to reactivate your Login ID and create a new Password.
If you receive this error message at login, you can no longer access the Section 111 COBSW.
Refer to Chapter 6.
1. If the RRE has a valid IRS-assigned TIN, provide that number. If the RRE does not have an IRS-assigned TIN, then enter a pseudo-TIN in the format of 9999xxxxx, where “xxxx” is a 5-digit number created by the RRE.
2. Supply a valid E-mail address for the Authorized Representative.
3. If the RRE does not have a mailing address in the United States, select “Foreign Country” for the RRE state code and leave the other RRE address fields blank.
4. If the Authorized Representative does not have a mailing address in the United States, select “Foreign Country” for the Authorized Representative state code and leave the other address fields blank.
5. After successfully completing the New Registration step, a page will display with your RRE ID and assigned EDI Representative.
6. Contact your EDI Representative or call the COBC EDI Department at 646-458-6740 to continue with the registration process.
7. Provide your EDI Representative with the actual valid international addresses for the RRE, Authorized Representative, and Account Manager, as applicable. You may be asked to provide other supporting documentation depending on the circumstances.
8. A letter will then be sent to your Authorized Representative with the PIN needed to complete the Account Setup step on the COBSW.
9. Upon receipt of the PIN, the Account Manager for the RRE must go to the Section 111 COBSW Login page and click on Account Setup to continue with the registration process.
10. If your Account Manager does not have a mailing address in the US, then he may select “Foreign Country” for the Account Manager state code field and leave the rest of the address fields blank.
11. If the Account Manager has completed the Account Setup step and the registration has been accepted by the COBC, an e-mail will be sent to the RRE’s Authorized Representative and Account Manager containing the Profile Report.
12. Once the Authorized Representative has signed and returned the Profile Report to the COBC, the status for the RRE ID will be set to Testing and files may be submitted.
For any additional problems, contact your assigned EDI Representative or call the COBC EDI Department at 646-458-6740.
EDI Representatives are available to assist you Monday through Friday, excluding Federal holidays, from 9:00 a.m. to 5:00 p.m. Eastern Time.


[current date]
[company name]
[company mailing address 1]
[company mailing address 2]
[mail city] [st] [zip][zip+4]
Attn: [Authorized Representative name]
*** MMSEA Section 111 Mandatory Reporting
Registration Notification ***
Your organization has been successfully verified and registered for the Medicare, Medicaid and SCHIP Extension Act (MMSEA) Section 111 Mandatory Reporting. Through the Coordination of Benefits Secure Web site (COBSW), you may submit required files, download response files, and monitor file processing. Please refer to the http://www.cms.hhs.gov/MandatoryInsRep/ Web site for more information on required file submissions.
To begin using the COBSW, you must complete the
registration/setup process by creating an account. Please review the following
user roles and required information carefully before attempting to complete the
account setup. Please complete the account setup within the next thirty (30)
days to avoid being out of compliance with Section 111 Mandatory Reporting
requirements. If account setup is not completed within the next sixty (60)
days, your account will be placed in “Discontinued” status.
COBSW User Roles:
Account Manager:
Each Responsible Reporting Entity (RRE) account must have an Account Manager assigned. The Account Manager must be selected and approved by the Authorized Representative named in your initial Section 111 registration. Your Account Manager and Authorized Representative must be different individuals. An Authorized Representative cannot be a user on the COBSW. The Account Manager is the individual who will administer the account on behalf of the RRE on the COBSW. This includes; uploading Section 111 files, downloading response files, updating RRE account information, monitoring file processing, and inviting others to assist (Account Designees).
Account Designee:
Each RRE account may have multiple Account Designees. Account Designees may also upload Section 111 files, download response files, and monitor file processing. However, Account Designees cannot modify RRE account information or invite others to assist. Account Designees can only register as users on the COBSW through an invitation from the Account Manager.
Additional Account
Setup Information:
Please review the documentation regarding information needed for completing your Section 111 registration and account set up on the dedicated Section 111 Web site: http://www.cms.hhs.gov/MandatoryInsRep/, including the Registration Process notice and applicable user guides.
Next Steps:
To complete the account setup, your designated Account Manager should be selected and provided with your Section 111 Reporter ID and Personal Identification (PIN).
Section 111 Reporter ID: [999999999]
PIN: [9999]
The Account Manager should return to the Section 111 Mandatory Reporting COBSW at http://www.section111.cms.hhs.gov, and select the “Account Setup” button.
If you have any questions or concerns, please contact your assigned COBC EDI Representative:
EDI Representative: [insert EDI Rep name]
Phone: [insert EDI Rep phone]
E-mail: [insert EDI Rep E-mail]
Sincerely,
Medicare Coordination of Benefits Contractor

[current date]
[company name]
[company mailing address 1]
[company mailing address 2]
[mail city] [st] [zip][zip+4]
Attn: [Authorized Representative name]
*** [1st/2nd]
Non-Submission Notification ***
Responsible Reporting ID: [insert RRE#]
Authorized Representative: [insert Authorized Representative name]
Account Manager: [insert Account Manager name]
According to our records, we have not received [an MSP/ a Claim] file for your account for [the/the past 2] reporting quarter(s). Your scheduled submission period for the quarter was [99/99/9999] – [99/99/9999]. The last successfully processed submission file was received on [99/99/9999]. Please submit your file as soon as possible. Failure to comply with the quarterly file submission places your account at risk of not complying with Medicare Secondary Payer Mandatory Reporting Provisions mandated in Section 111 of the Medicare, Medicaid and SCHIP Extension Act (MMSEA) of 2007.
Continued failure to comply with required quarterly submissions may result in the assessment of civil monetary penalties.
If you believe you have incorrectly received this notification, please contact your assigned EDI Representative immediately:
EDI Representative: [insert EDI Rep name]
Phone: [insert EDI Rep phone]
Email: [insert EDI Rep Email]
Sincerely,
Medicare Coordination of Benefits Contractor
Recipient: Authorized Representative
Subject: Section 111 Mandatory Reporting: RRE ID# [RPTR_ID] Profile Report
RRE ID: [RPTR_ID]
RRE Name: [RPTR_NAME]
Authorized Representative: [AR_RCNT_FNAME] [AR_RCNT_LNAME]
Account Manager: [AM_RCNT_FNAME] [AM_RCNT_LNAME]
The Section 111 Mandatory Reporting Profile Report has been attached to this email. The Profile Report contains information regarding your account for Section 111 Mandatory Reporting. A Profile Report is generated after a new registration or if your organization or file transmission information has changed.
Please review the attached Profile Report carefully and ensure all information is accurate. The report must be signed by the Authorized Representative for this RRE ID and returned to the COBC. Please send signed reports:
via Fax: (646)
458-6761
via Email: cobva@ehmedicare.com
via mail: MEDICARE – COB
Section 111 Reporting
Program
P.O. Box 660
New York, NY 10274-0660
If you disagree with or wish to change anything in this report please contact your EDI Representative immediately.
EDI Rep: [EDIR_FNAME]
[EDIR_LNAME]
Phone: [EDIR_PHONE_NO] X[EDIR_PHONE_EXT_NO]
Email: [EDIR_EMAIL]
This electronic message transmission is intended only
for the person or entity to which it is addressed and may contain information
that is privileged, confidential or otherwise protected from disclosure. If you
have received this transmission, but are not the intended recipient, you are
hereby notified that any disclosure, copying, distribution or use of the
contents of this information is strictly prohibited. If you have received this
e-mail in error, please contact the COBC Electronic Data Interchange (EDI)
Department at 646-458-6740 and delete and destroy the original message and all
copies.
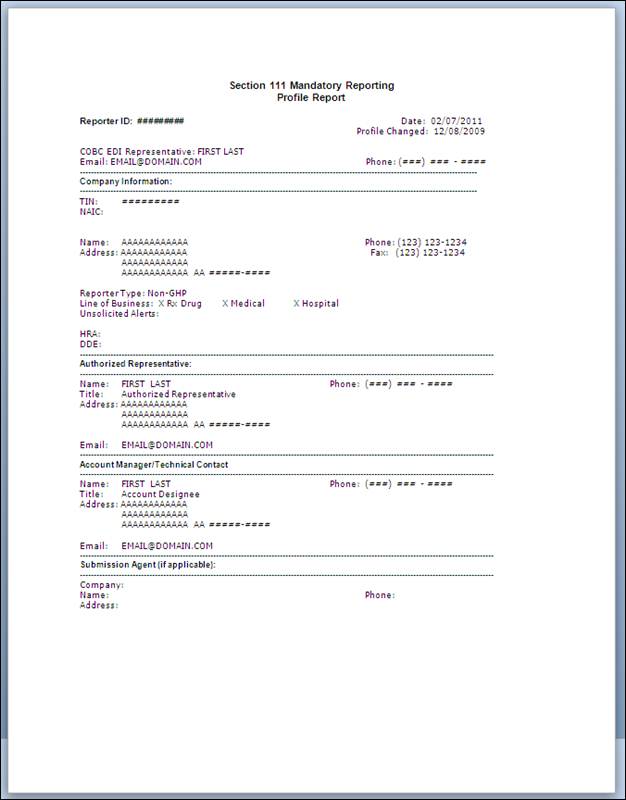
Figure 153: Profile Report, page 1
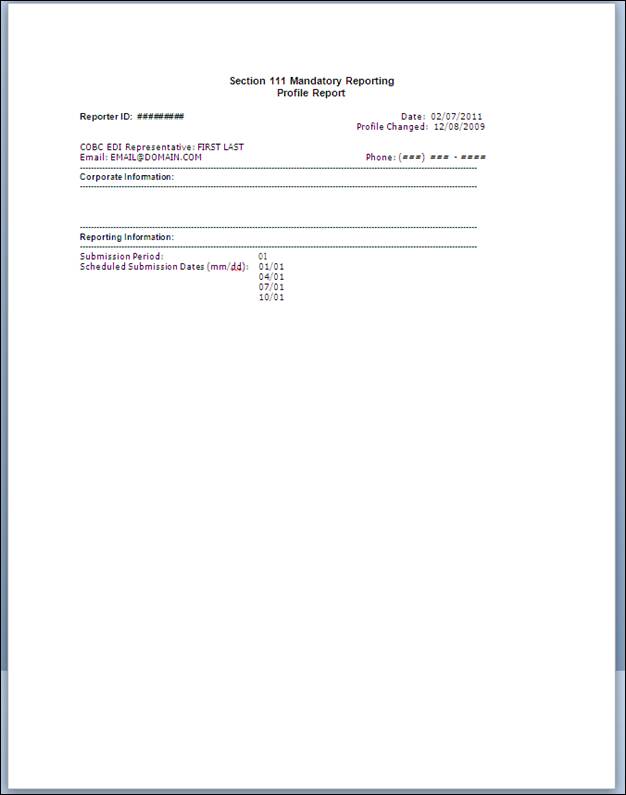
Figure 154: Profile Report, page 2
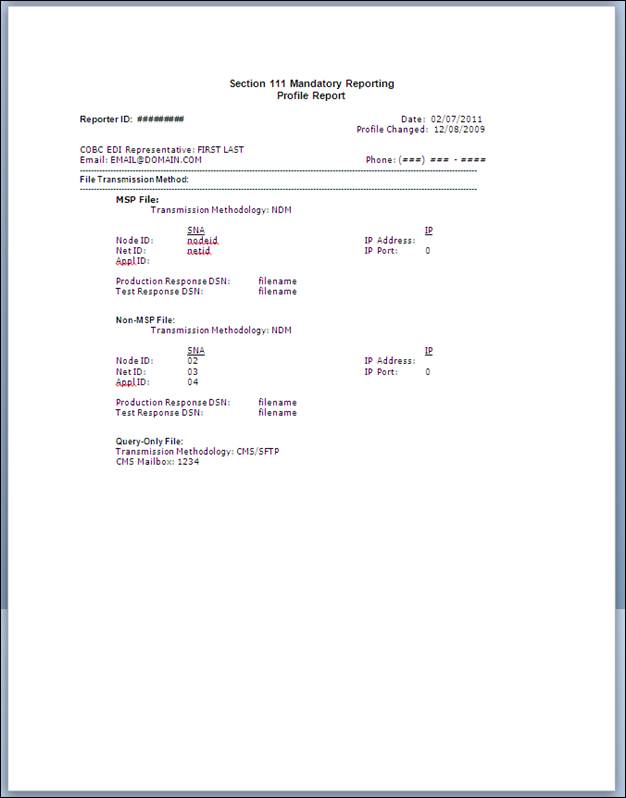
Figure 155: Profile Report, page 3
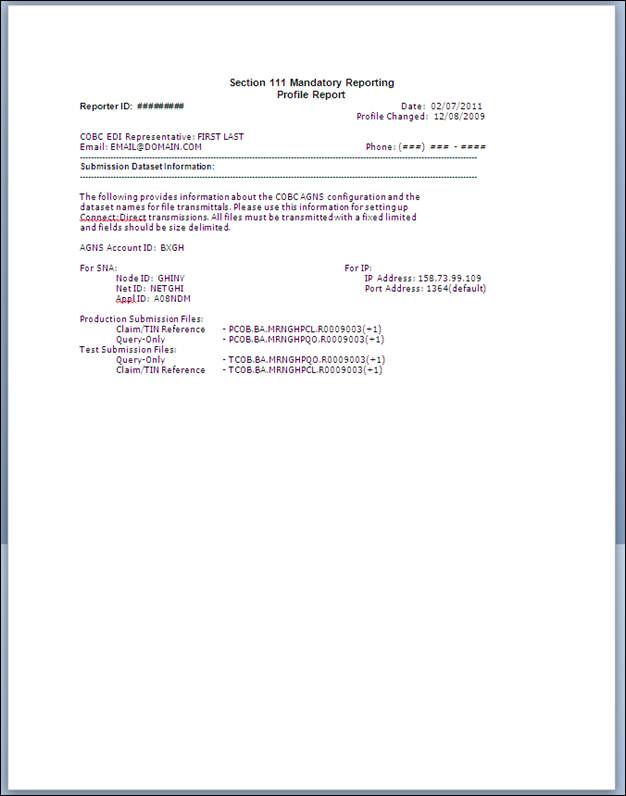
Figure 156: Profile Report, page 4
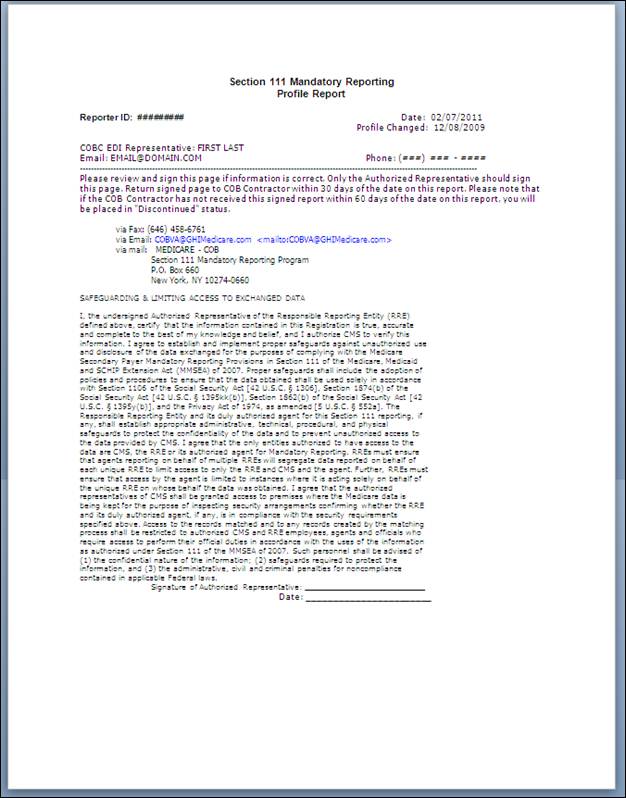
Figure 157: Profile Report, page 5
Recipient: Authorized Representative/Account Manager
Subject: Section 111 Mandatory Reporting: RRE ID# [RPTR_ID] Non-Receipt of Signed Profile Report
*** PLEASE DO NOT REPLY TO THIS EMAIL ***
RRE ID: [RPTR_ID]
RRE Name: [RPTR_NAME]
Authorized Representative: [AR_RCNT_FNAME] [AR_RCNT_LNAME]
Account Manager: [AM_RCNT_FNAME] [AM_RCNT_LNAME]
This notification is being sent because a signed Section 111 Mandatory Reporting Profile Report has not been received. It was e-mailed to you over 30 days ago. Your account cannot be placed into a "testing" status until the signed Section 111 Mandatory Reporting Profile Report has been received by the COB Contractor. Failure to return a signed Profile Report places your organization at risk of non-compliance with Section 111 Mandatory Reporting requirements.
If you have received the Profile Report but have not yet signed and returned it, please submit it to the COB Contractor as follows:
via Fax: (646)
458-6761
via Email: cobva@ehmedicare.com
via mail: MEDICARE – COB
Section 111 Mandatory
Reporting Program
P.O. Box 660
New York, NY 10274-0660
If you believe you have received this notification improperly because you have not received the Profile Report or have already signed and returned it, please contact your EDI Representative immediately.
EDI Rep: [EDIR_FNAME] [EDIR_LNAME]
Phone: [EDIR_PHONE_NO]
X[EDIR_PHONE_EXT_NO]
Email: [EDIR_EMAIL]
This electronic message transmission is intended only
for the person or entity to which it is addressed and may contain information
that is privileged, confidential or otherwise protected from disclosure. If you
have received this transmission, but are not the intended recipient, you are
hereby notified that any disclosure, copying, distribution or use of the
contents of this information is strictly prohibited. If you have received this
Email in error, please contact the COBC Electronic Data Interchange (EDI)
Department at 646-458-6740 and delete and destroy the original message and all
copies.
Recipient: Authorized Representative/Account Manager
Subject: Section
111 Mandatory Reporting: RRE ID# [RPTR_ID] Profile Report, Annual Recertification
*** PLEASE DO NOT REPLY DIRECTLY TO THIS E-MAIL.
PLEASE UTILIZE THE SPECIFIC CONTACT INFORMATION PROVIDED BELOW. ***
RRE ID: [RPTR_ID]
RRE Name: [RPTR_NAME]
Authorized
Representative: [AR_RCNT_FNAME] [AR_RCNT_LNAME]
Account Manager: [AM_RCNT_FNAME] [AM_RCNT_LNAME]
Your Section 111
Mandatory Reporting Profile Report has been attached to this e-mail. The
Profile Report contains information regarding your account for Section 111
Mandatory Reporting. The Profile Report must be recertified at the beginning of
each 12-month period.
If all information
within the attached Profile Report is still accurate, a call or e-mail to your
EDI Representative will suffice to confirm and recertify your account
information. If the Profile Report
contains any inaccuracies or outdated information then you must contact your
EDI Representative in order to provide them with the appropriate updates. After
you have provided your EDI Representative with your updated information a new
Profile Report will be transmitted to you via e-mail. The Authorized
Representative will then be required to sign and return that updated copy.
The COBC should be
contacted within 10 days of the receipt of this notification. Failure to
confirm the accuracy of the attached Profile Report or sign and return a newly
corrected copy may result in account deactivation.
To confirm the
accuracy of or request changes to the information within the attached profile
report, please contact your EDI Representative immediately.
EDI Rep: [EDIR_FNAME]
[EDIR_LNAME]
Phone: [EDIR_PHONE_NO] X[EDIR_PHONE_EXT_NO]
E-mail: [EDIR_E-MAIL]
This electronic message transmission is intended only
for the person or entity to which it is addressed and may contain information
that is privileged, confidential or otherwise protected from disclosure. If you
have received this transmission, but are not the intended recipient, you are
hereby notified that any disclosure, copying, distribution or use of the
contents of this information is strictly prohibited. If you have received this
e-mail in error, please contact the COBC Electronic Data Interchange (EDI)
Department at 646-458-6740 and delete and destroy the original message and all
copies.
Recipient: Authorized Representative/Account Manager
Subject: Section 111 Mandatory Reporting: RRE ID# [RPTR_ID] Profile Report, Annual Recertification—Second and Final Notice
*** PLEASE DO NOT REPLY DIRECTLY TO THIS E-MAIL.
PLEASE UTILIZE THE SPECIFIC CONTACT INFORMATION PROVIDED BELOW. ***
RRE ID: [RPTR_ID]
RRE Name: [RPTR_NAME]
Authorized Representative: [AR_RCNT_FNAME] [AR_RCNT_LNAME]
Account Manager: [AM_RCNT_FNAME] [AM_RCNT_LNAME]
This notification is being sent because a response to our prior Profile Report, Annual Recertification correspondence has not been received. It was e-mailed to you over 30 days ago. Your Section 111 account may be deactivated if you do not contact the COB Contractor. This places your organization at risk of non-compliance with Section 111 Mandatory Reporting requirements.
Your Section 111 Mandatory Reporting Profile Report has been attached to this e-mail. The Profile Report contains information regarding your account for Section 111 Mandatory Reporting. The Profile Report must be recertified at the beginning of each 12-month period.
If all information within the attached Profile Report is still accurate, a call or e-mail to your EDI Representative will suffice to confirm and recertify your account information. If the Profile Report contains any inaccuracies or outdated information then you must contact your EDI Representative in order to provide them with the appropriate updates. After you have provided your EDI Representative with your updated information a new Profile Report will be transmitted to you via e-mail. The Authorized Representative will then be required to sign and return that updated copy.
The COBC should be contacted immediately upon receipt of
this notification. Failure to confirm the accuracy of the attached Profile
Report or sign and return a newly corrected copy may result in account
deactivation. THIS IS YOUR SECOND AND FINAL NOTICE.
To confirm the accuracy of or request changes to the information within the attached profile report, please contact your EDI Representative immediately.
EDI Rep: [EDIR_FNAME]
[EDIR_LNAME]
Phone: [EDIR_PHONE_NO] X[EDIR_PHONE_EXT_NO]
E-mail: [EDIR_E-MAIL]
This electronic message transmission is intended only
for the person or entity to which it is addressed and may contain information
that is privileged, confidential or otherwise protected from disclosure. If you
have received this transmission, but are not the intended recipient, you are
hereby notified that any disclosure, copying, distribution or use of the
contents of this information is strictly prohibited. If you have received this
E-mail in error, please contact the COBC Electronic Data Interchange (EDI)
Department at 646-458-6740 and delete and destroy the original message and all
copies.
Recipient: Account Manager
Subject: Section 111 Reporting: RRE ID# [RPTR_ID] [FILE_TYPE_NAME] File Receipt Notification
*** PLEASE DO NOT REPLY TO THIS E-MAIL ***
RRE ID: [RPTR_ID]
RRE Name: [RPTR_NAME]
Authorized Representative: [AR_RCNT_FNAME] [AR_RCNT_LNAME]
Account Manager: [AM_RCNT_FNAME] [AM_RCNT_LNAME]
A [FILE_TYPE_NAME] file was received on [RFIL_RCPT_DT][RSUB_TOT_REC_CNT]. Processing of the file has been initiated.
You will receive a subsequent email notification to inform you of the results of file processing.
If the account information included in this email is not correct, please contact your EDI Representative.
This electronic message transmission is intended only
for the person or entity to which it is addressed and may contain information
that is privileged, confidential or otherwise protected from disclosure. If you
have received this transmission, but are not the intended recipient, you are
hereby notified that any disclosure, copying, distribution or use of the
contents of this information is strictly prohibited. If you have received this
e-mail in error, please contact the COBC Electronic Data Interchange (EDI)
Department at 646-458-6740 and delete and destroy the original message and all
copies.
Recipient: Account Manager
Subject: Section 111 Reporting: RRE ID# [RPTR_ID] [FILE_TYPE_NAME] Threshold Limit Notification
*** PLEASE DO NOT REPLY TO THIS E-MAIL ***
RRE ID: [RPTR_ID]
RRE Name: [RPTR_NAME]
Authorized Representative: [AR_RCNT_FNAME] [AR_RCNT_LNAME]
Account Manager: [AM_RCNT_FNAME] [AM_RCNT_LNAME]
A [FILE_TYPE_NAME] file received on [RFIL_RCPT_DT] has exceeded the following error threshold(s):
[ERROR_MESSAGE][SP_ERRORS]
Processing of the file has been suspended. Please contact your EDI Representative immediately for further instructions.
EDI Rep: [EDIR_FNAME]
[EDIR_LNAME]
Phone: [EDIR_PHONE_NO] X [EDIR_PHONE_EXT_NO]
Email: [EDIR_EMAIL]
If the account information included in this email is not correct, please contact your EDI Representative.
This electronic message transmission is intended only
for the person or entity to which it is addressed and may contain information
that is privileged, confidential or otherwise protected from disclosure. If you
have received this transmission, but are not the intended recipient, you are
hereby notified that any disclosure, copying, distribution or use of the
contents of this information is strictly prohibited. If you have received this
e-mail in error, please contact the COBC Electronic Data Interchange (EDI)
Department at 646-458-6740 and delete and destroy the original message and all
copies.
Recipient: Account Manager
Subject: Section 111 Reporting: RRE ID# [RPTR_ID] [FILE_TYPE_NAME] Severe Error Notification
*** PLEASE DO NOT REPLY TO THIS E-MAIL ***
RRE ID: [RPTR_ID]
RRE Name: [RPTR_NAME]
Authorized Representative: [AR_RCNT_FNAME] [AR_RCNT_LNAME]
Account Manager: [AM_RCNT_FNAME] [AM_RCNT_LNAME]
A [FILE_TYPE_NAME] file received on [RFIL_RCPT_DT] cannot be processed due to the following severe error:
[ERROR_MESSAGE]
This file is not acceptable and cannot be processed. Please submit a corrected file or contact your EDI Representative immediately for further instructions.
EDI Rep: [EDIR_FNAME]
[EDIR_LNAME]
Phone: [EDIR_PHONE_NO] X[EDIR_PHONE_EXT_NO]
Email: [EDIR_EMAIL]
If the account information included in this email is not correct, please contact your EDI Representative.
This electronic message transmission is intended only
for the person or entity to which it is addressed and may contain information
that is privileged, confidential or otherwise protected from disclosure. If you
have received this transmission, but are not the intended recipient, you are
hereby notified that any disclosure, copying, distribution or use of the
contents of this information is strictly prohibited. If you have received this
e-mail in error, please contact the COBC Electronic Data Interchange (EDI)
Department at 646-458-6740 and delete and destroy the original message and all
copies.
Recipient: Account Manager
Subject: Section 111 Reporting: RRE ID# [RPTR_ID] Ready for Testing Notice
*** PLEASE DO NOT REPLY TO THIS EMAIL ***
RRE ID: [RPTR_ID]
RRE Name: [RPTR_NAME]
Authorized Representative: [AR_RCNT_FNAME] [AR_RCNT_LNAME]
Account Manager: [AM_RCNT_FNAME] [AM_RCNT_LNAME]
You have successfully registered and set up an account for the RRE ID listed above. You may now begin testing with this RRE ID. Please be sure to review testing requirements as documented in the current Section 111 MSP Mandatory Reporting User Guide. Your account cannot be placed into a production status until all testing requirements have been completed.
If the account information included in this Email is not correct, please contact your EDI Representative.
This electronic message transmission is intended only
for the person or entity to which it is addressed and may contain information
that is privileged, confidential or otherwise protected from disclosure. If you
have received this transmission, but are not the intended recipient, you are
hereby notified that any disclosure, copying, distribution or use of the
contents of this information is strictly prohibited. If you have received this
e-mail in error, please contact the COBC Electronic Data Interchange (EDI)
Department at 646-458-6740 and delete and destroy the original message and all
copies.
Recipient: Authorized Representative/Account Manager
Subject: Section 111 Mandatory Reporting: RRE ID# [RPTR_ID] Non-Attainment of Production Status
*** PLEASE DO NOT REPLY TO THIS EMAIL ***
RRE ID: [RPTR_ID]
RRE Name: [RPTR_NAME]
Authorized Representative: [AR_RCNT_FNAME] [AR_RCNT_LNAME]
Account Manager: [AM_RCNT_FNAME] [AM_RCNT_LNAME]
This warning notification is being sent because your account has been in a "testing" status for more than 90 days. Testing requirements must be met before your account can be placed in a "production" status. Failure to complete testing in a timely manner places your organization at risk of non-compliance with Section 111 Mandatory Reporting requirements. Your account will be placed in “Discontinued” status in the next 30 days if testing requirements have not been met in that timeframe.
If you have any questions or concerns regarding this notice, please contact your EDI Representative immediately.
EDI Rep: [EDIR_FNAME] [EDIR_LNAME]
Phone: [EDIR_PHONE_NO] X[EDIR_PHONE_EXT_NO]
Email: [EDIR_EMAIL]
This electronic message transmission is intended only
for the person or entity to which it is addressed and may contain information
that is privileged, confidential or otherwise protected from disclosure. If you
have received this transmission, but are not the intended recipient, you are
hereby notified that any disclosure, copying, distribution or use of the
contents of this information is strictly prohibited. If you have received this
Email in error, please contact the COBC Electronic Data Interchange (EDI)
Department at 646-458-6740 and delete and destroy the original message and all
copies.
Recipient: Account Manager
Subject: Section 111 Reporting: RRE ID# [RPTR_ID] Ready for Production File Submission Notice
*** PLEASE DO NOT REPLY TO THIS EMAIL ***
RRE ID: [RPTR_ID]
RRE Name: [RPTR_NAME]
Authorized Representative: [AR_RCNT_FNAME] [AR_RCNT_LNAME]
Account Manager: [AM_RCNT_FNAME] [AM_RCNT_LNAME]
All Section 111 testing requirements have been satisfied for this RRE ID. Accordingly, your account has been placed in a "Production Ready" status. Your assigned file submission timeframe is: [SBMSSN_PERIOD]. Please be sure to submit your production files during this submission timeframe according to the requirements documented in the current Section 111 MSP Mandatory Reporting User Guide.
If the account information included in this Email is not correct, please contact your EDI Representative.
This electronic message transmission is intended only
for the person or entity to which it is addressed and may contain information
that is privileged, confidential or otherwise protected from disclosure. If you
have received this transmission, but are not the intended recipient, you are
hereby notified that any disclosure, copying, distribution or use of the
contents of this information is strictly prohibited. If you have received this
e-mail in error, please contact the COBC Electronic Data Interchange (EDI)
Department at 646-458-6740 and delete and destroy the original message and all
copies.
Recipient: Account Manager
Subject: Section 111 Reporting: RRE ID# [RPTR_ID] [FILE_TYPE_NAME] File Processed Notification
*** PLEASE DO NOT REPLY TO THIS
E-MAIL ***
RRE ID: [RPTR_ID]
RRE Name: [RPTR_NAME]
Authorized Representative: [AR_RCNT_FNAME]
[AR_RCNT_LNAME]
Account Manager: [AM_RCNT_FNAME] [AM_RCNT_LNAME]
The [FILE_TYPE_NAME] file received on [RFIL_RCPT_DT] with [RSUB_TOT_REC_CNT] records, has completed processing.
The response file for this submitted file is now available for review. Please process this response file according to the instructions in the current Section 111 MSP Mandatory Reporting User Guide.
If the account information included in this email is not correct, please contact your EDI Representative.
This electronic message transmission is
intended only for the person or entity to which it is addressed and may contain
information that is privileged, confidential or otherwise protected from
disclosure. If you have received this transmission, but are not the intended
recipient, you are hereby notified that any disclosure, copying, distribution
or use of the contents of this information is strictly prohibited. If you have
received this e-mail in error, please contact the COBC Electronic Data
Interchange (EDI) Department at 646-458-6740 and delete and destroy the
original message and all copies.
Recipient: Account Manager
Subject: Designee Self-Revocation
*** PLEASE DO NOT REPLY TO THIS EMAIL ***
Dear LAST FIRST:
The following Account Designee
First Name: FIRST
Last Name: LAST
Email Address: email@domain.com
has removed themself from the RRE ID account listed below:
RRE ID: [RPTR_ID]
RRE Name: [RPTR_NAME]
For any questions or problems please contact the person named in the paragraph above.
This electronic message transmission is intended only for the person or entity to which it is addressed and may contain information that is privileged, confidential or otherwise protected from disclosure. If you have received this transmission, but are not the intended recipient, you are hereby notified that any disclosure, copying, distribution or use of the contents of this information is strictly prohibited. If you have received this e-mail in error, please contact the COBC Electronic Data Interchange (EDI) Department at646-458-6740 and delete and destroy the original message and all copies.